# 1. OS기술노트 # /proc/meminfo 내용 분석 방법 ### 소개 현재 사용중인 메모리 상태를 볼 수 있는 명령어와 각 항목에 설명을 기재해보려고 합니다. ### 명령어 실행 1. ##### 명령어 실행결과 확인 (free / meminfo) - free 결과 ```shell $> free -m               total        used        free      shared  buff/cache   available Mem:          15786        7716         583         632        7487        7102 Swap:          4095         516        3579 ``` - meminfo 파일 확인 ```shell $> cat /proc/meminfo MemTotal: 16165732 kB MemFree: 596400 kB MemAvailable: 7271976 kB Buffers: 11120 kB Cached: 7050372 kB SwapCached: 24948 kB Active: 8539812 kB Inactive: 5451740 kB Active(anon): 5466632 kB Inactive(anon): 2113380 kB Active(file): 3073180 kB Inactive(file): 3338360 kB Unevictable: 19572 kB Mlocked: 19572 kB SwapTotal: 4194300 kB SwapFree: 3665916 kB Dirty: 100 kB Writeback: 0 kB AnonPages: 6935760 kB Mapped: 117016 kB Shmem: 647612 kB Slab: 736736 kB SReclaimable: 605232 kB SUnreclaim: 131504 kB KernelStack: 9568 kB PageTables: 48308 kB NFS_Unstable: 0 kB Bounce: 0 kB WritebackTmp: 0 kB CommitLimit: 12277164 kB Committed_AS: 9486816 kB VmallocTotal: 34359738367 kB VmallocUsed: 303816 kB VmallocChunk: 34358947836 kB Percpu: 3008 kB HardwareCorrupted: 0 kB AnonHugePages: 1742848 kB CmaTotal: 0 kB CmaFree: 0 kB HugePages_Total: 0 HugePages_Free: 0 HugePages_Rsvd: 0 HugePages_Surp: 0 Hugepagesize: 2048 kB DirectMap4k: 96400 kB DirectMap2M: 6094848 kB DirectMap1G: 10485760 kB ```
2. ##### 내용 설명 - free 명령어 결과와 meminfo내용 비교
**free****meminfo**
Mem: totalMemtotal
MEM: usedMemTotal - MemFree
Mem: freeMemFree
Mem: shared(의미없음)매칭값없음
Mem: buffersBuffers
mem: cachedcached
-/+ buffers/cache: used (Centos 66이하만 출력)MemTotal - (MemFree + Buffers + Cached)
-/+ buffers/cache: free (Centos 66이하만 출력)MemFree + Buffers + Cached
Swap: totalSwapTotal
Swap: usedSwapTotal - SwapFree
Swap: freeSwapFree
- meminfo값 출력필드 설명
**필드값****설 명****출력OS**
MemTotal 사용가능한 총 메모리Centos5, 6, 7
MemFree시스템에서 사용하지 않는 물리적 메모리양Centos5, 6, 7
Buffers버퍼 캐시 메모리(디스크 블록의 임시저장위치)Centos5, 6, 7
Cached페이지 캐시 메모리(디스크 캐시 및 공유메모리)Centos5, 6, 7
Swapcached스왑파일시 사용하는 메모리(메인메모리에 존재)Centos5, 6, 7
Memavailable새로운 app을 실행할때 스왑을 사용하지 않고 사용할 수 있는 메모리(근사치)Centos7이상
Active비교적 최근에 사용된 메모리로, 스왑아웃 혹은 회수할 수 없는 메모리Centos5, 6, 7
Inactive비교적 최근에 사용되지 않은 메모리로, 스왑아웃 또는 복구 할 수 있는 메모리Centos5, 6, 7
Active(anon)비교적 최근에 사용된 익명 메모리Centos 6, 7
Inactive(anon)비교적 사용되지 않고 스왑아웃할 수 있는 익명 메모리Centos 6, 7
Active(file)비교적 최근에 사용되고 필요할때까지 회수되지 않는 페이지 캐시 메모리Centos 6, 7
Inactive(file)성능에 영향주지 않고 회수할 수 있는 페이지 캐시 메모리Centos 6, 7
Unevictable시스템 운영상 스왑아웃할 수 없는 메모리Centos 6, 7
Mlock시스템 호출을 사용하게 메모리에 잠긴 페이지(Mlocked = Unevictable)Centos 6, 7
SwapTotal사용가능한 총 스왑영역Centos5, 6, 7
SwapFree사용가능한 총 스왑영역 잔여공간Centos5, 6, 7
Dirty디스크에 다시 쓰여질때까지 기다리는 메모리Centos5, 6, 7
Writeback디스크에 쓰기가 진행되는 메모리Centos5, 6, 7
AnonPages사용자 공간 페이지에 매핑되어 있는 페이지 공간Centos5, 6, 7
Mapped시스템 라이브러리과 같은 파일Centos5, 6, 7
Slab커널 데이터 구조의 캐시 메모리Centos5, 6, 7
PageTables페이지 테이블에 사용되는 메모리 (많은 프로세스가 동일한 공유메모리 세그먼트에 연결되면 용량증가함)Centos5, 6, 7
NFS\_UnstableNFS서버로 전송은 되읐지만, 스토리지에 커밋되지 않는 페이지Centos5, 6, 7
Bounce블록장비 버퍼에 사용되는 메모리Centos5, 6, 7
CommitLimit커널 파라미터(vm.overcommit\_ratio)을 기반으로 시스템에서 확보할 수 있는 총 메모리량 해당 값이 2인 경우 유효 Centos5, 6, 7
Committed\_AS현재 시스템에서 예약된 메모리 양Centos5, 6, 7
VmallocTotalvmallokc 메모리 공간의 총 크기Centos5, 6, 7
VmallocUsedvmalloc이 사용중인 공간Centos5, 6, 7
VmallocChunkvmalloc영역의 최대 블록Centos5, 6, 7
HugePages\_Total커널 파라미터(vm.nr\_hugepages)에 의해 확보된 hugepage 수Centos5, 6, 7
HugePages\_Free프로세스에 의해 확보되지 않은 hugepage 수Centos5, 6, 7
HugePages\_Rsvd풀에서 확보되었지만 예약되어 있지 않은 hugepage수Centos5, 6, 7
Hugepagesizehugepage크기(x86dms 일반적으로 2MB)Centos5, 6, 7
Shmem사용중인 공유메모리 총 공간Centos 6, 7
SReclaimable회수 가능한 slab의 일부 (캐시)Centos 6, 7
SUnreclaim메모리가 압박된 상태에서는 회수 할 수 없는 slab 영역Centos 6, 7
KernelStack커널이 사용중인 메모리 (회수 불가)Centos 6, 7
WritebackTmpFUSE가 버퍼로 사용중인 메모리Centos 6, 7
HardwareCorrupted손상되거나 작동되지 않을때 커널이 식별한 메모리 용량Centos 6, 7
AnonHugePages사용자 공간 페이지에 매핑된 파일이 없는 hugepageCentos 6, 7
HugePages\_Surp커널파라미터(vm.nr\_hugepages)를 초과하는 hugepage수 hugepage수는 (vm.nr\_overcommit\_hugepage)값에 의해 제어Centos 6, 7
DirectMap4k표준 4k페이지에 매핑되는 메모리양Centos 6, 7
DirectMap2Mhugepage에 매핑되는 메모리 양(일반적으로 2M)Centos 6, 7
- page: 가상메모리를 특정 사이즈로 분할한 단위 (표준은 4K) - hugepage : 일반 표준 페이징보다 더 큰 사이즈의 페이지가 large page 혹은 huge page, Oracle / Pgsql등 DBMS에서는 해당 페이징을 활성화 하면 성능향상 ### *reference* - *[https://access.redhat.com/en/solutions/502443](https://access.redhat.com/en/solutions/502443)* - *[https://hoing.io/archives/2690](https://hoing.io/archives/2690)* # Centos 4.x 리포지터리 변경 방법 Centos 4버전은 EOL(End Of Life)된 OS이기 때문에, 국내경로에서는 업데이트 제공이 안됩니다. Centos.org에서 가지고 있는 이미지로 패키지 관리를 해야 하기 떄문에 기본 경로에서 변경을 해 주어야 합니다. /etc/yum.repos.d/CentOS-Base.repo 파일 열어서 아래 내용으로 내용 변경 ```shell $> vi /etc/yum.repos.d/CentOS-Base.repo # CentOS-Base.repo # # CentOS-4 is past End of Life … use at your own risk # [base] name=CentOS-$releasever – Base baseurl=http://vault.centos.org/4.9/os/$basearch/ gpgcheck=1 gpgkey=http://vault.centos.org/RPM-GPG-KEY-centos4 protect=1 priority=1 #released updates [update] name=CentOS-$releasever – Updates baseurl=http://vault.centos.org/4.9/updates/$basearch/ gpgcheck=1 gpgkey=http://vault.centos.org/RPM-GPG-KEY-centos4 protect=1 priority=1 #packages used/produced in the build but not released [addons] name=CentOS-$releasever – Addons baseurl=http://vault.centos.org/4.9/addons/$basearch/ gpgcheck=1 gpgkey=http://vault.centos.org/RPM-GPG-KEY-centos4 protect=1 priority=1 #additional packages that may be useful [extras] name=CentOS-$releasever – Extras baseurl=http://vault.centos.org/4.9/extras/$basearch/ gpgcheck=1 gpgkey=http://vault.centos.org/RPM-GPG-KEY-centos4 protect=1 priority=1 # additional packages that extend functionality of existing packages [centosplus] name=CentOS-$releasever – Plus baseurl=http://vault.centos.org/4.9/centosplus/$basearch/ gpgcheck=1 enabled=0 gpgkey=http://vault.centos.org/RPM-GPG-KEY-centos4 protect=1 priority=2 #contrib – packages by Centos Users [contrib] name=CentOS-$releasever – Contrib baseurl=http://vault.centos.org/4.9/contrib/$basearch/ gpgcheck=1 enabled=0 gpgkey=http://vault.centos.org/RPM-GPG-KEY-centos4 protect=1 priority=2 ``` # Centos 방화벽 명령 실패 방화벽 설정하려고 명령어 실행시 실행 안되고 에러메시지 출력 1. ##### 메세지 내용 ```shell $> system-config-firewall-tui Traceback (most recent call last): File “/usr/bin/system-config-firewall-tui”, line 29, in import fw_tui File “/usr/share/system-config-firewall/fw_tui.py”, line 34, in import fw_nm ImportError: No module named fw_nm ``` 2. ##### 패키지 설치 ```shell $> yum install system-config-firewall ```
# 우분투 네트워크 설정하기 ### 우분투환경에서 네트워크 설정하기 1. eth0 수동으로 ip설정 및 자동활성화 ```shell $> vi /etc/network/interfaces auto eth0 iface eth0 inet static address 192.168.10.10 netmask 255.255.255.0 gateway 192.168.10.1 ``` 2. resolv설정 ```shell $> vi /etc/resolvconf/resolv.conf.d/head nameserver 168.126.63.1 nameserver 168.126.63.2 ``` # 디스크 badblock 확인방법 1. smartctl을 이용한 디스크 상태 확인 ```shell $ smartctl -l selftest /dev/sda ``` 2. badblock 명령어를 이용한 배드블록 확인 ```shell $ badblocks -v /dev/sda ``` # Centos4에서 Bash 업데이트 진행하기 Centos4이하 버전에서는 정식지원이 끝났기 때문에, yum update를 통해서는 업데이트가 불가능합니다. 이 때문에 최근 이슈가 된 Bash 취약점 업데이트는 시스템 담당자가 직접 소스RPM과 패치파일을 가지고 업데이트를 적용해야 하는데, 업데이트를 쬐금이라도 쉽게할수 있게 작성해서 업로드 합니다. 1. 패치할 소스RPM과 패치데이터 다운로드 ```shell $> mkdir -p /root/rpmbuild/{BUILD,RPMS,SOURCES,SPECS,SRPMS} $> echo "%_topdir /root/rpmbuild/" > /root/.rpmmacros $> rpm -Uvh http://vault.centos.org/4.9/updates/SRPMS/bash-3.0-27.el4.src.rpm $> cd rpmbuild/ $> cd SOURCES/ $> wget http://ftp.gnu.org/gnu/bash/bash-3.0-patches/bash30-017 $> wget http://ftp.gnu.org/gnu/bash/bash-3.0-patches/bash30-018 $> wget http://ftp.gnu.org/gnu/bash/bash-3.0-patches/bash30-019 ``` 2. 업데이트 내용변경
```shell $> cd .. $> vi SPECS/bash.spec Release: 27.2.019%{?dist} 28번줄 이하 내용 추가 Patch17: bash30-017 Patch18: bash30-018 Patch19: bash30-019 ```
3. 110번 줄 내용추가 (%patch16 -p0 -b .016 내용은 주석처리되어 있는데, 주석해제 하면 됨.). ```shell %patch16 -p0 -b .016 %patch17 -p0 -b .017 %patch18 -p0 -b .018 %patch19 -p0 -b .019 ``` 4. RPM생성한 후에 생성된 RPM으로 패치 ```shell $> rpmbuild -ba SPECS/bash.spec $> rpm -Uvh RPMS/설치된비트/*.rpm ``` # Centos5에서 Sendmail 구성하기 1. Sendmail 패키지 설치 ```shell $> yum install -y sendmail sendmail-cf ``` 2. Sendmail 설정
1. 발송 시 인증을 이용한 메일 발송으로 변경 ```shell $> vi /etc/mail/sendmail.mc ... TRUST_AUTH_MECH(`EXTERNAL DIGEST-MD5 CRAM-MD5 LOGIN PLAIN’)dnl ... define('confAUTH_MECHANISMS', 'EXTERNAL GSSAPI DIGEST-MD5 CRAM-MD5 (생략)' ... ``` 2. 외부에서 25번 포트 접속 허용하기 ```shell $> vi /etc/mail/sendmail.mc ... DAEMON_OPTIONS('Port=smtp, Name=MTA')dnl ... ``` 3. 발송하는 호스트명 지정 ```Python $> vi /etc/mail/sendmail.mc LOCAL_DOMAIN('실제_발송할_도메인명')dnl ``` 4. Sendmail 버전 숨기기 ```shell $> vi /etc/mail/sendmail.mc define('confSMTP_LOGIN_MSG')dnl ``` 5. Sendmail 서비스 활성화 및 시작 ```shell $> chkconfig sendmail on $> chkconfig saslauthd on $> /etc/init.d/sendmail start $> /etc/init.d/saslauthd start ```
3. 포트 확인 ```shell $> netstat -antp Active Internet connections (servers and established) Proto Recv-Q Send-Q Local Address Foreign Address State PID/Program name tcp 0 0 0.0.0.0:25 0.0.0.0:* LISTEN 19466/sendmail ``` 4. 접속 테스트 ```shell $> telnet localhost 25 mail from:발신계정 rcpt to:수신계정 data send test . quit (수신계정으로 메일 수신되는지 확인)   ``` # 우분투 몇가지 정보들 1. 패키지 업데이트 방법 ```shell $> apt-get update -y $> apt-get upgrade -y ``` 2. 언어셋 설정 ```shell $> /etc/default/locale ``` 3. 네트워크 설정 ```shell $> /etc/network/interfaces ``` 4. 패키지 찾을때 ```shell $> apt-cache search jpeg | more ``` 5. 서비스 데몬 관리 ```shell $> sudo apt-get install dialog rcconf -y ``` 6. 우분투 설치후 root 패스워드 설정방법 ```shell $> sudo passwd root ``` \* 우분투 설치 이후에 root 패스워드는 따로 설정되어 있지 않기 때문에 설치한 다음에 root패스워드 설정을 해 주어야 함 # 리눅스 메모리 반환 프로세스가 종료되어도, 커널에서 메모리 잡고 있는 부분 정리하기 메모리 정리 전) ```shell [root@/]# free -m total used free shared buffers cached Mem: 3925 1706 2218 0 238 963 -/+ buffers/cache: 504 3421 Swap: 4095 0 4095 ``` 메모리 정리 후) ```shell [root@/]# free -m total used free shared buffers cached Mem: 3925 463 3462 0 0 30 -/+ buffers/cache: 433 3492 Swap: 4095 0 4095 ``` 커널상에서 캐쉬를 클리어하게 만드는 값으로 1,2,3 중에 하나를 사용하면 되며 커널 2.6.16 이상에서부터 추가되서 사용가능하다. 1. To free pagecache: (페이지케쉬 클리어) ```shell echo 1 > /proc/sys/vm/drop_caches ``` 2. To free dentries and inodes: (트리와 아이노드 클리어) ```shell echo 2 > /proc/sys/vm/drop_caches ``` 3. To free pagecache, dentries and inodes: (1번과 2번 모두 클리어, 정리하는 중에 시스템 응답이 지연될 수 있음) ```shell echo 3 > /proc/sys/vm/drop_caches ```
*reference* - *[http://chonnom.com/bbs/board.php?bo\_table=B17&wr\_id=61](http://chonnom.com/bbs/board.php?bo_table=B17&wr_id=61)* # Centos기반의 loop device생성 기본적으로 Loop디바이스는 8개 생성이 기본인데 추가로 생성할 경우 수행
1. Centos5버전의 경우 구성방법1. loop 장치 갯수 올리기 ```shell $> vi /etc/modprobe.conf ... options loop max_loop=64 ... ```
1. 커널에서 loop 모듈 다시 로드하기 ```shell $> rmmod loop $> modprobe loop $> lsmod | grep loop ... loop                   28072  0 ... ```
2. Centos6의 경우 구성방법 ```shell $ MAKEDEV -v /dev/loop ``` # 우분투-resolv.conf 파일 수정하기 우분투에서 /etc/resolv.conf 파일을 직접 수정하고 네트워크 재시작하면 원래대로 돌아온다… ```shell root@ubuntu:/# cat /etc/resolv.conf # Dynamic resolv.conf(5) file for glibc resolver(3) generated by resolvconf(8) # DO NOT EDIT THIS FILE BY HAND — YOUR CHANGES WILL BE OVERWRITTEN ``` - 수정해봐야 별 볼일 없다는 뜻…. 1. 영구적으로 적용하려면 해당파일에서 지정할 네임서버의 주소를 입력을 해주어야 한다. ```shell $> vi /etc/resolvconf/resolv.conf.d/head nameserver 168.126.63.1 nameserver 168.126.63.2 ``` 파일 : /etc/resolvconf/resolv.conf.d/head 내용 : nameserver 네임서버IP 2. 적용하기 ```shell $> resolvconf -u ``` # Centos/RHEL6 기술노트 # centos6에서 네트워크 장치명 변경 Centos에서 eth0과 eth1의 맥이나 장치명의 순서를 바꾸고 싶을때가 있는데 그때 변경해주면 되는 항목 ```shell $> vi /etc/udev/rules.d/70-persistent-net.rules ... # PCI device 0x8086:0x1076 (e1000) SUBSYSTEM=="net", ACTION=="add", DRIVERS=="?*", ATTR{address}=="00:00:00:00:00:00", ATTR{type}=="1", KERNEL=="eth*", NAME="eth0"  ... # PCI device 0x8086:0x1076 (e1000) SUBSYSTEM=="net", ACTION=="add", DRIVERS=="?*", ATTR{address}=="00:00:00:00:00:01", ATTR{type}=="1", KERNEL=="eth*", NAME="eth1" ... ``` # centos6에서 iscsi 연결하기 ### 서버구성
1. 패키지 설치 ```shell $ yum install -y scsi-target-utils libibverbs libibverbs-devel librdmacm librdmacm-devel ``` 2. 데몬 실행 및 서비스 활성화 후 실행 ```shell $ chkconfig tgtd on; /etc/init.d/tgtd start $ chkconfig --list | grep tgtd tgtd            0:off   1:off   2:on    3:on    4:on    5:on    6:off ``` 1. target이름 설정 ```shell $ tgtadm --lld iscsi -o new -m target --tid 1 -T iqn.test.storage #iqn.test.storage이 값은 임의 변경 가능하고, 물리적인 디스크와 직접 연결하는 부분이 아님 ``` 2. target설정상태 확인 ```shell $ tgtadm --lld iscsi -o show -m target Target 1: iqn.test.storage     System information:         Driver: iscsi         State: ready     I_T nexus information:     LUN information:         LUN: 0             Type: controller             SCSI ID: IET     00010000             SCSI SN: beaf10             Size: 0 MB, Block size: 1             Online: Yes             Removable media: No             Readonly: No             Backing store type: null             Backing store path: None             Backing store flags:     Account information:     ACL information: ``` 3. 설정한 target에 볼륨지정 ```shell $ tgtadm  --lld iscsi -o new -m logicalunit --tid 1 --lun 1 -b /dev/sda5 ``` 4. 볼륨 등록 확인 ```shell $ tgtadm  --lld iscsi -o show -m target Target 1: iqn.test.storage     System information:         Driver: iscsi         State: ready     I_T nexus information:     LUN information:         LUN: 0             Type: controller             SCSI ID: IET     00010000             SCSI SN: beaf10             Size: 0 MB, Block size: 1             Online: Yes             Removable media: No             Readonly: No             Backing store type: null             Backing store path: None             Backing store flags:         LUN: 1             Type: disk             SCSI ID: IET     00010001             SCSI SN: beaf11             Size: 10619 MB, Block size: 512             Online: Yes             Removable media: No             Readonly: No             Backing store type: rdwr             Backing store path: /dev/sda5             Backing store flags:     Account information:     ACL information: ``` 5. target 접근 제한 적용 ```shell $ tgtadm --lld iscsi --op bind --mode target --tid 1 --initiator-address 192.168.100.10 ``` 6. target에 계정등록 ```shell $ tgtadm  --lld iscsi --op new --mode account --user test --password iscsitest ``` 7. 등록한 계정리스트 확인하기 ```shell $ tgtadm  --lld iscsi --op show --mode account Account list:    test ``` 8. 등록한 볼륨에 계정 연동하기 ```shell $ tgtadm --lld iscsi --op bind --mode account --tid 1 --user test ``` 9. 볼륨과 계정연동 확인 ```shell $ tgtadm --lld iscsi --op show --mode target Target 1: iqn.test.storage     System information:         Driver: iscsi         State: ready     I_T nexus information:     LUN information:         LUN: 0             Type: controller             SCSI ID: IET     00010000             SCSI SN: beaf10             Size: 0 MB, Block size: 1             Online: Yes             Removable media: No             Readonly: No             Backing store type: null             Backing store path: None             Backing store flags:         LUN: 1             Type: disk             SCSI ID: IET     00010001             SCSI SN: beaf11             Size: 10619 MB, Block size: 512             Online: Yes             Removable media: No             Readonly: No             Backing store type: rdwr             Backing store path: /dev/sda5             Backing store flags:     Account information:        test     ACL information:        192.168.100.10 ``` 10. 등록한 target을 설정파일로 저장하기(기존파일은 백업 수행) ```shell $ mv /etc/tgt/targets.conf /etc/tgt/targets.conf_ori $ tgt-admin --dump > /etc/tgt/targets.conf ``` 11. 생성된 파일 정보 확인 ```shell $ cat /etc/tgt/targets.conf default-driver iscsi         backing-store /dev/sda5         incominguser test iscsitest        # 패스워드 지정시, 12자~16자 위안에서 설정        initiator-address 192.168.100.10 ``` 12. target 재시작 ```shell $ /etc/init.d/tgtd restart Stopping SCSI target daemon: Stopping target framework daemon                                                           [  OK  ] Starting SCSI target daemon: Starting target framework daemon ``` ### 클라이언트 설정 1. 패키지 설치 ```shell $ yum install -y iscsi-initiator-utils ``` 2. 서비스 활성화 후 실행 ```shell $ /etc/init.d/iscsi start $ /etc/init.d/iscsid start $ chkconfig iscsi on; chkconfig iscsid on;​ ``` 3. target에서 지정한 인증정보 적용하기 ```shell $vi /etc/iscsi/iscsid.conf #node.session.auth.username = username #node.session.auth.password = password #discovery.sendtargets.auth.username = username #discovery.sendtargets.auth.password = password # 4군데 주석풀고 지정한 계정입력 ``` 4. iscsid 서비스 재시작 ```shell $ /etc/init.d/iscsid restart Stopping iSCSI daemon:                                     [  OK  ] Starting iSCSI daemon:                                     [  OK  ] ``` 5. target 정보 확인 ```shell $ iscsiadm --mode discovery --type sendtargets --portal 192.168.10.10 (target서버ip) #192.168.10.10:3260,1 iqn.test.storage (정상적일 경우, 해당 정보가 출력되며, 기타 문제가 발생할 경우 "iscsiadm: No portals found" 메시지를 뿌린다. ``` 6. target 서버 연결 ```shell $ iscsiadm --mode node --targetname iqn.test.storage --portal 192.168.10.10 -l -n node.startup -v automatic ``` 7. 디스크 연결정보 확인 ```shell $ fdisk -l Disk /dev/sda: 21.4 GB, 21474836480 bytes 255 heads, 63 sectors/track, 2610 cylinders Units = cylinders of 16065 * 512 = 8225280 bytes    Device Boot      Start         End      Blocks   Id  System /dev/sda1   *           1          13      104391   83  Linux /dev/sda2              14        1057     8385930   83  Linux /dev/sda3            1058        1452     3172837+  82  Linux swap / Slaris /dev/sda4            1453        2610     9301635    5  Extended /dev/sda5            1453        2610     9301603+  83  Linux Disk /dev/sdb: 10.6 GB, 10618804224 bytes 64 heads, 32 sectors/track, 10126 cylinders Units = cylinders of 2048 * 512 = 1048576 bytes Disk /dev/sdb doesn't contain a valid partition table ```
\# 기존에 없던 /dev/sdb 장비 출력확인 되었으면, /dev/sdb장치 파티션 구성하여 사용하면 됨.
8. 부팅후 활성화를 위해 적용 ```shell $ vi /etc/fstab ... /dev/sdb1               /data                   ext3    _netdev         0 0 ``` ### 클라이언트와 서버 구성 작업 1. iscsi 사용 중단 ```shell $ iscsiadm  -m node -T iqn.test.storage -p 192.168.10.10 -u Logging out of session [sid: 1, target: iqn.test.storage, portal: 192.168.10.10,3260] Logout of [sid: 1, target: iqn.test.storage, portal: 192.168.10.10,3260] successful. ``` 2. 영구적 연결 해제 ```shell $ iscsiadm  -m node -T iqn.test.storage -p 192.168.10.10 -o delete ``` 3. target에 연결세션 확인 ```shell $ tgtadm --lld iscsi --op show --mode session --tid 1 --sid 1 ``` # 리눅스에서 사용자 관리하기-1 1. test 사용자를 test123으로 변경 ```shell $> usermod -l test123 test $> egrep 'test123' /etc/passwd test123:x:10000:10000::/data/test:/bin/sh ``` 2. uid를 10000에서 20000으로 변경하기 ```shell $> usermod -u 20000 test $> egrep 'test123' /etc/passwd test:x:20000:10000::/home/test:/bin/sh ``` 3. gid를 10000에서 20000으로 변경하기 ```shell $> usermod -u 20000 test $> egrep 'test' /etc/passwd test:x:20000:20000::/home/test:/bin/sh ``` 4. 홈디렉토리를 /data/test 를 /home/test로 변경 ```shell $> usermod -d /home/test11 test $> egrep 'test' /etc/passwd test:x:20000:20000::/home/test11:/bin/sh ``` \* 실제 데이터가 이동하진 않고, 설정만 바뀜 5. 사용자 잠금 ```shell $> usermod -L test $> grep 'test' /etc/shadow ... test:!aaaa::: ... ``` \*사용자가 잠길경우, shadow파일에 !로 시작하며, 로그인이 안됨. 6. 사용자 잠금해제 ```shell $> usermod -U test ``` 7. 그룹명을 test 그룹명을 test123으로 변경 ```shell $> groupmod -n test123 test $> grep 'test' /etc/group test123:x:10000: ``` 8. 그룹ID를 10000에서 20000으로 변경 ```shell $> groupmod -g 20000 test $> grep 'test' /etc/group test123:x:20000: ``` # 디폴트 에디터 변경 sudo에 계정을 추가하겨고 visudo를 실행시켰는데 vi가 아니라 nano기반으로 나온다. [![image.png](http://igoni.kr/uploads/images/gallery/2024-01/scaled-1680-/QZFimage.png)](http://igoni.kr/uploads/images/gallery/2024-01/QZFimage.png) vi로만 사용하다가 nano를 사용하려니 영....어색하다...ㅠㅠ (일단 취소 : Ctrl + C / 종료 : Ctrl + x) 키로 나올수 있다. 조치방법 1. 일단 vi가 설치되어 있는지 한번 봅시다. ```bash $> which vim /usr/bin/vim ``` 음. 잘 설치되어 있네요... 2. 쉘의 기본 에디터를 변경하기 위해 EDITOR 변수를 지정해봅시다. ```bash $> vi /etc/profile ... export EDITOR="/usr/bin/vim" ``` 3. 쉘 프로필 적용 ```bash $> . /etc/profile ``` 4. 에디터 변수가 선언되었는지 확인해봅시다. (vi로 잘 나오네요.ㅎㅎ) [![image.png](http://igoni.kr/uploads/images/gallery/2024-01/scaled-1680-/q8yimage.png)](http://igoni.kr/uploads/images/gallery/2024-01/q8yimage.png) Reference - [https://wookiist.dev/80](https://wookiist.dev/80) # Centos/RHEL7 기술노트 # Centos 7 Run level 변경방법 자주 사용하는 시스템 런레벨
**런레벨****용도**
0종료
1싱글사용자
2다중사용자 (multi-user.target)
5그래픽 환경 (graphic.target)
6재부팅
Centos7에서는 아래 명령어로 변경 가능 (재부팅 후부터 반영) ```shell [root@localhost ~]# systemctl set-default graphical.target ``` 현재환경에서 변경 ```shell [root@localhost ~]# systemctl isolate graphical.target ``` 현재 사용중인 런레벨 확인 방법 1. who명령어로 확인 ```shell [root@localhost ~]# who -r run-level 3  2014-09-18 10:22 ``` 2. systemctl 명령어로 확인 ```shell [root@localhost ~]# systemctl get-default multi-user.target ``` # Centos7(vsftp 3.x) chroot적용하기 Centos7에서 vsftp 구성할때, 일반 사용자가 홈디렉토리 상단으로 올라오지 못하게 하는 chroot 옵션만 넣으면 FTP접근이 안됨. 응답 500 OOPS:vsftpd:refusing to run with writable root inside chroot() ```shell $> vi /etc/vsftpd/vsftpd.conf ... chroot_loca_user=YES ... ``` 보통 이렇게만 설정하는데, Centos7(VSFTP 3.x)에서는 저렇게만 하면 접속이 안된다. [![image-1654587303751.png](http://igoni.kr/uploads/images/gallery/2022-06/scaled-1680-/image-1654587303751.png)](http://igoni.kr/uploads/images/gallery/2022-06/image-1654587303751.png) 이런 메시지를 보게 될 것이야…;; 그래서 한줄 더 넣어줘야 한다. chroot가 적용된 사용자만 쓰기권한부여 하는 옵션.. ```shell $> vi /etc/vsftpd/vsftpd.conf ... allow_writeable_chroot=YES ... ``` 그리고 나서 서비스 재시작 하면 원하는 파일리스트가 잘 나온다~ 짜잔~~ ```shell $> systemctl restart vsftpd.service ``` # Centos7에 프록시 서버 설정하기 1. Squid 패키지 설치 ```shell $> yum install -y squid ``` 2. 설정파일 확인 ```shell $> vi /etc/squid/squid.conf ... acl 정책이름 (소스정보/목적지정보) (ip/class) acl proxy_net src 127.0.0.1/32 acl proxy_net src 1.2.3.4/24 * proxy_net이라는 정책으로, 소스IP가 127.0.0.1, 1.2.3.4에 대해서 적용 ... #ACL설정방법 http_access 적용방법 정책명 http_access allow proxy_net http_access deny all * 정책명이 proxy_net인 정보를 제외하고 모두 거부 ... #프록시 접근포트 http_port 8080 #캐쉬정보 cache_dir ufs /dev/shm/squid 100 5 10 #덤프파일 경로 coredump_dir /dev/shm/squid #캐쉬데이터 보관주기 refresh_pattern . 5 20% 360 #5분동안 20%의 예전데이터를 보관하고 최대 360분까지 캐쉬데이터를 보관. ``` 3. 서비스 활성화 ```shell $> systemctl enable squid --now ``` 4. 디렉토리 구조 설명
1. /var/spool/squid 디렉토리에 최대 100M까지 1차로 생성하는 디렉토리는 5개까지, 2차 디렉토리는 10개까지 설정 2. 기본값은 1차는 16개까지, 2차는 256개까지 생성하는 값 3. 디렉토리 구조는 다음과 같이 생성된다 ```shell $> ls -l /var/spool/squid/ /var/spool/squid/00 /var/spool/squid/00/00 /var/spool/squid/00/01 /var/spool/squid/00/02 /var/spool/squid/00/03 … /var/spool/squid/00/09 /var/spool/squid/01 /var/spool/squid/01/00 /var/spool/squid/01/01 /var/spool/squid/01/02 /var/spool/squid/01/03 … /var/spool/squid/01/09 ```
# centos7에서 vnc 구성하기 1. VNC패키지 설치 ```shell $ yum install -y tiger*  ``` 2. 설정파일 복사 ```shell $ cp /lib/systemd/system/vncserver@.service /etc/systemd/system/vncserver@\:2.service ``` 3. 설정파일 편집 ```shell $ vi /etc/systemd/system/vncserver@\:2.service ... ExecStartPre=/bin/sh -c '/usr/bin/vncserver -kill %i > /dev/null 2>&1 || :' ExecStart=/sbin/runuser -l root -c "/usr/bin/vncserver %i -geometry 1024x768"      PIDFile=/root/.vnc/%H%i.pid ``` 4. 설정파일 읽어오기 ```shell $ systemctl daemon-reload ``` 5. vnc 패스워드 파일 성성 (두번입력) ```shell $ vncpasswd Password: Password:  ``` 6. VNC 서비스 활성화 및 실행 ```shell $ systemctl enable vncserver@:2.service --now ``` 7. VNC 서비스 중지 ```shell $ systemctl stop vncserver@:2.service ``` 8. vnc서비스 자동으로 비활성화 ```shell $ systemctl disable vncserver@:2.service ``` # Centos7환경에서 VNC서비스 실행시킬때 vnc failed로 응답할때 1. VNC 구동시 Fail로그 확인 ```shell $> systemctl start vncserver@:2.service Job for vncserver@:2.service failed. See 'systemctl status vncserver@:2.service' and 'journalctl -xn' for details. ``` 2. 프로세스 실행여부 확인 ```shell [root@localhost /]# ps -ef | grep vnc test 24303 1 0 20:08 ? 00:00:00 /usr/bin/Xvnc :2 -desktop 192.168.0.100:2 (test) -httpd /usr/share/vnc/classes -auth /home/test/.Xauthority -geometry 600×800 -rfbwait 30000 -rfbauth /home/test/.vnc/passwd -rfbport 5902 -fp catalogue:/etc/X11/fontpath.d -pn -nolisten tcp test 24310 1 0 20:08 ? 00:00:00 /usr/bin/vncconfig -iconic root 25037 21274 0 20:09 pts/0 00:00:00 grep –color=auto vnc ``` 3. 프로세스가 실행중이기 때문에, VNC viewer로 접속하거나, 프로세스가 이상할 경우에는 서비스 재시작. 4. 실행중인 포트 확인 ```shell [root@localhost tmp]# netstat -antp | grep vnc tcp 0 0 0.0.0.0:5802 0.0.0.0:* LISTEN 24303/Xvnc tcp 0 0 0.0.0.0:5902 0.0.0.0:* LISTEN 24303/Xvnc ```
- 기본적으로 5900을 기본으로 뒤에 디스플레이번호에 따라서 1자리 포트가 바뀜. - 2번 디스플레이일경우에는 5902, 5번 디스플레이이면 5905번 포트가 LISTEN으로 됨. - 2. 1번 사항대로 확인했는데 아무것도 없을때…. - VNC서비스를 실행시키면서 생성되는 파일이 정상적으로 삭제되지 않았기 때문인데, - VNC가 활성화 되어 있는 상태에서 재부팅이 이루어지면 이런 현상이 자주 발생하고 있네요. - /tmp/.ICE-unix /tmp/.X11-unix 폴더가 제거되지 않았을 경우에 이렇게 때문에 해당 파일을 삭제해주면 됨. ```shell $> ls -al /tmp total 48 drwxrwxrwt. 11 root root 12288 Dec 29 20:15 . drwxr-xr-x. 20 root root 4096 Dec 29 12:58 .. drwxrwxrwt 2 test test 30 Dec 29 20:08 .ICE-unix drwxrwxrwt 2 test test 15 Dec 29 20:08 .X11-unix ```
\#.ICE-unix, .X11-unix 이 두개 폴더 삭제
```shell $> rm -rf /tmp/.ICE-unix /tmp/.X11-unix ```
- 서비스 재실행 ```shell $> systemctl start vncserver@:2.service ```
# 리눅스에서 사용자 관리하기-2 사용자 추가할때 자동으로 디렉토리 생성되게 하려면..? /etc/skel 밑에 생성할 디렉토리를 만들어 놓으면 됨. \*기본적으로 /etc/skel(탬플릿)를 가지고 생성하기 때문에 기본적으로 생성된게 없기 때문에 생성되지 않는다 1. 탬플릿 디렉토리 생성 ```shell $> mkdir /etc/skel/public_html ``` 2. 예시는 public\_html 디렉토리를 만들기 ```shell $> ls -l /home/test total 0 drwxr-wr-w 2 test test 5 Dec 26 14:29 public_html ``` 3. 사용자가 추가되면 자동으로 public\_html 디렉토리를 생성한다. ```shell $> mkdir /etc/skel/public_html ``` # Centos/RHEL8 기술정보 Centos / Rocky / Alma / RHEL 8버전 기술노트 # Centos8에서 nic 이름 변경 1. NIC이름이 eno1, ens1 이런식으로 인식하는 경우가 있는데, 해당 장치정보 사용하지 않고 eth0, eth1... ethX로 변경할 수 있는 방법 2. 커널값 적용 ```shell $> grubby --update-kernel ALL --args net.ifnames=0 $> cat /etc/default/grub ... GRUB_CMDLINE_LINUX="resume=UUID=da0bac52-eef8-413d-ba2b-904962752f57 rhgb quiet selinux=0 net.ifnames=0" ... ``` 3. 기존에 설정된 NIC정보 ```shell # ifconfig -a ens3f0: flags=4163  mtu 1500         inet 192.168.10.100  netmask 255.255.255.255  broadcast 0.0.0.0         ether 52:54:00:b1:17:18  txqueuelen 1000  (Ethernet)         RX packets 1299631  bytes 97471826 (92.9 MiB)         RX errors 0  dropped 18  overruns 0  frame 0         TX packets 10224  bytes 12704712 (12.1 MiB)         TX errors 0  dropped 0 overruns 0  carrier 0  collisions 0 ``` 4. 서버 재부팅 후 NIC정보 확인 ```shell $> ifconfig eth0: flags=6211  mtu 1500         inet 192.168.10.10  netmask 255.255.255.0  broadcast 192.168.10.255         ether 52:54:00:b1:17:18  txqueuelen 1000  (Ethernet)         RX packets 55605  bytes 4171181 (3.9 MiB)         RX errors 0  dropped 0  overruns 0  frame 0         TX packets 262  bytes 38336 (37.4 KiB)         TX errors 0  dropped 0 overruns 0  carrier 0  collisions 0 ``` # nmcli기반의 네트워크 설정 RHEL8계열부터는 networkscripts를 사용하지 못하고 NetworkManager를 이용한 네트워크 장치를 관리해야 하기 때문에, NetworkManager를 사용할줄 알아야 하네요.... 1. 수동으로 생성된 ifcfg파일을 NetworkManager 로드 ```shell $> nmcli connection load /etc/sysconfig/network-scripts/ifcfg-eth0 $> nmcli connection up eth0 ``` 2. 네트워크 up/down 설정 ```shell $> nmcli connection up eth0     #nic 활성화 $> nmcli connection down eth0   #nic 비활성화 ``` 3. 네트워크 연결상태 확인 ```shell $> nmcli device status DEVICE  TYPE      STATE          CONNECTION eth0    ethernet  연결됨         eth0 eth1    ethernet  연결됨         eth1 lo      loopback  관리되지 않음  -- ``` 4. 네임서버 설정 bond0에 네임서버를 8.8.8.8, 219.250.36.130 으로 설정 ```shell $> nmcli connection modify eth0 ipv4.dns "8.8.8.8,219.250.36.130" $> nmcli connection up eth0 $> cat /etc/resolv.conf # Generated by NetworkManager nameserver 8.8.8.8 nameserver 219.250.36.130 ```
5. 본딩구성하기(active-backup 방식으로 설정)
\#bond NIC이름 설정하고 네트워크 정보 설정
```shell $> nmcli connection add type bond con-name bond0 ifname bond0 bond.options "mode=1,miimon=100" $> nmcli connection mod bond0 ipv4.addresses 192.168.10.100/24 $> nmcli connection mod bond0 ipv4.gateway 192.168.10.1 $> nmcli connection mod bond0 ipv4.method manual $> nmcli connection mod bond0 ipv6.method disabled ```
\#eth0과 eth1을 본딩 맴버용 NIC 추가
```shell $> nmcli connection add type ethernet con-name eth0 ifname eth0 master bond0 $> nmcli connection add type ethernet con-name eth1 ifname eth1 master bond0 ```
\#본딩 NIC 활성화
```shell $> nmcli connection up bond0 ```
6. 본딩 모드 변경 ```shell $> nmcli connection mod bond0 +bond.options "mode=0,miimon=100" $> nmcli connection up bond0 ```
*reference* - *[https://access.redhat.com/documentation/en-us/red\_hat\_enterprise\_linux/7/html/networking\_guide/sec-network\_bonding\_using\_the\_networkmanager\_command\_line\_tool\_nmcli//](https://access.redhat.com/documentation/en-us/red_hat_enterprise_linux/7/html/networking_guide/sec-network_bonding_using_the_networkmanager_command_line_tool_nmcli//)* - *[https://fendys.tistory.com/28//](https://fendys.tistory.com/28//)* # Oraclelinux8 버전에서 특정 버전 커널로 부팅 하기 Oracle8 부팅시 커널 버전 선택 절차 (커널 롤백시 사용) 1. 현재 설치된 커널 버전 리스트 확인 ```shell $> ls -l /boot/vmlinuz-* -rwxr-xr-x. 1 root root 10348096  2월  3 17:50 /boot/vmlinuz-0-rescue-21dd73f136ab4c494ec052b5eb5f91e2 -rwxr-xr-x  1 root root 10225200  1월 21 06:39 /boot/vmlinuz-4.18.0-348.12.2.el8_5.x86_64 -rwxr-xr-x. 1 root root 10212912 11월 11 04:47 /boot/vmlinuz-4.18.0-348.el8.x86_64 -rwxr-xr-x. 1 root root 10348096 10월  9 08:29 /boot/vmlinuz-5.4.17-2136.300.7.el8uek.x86_64 -rwxr-xr-x  1 root root 10368576  1월 29 13:10 /boot/vmlinuz-5.4.17-2136.302.7.2.2.el8uek.x86_64 ``` 2. vmlinuz-4.18.0-348.12.2.el8\_5.x86\_64 버전으로 커널 버전 선택 ```shell $> grubby --set-default /boot/vmlinuz-4.18.0-348.12.2.el8_5.x86_64 The default is /boot/loader/entries/21dd73f136ab4c494ec052b5eb5f91e2-4.18.0-348.12.2.el8_5.x86_64.conf with index 2 and kernel /boot/vmlinuz-4.18.0-348.12.2.el8_5.x86_64 ``` # oraclelinux8에서 pacemaker 설치하기 Oracle linux8에서 HA구성할때 사용하는 pcs, pacemaker는 addon형식으로 제공되기 때문에 base repo에는 없는것 같네요. 해당버전에서 pacemaker설치하는 방법 공유합니다. 1. addonrepo 활성화 ```shell $> dnf config-manager --enable ol8_addmons ``` 2. pacemaker 패키지 설치 ```shell $> dnf install pcs pacemaker fence-agetns-all -y ``` # RHEL/Centos 8.0 Release Note RHEL / Centos 8.0 출시에 따른 릴리즈 노트 확인 전체 기능을 포함하고 있지는 않으며, 주요기능만 작성되어 있음 1. 릴리즈 일자
RHEL
커널버전
19.54.18.0-80
2. 추가된 기능 1. 리포지터리 추가 1. Base : 기본패키지 2. Appstream : 응용프로그램 런타임 언어 2. 패키지 관리 명령어 변경 1. yum → dnf 3. 주요 추가/변경 되는 패키지 버전정보
패키지명
버전
gcc8.2
git2.18
subversion1.10
python3.6
MadiaDB (XtraDB Galera Cluster 내장)10.3
Mysql8.0
Nginx1.14
node.js10
openJDK8, 11
pacemaker2.0
Varnish6.0
4. 웹콘솔(Cockpit) 패키지 추가 5. OS이미지 빌드 기능 6. Varnish 7. rsyslog에 kafka연동을 위한 omnkafka 추가 3. 변경된 기능 1. iso 파일사이즈 증가. (7.1G 가량) 1. Dual layer DVD 혹은 USB을 이용해 설치 필요 2. Firewall데몬의 백엔드는 nftable로 변경 1. Firewalld에서 적용하는 직접규칙은 iptables을 사용하고 2. 나머지 규칙은 nftable을 사용 3. iptables에 정의한 규칙은 nftable보다 우선 적용 3. display 방식이 X.org → Wayland로 변경 (UI개선) : 다만 Wayland는 다중모니터 / 다중 GPU설정 불가, Nvidia 드라이버 지원 불가 4. nfs사용자 정보 변경 : nobody → nfsbody로 변경 (nobody uid삭제) 5. rpm으로 설치시 시작전에 유효성 검사를 수행 6. 물리메모리 인식용량 증가 (4PB) 7. pacemaker 2.0은 마스터 / 슬레이브 개념이 아닌 복제 리소스 개념으로 변경 8. resolve(/etc/resolv.conf) 내용 변경시 자동으로 reload 9. ext4 파일시스템에 대한 메타데이터 체크섬 지운 10. xfs 파일시스템 용량 증가 (600TiB → 1024TiB) : 1024TiB를 사용할 경우 할당하는 그룹크기는 512Gib이상으로 설정해야 함 11. ssh 7.8p1 1. ssh v1 프로토콜 삭제 2. useDNS no로 기본값 변경 3. DSA 알고리즘 변경 4. 최초 RSA키값은 1024bit으로 변경 12. docker 패키지 삭제, podman으로 패키지 변경 13. mariadb / Mysql 동시 설치 불가 14. 커널 파라미터에 selinux를 off하기 위한 절차 ```shell $  grubby --update-kernel ALL --args selinux=0 ```
15. xfs파일시스템에 dax 옵션을 사용하는 경우 CoW호환 불가 1. DAX : 페이지 캐쉬를 사용하지 않고 바이트 단위로 파일스템 직접 접근 2. 파일시스템 생성 예재 ```shell # mkfs.xfs -m netflink=0 /dev/{장치명} <-- extent 비활성화화 # mount -o dax /dev/{장치명} ```
16. 그래픽 환경 변경 1. 사용자 환경 1. Gnome Standard - Version 3에 맞춰서 새로운 UI제공 (기본값) 2. Gnome Classic - Version2와 비슷한 UI제공 2. 지원 프토토콜 1. X.org를 사용하는 X11 프로토콜, Gnome shell을 사용하는 Wayland (기본값) 3. 프로토콜 차이점 1. X.org는 클라이언트/서버 모델로 서버에서 렌더링 수행 후 클라이언트에서 그래픽를 수신. 2. Wayland는 프로세스 모델로, 컴포지터(창 관리자)와 직접 통신해서 X11보다 프로토콜 경량화 / 대기시간 감소 3. 장치 제어는 Wayland는 ghome shell에서 제어하고, Xorg는 libinput 드라이버로 제어 4. 삭제된 기능 1. kickstart 설정 에서 일부 구문 삭제 (auth / device / dmraid / instlal / mouse / multipath / bootloader --update / ignoredisk --interactive / partition --active / reboot -kexec) 2. 네트워크 인터페이서 스크립트 제공하지 않으며 실행시 경고메시지 출력함 3. 가상화 1. 스냅샷 제공기능 제거 2. cirrus VGA 디스플레이 제거 3. virt-manag 툴 제거 4. net-snmp 패키지에 python 사용불가 5. yum-plugin-changelog 명령어 삭제 5. 알려진 이슈사항 1. selinux 비활성화 1. /etc/selinux/config파일에 SELINUX=disabled 옵션을 사용하는 경우, 재부팅시 부팅프로세스에서 비활성화 모드로 전환하는 과정에서 메모리 누수가 발생할 소지가 있음 2. 조치사항 : /.autorelabel 파일생성 후 selinux=0 내용 적용 *Reference* - *[https://access.redhat.com/documentation/en-us/red\_hat\_enterprise\_linux/8/html/8.0\_release\_notes/index](https://access.redhat.com/documentation/en-us/red_hat_enterprise_linux/8/html/8.0_release_notes/index)* # RHEL/Centos 8.1 Release Note RHEL / Centos 8.1출시에 따른 릴리즈 노트 확인 프리뷰를 포함한 전체 내용을 기재하진 않았고, 주로 사용하는 하는 기능 및 패키지 정보들에 한해 작성 1. #### **릴리즈 정보**
출시일자
커널버전
19.114.18.0-147
2. #### **주요변경사항** 1. ##### 새로운 기능 1. selinux정책 을 생성하기 위한 udica 도입 2. LUKS2형식은 블록장치 재암호화 지원 3. WindowsVM에서 드라이버용 ISO파일에서 virtio-win드라이버를 자동으로 검색 4. KVM 가상화를 5단계 페이징으로 확대 2. #### 주요 변경사항 1. 패키지 변경사항 1. 클러스터 1. concurrent-fencing 속성 true 추가 여러 클러스터 노드가 동시에 차단되어야 할때 사용 2. HA 클러스터 크기 변경 : 16 → 32 노드로 변경 2. 파일 / 스토리지 1. ext4 기능 1. 기본이 아닌 기능 : proejct / quota / mmp 2. 기본이 아닌 마운트 옵션 : bsddf, grpid, resgid, error, commit, max\_batch, min\_batch\_time, grpquota, prjquota, dax, lazytime, discard, init\_itable, jqfmt 2. 커널 파라미터 1. mitigations= CPU 취약성에 대한 선택적 완화 off = 모든 CPU 완화 비활성화 (성능향상되나 CPU 취약점 노출될 수 있음) auto(기본값) = CPU취약성을 완화하지만, SMT(Simultaneous Multi Threading)활성화된 상태로 유지 auto,nosmt = SMT 비활성화, CPU 완화 비활성화 2. novmcoredd : 장치 덤프를 비활성화 수행 3. nospectre\_v1 : 경계확인 우회에 대한 완화 비활성화 4. psi = press stole 정보 추적을 활성화하거나 비활성화 5. rendom.truese\_cpu = 커널의 CRNG(암호화난수 생성)을 사용을 on / off 가능 6. creahkernel = {{ 크기 }} KN,x86\_64 : 먼저 4G미만으로 선택 offset값이 없는 경우 : 4G 이상의 free 영역으로 대체 7. l1ft = x86 8. hyperv\_record\_panic\_msg = 커널 패닉 메시지(kmsg)를 hyper-v에 report 여부 0 : 비활성화 1(기본값) : 활성화 3. 버그 수정 1. Xorg-xx-drv 비디오 드라이버 설치 Nvidia / AMD GPU 장착환경에서 정상적인 GUI기능 작동안하는 문제 수정 2. Linux 파티션이 없는 시스템에서 rescue mode 진입시 설치 프로그램 구동실패 → 에러팝업출력 으로 수정 3. python3-rpm라이브러리가 문자열 반환시 프로그램 예외 발생하면서 설치 실패 오류 수정 4. systemd 디버그 모드에서 시스템 관리자를 사용할때 무한 반복 로그 메시지 발생 수정 3. #### 주요 버전업데이트 / 추가된 패키지 리스트
패키지명
버전정보
php7.3
ruby2.6
Node.js12
nginx1.16
postgresql12
.NET Core3.1
virtio-win
tpm2-tools2.0
LLVM Toolset8.0.1
Rust Toolset1.37
GO Toolset1.12.8
3. #### **드라이버 변경사항** 1. #### 추가된 드라이버
드라이버 종류
모델명
네트워크Serial line internal protocol 지원
네트워크Baosch C\_CAN 컨트롤러 플랫폼 버스 드라이버
네트워크Softing DPRAM / Serial line EMS / esd 가상 CAN 인터페이스
네트워크SJA1000 소켓 CAN드라이버 / PLX90XX PCI 드라이버
네트워크Intel 2.5G 이더넷 드라이버
네트워크Realtek 801 무선 PCI / Core 드라이버
네트워크MediaTek MT76XX 장치 드라이버
그래픽+기타Virtual Kernel mode
그래픽+기타Intel GTT 루틴
그래픽+기타Xen FrontEnd / BackEnd 페이지 디렉토리 기반 공유 버퍼
그래픽+기타오디오 음소거 제어용 LED트리거
그래픽+기타호스트 무선 어댑터 무선 제어 드라이버
그래픽+기타네트워크 차단 장치
그래픽+기타Intel PCH 드라이버
2. #### 업데이트 드라이버
드라이버 종류
업데이트 버전
Intel Gigabit Ethernet5.6.0-k
Cisco FCoE HBA1.6.0.47
HP Smart Array Controller3.4.20-170-RH3
Emulex LightPulse Fibre Channel SCSI0.12.2.0.3
LSI MPT Fusion SAS 3.028.100.00.00
VMware SVGA2.15.0.0
Broadcom MegaRAID SAS07.707.51.00-rc1
HPE Watcgdog2.0.2
#### *reference* - *[https://access.redhat.com/documentation/en-us/red\_hat\_enterprise\_linux/8/html-single/8.1\_release\_notes/index](https://access.redhat.com/documentation/en-us/red_hat_enterprise_linux/8/html-single/8.1_release_notes/index)* # RHEL/Centos 8.2 Release Note 1. RHEL / Centos 8.2출시에 따른 릴리즈 노트 확인 프리뷰를 포함한 전체 내용을 기재하진 않았고, 주로 사용하는 하는 기능 및 패키지 정보들에 한해 작성
1. #### **릴리즈 정보**
출시일자
커널버전
20.44.18.0-193
2. #### **주요변경사항** 1. #### 새로운 기능 1. skopeo 명령어 기능 추가 1. sync 명령어 지원 - 컨테이너 레지스트리와 로컬레지스트리 동기화 기능 지원 2. login / logout 기능 추가 2. container.conf 지원 가능 1. 컨테이너 엔진 : /usr/shae/containers/containers.conf, /etc/containers/containers.conf 확인 2. root-less모드 엔진 : $HOME/.config/containers/containers.conf 확인 3. podman 명령어 기능 추가 1. podman system reset : podman 스토리지 초기상태로 재설정 4. rsyslog기능 추가 1. omhttp모듈을 사용해서 HTTP REST API 사용해서 메시지 전달 2. 디스크 대기열이 multi thread로 실행되어 로그처리 기능 향상 5. sudo 기능 추가 1. stdout / stderr 대신 pam 메시지를 사용자 터미널에 기록. 6. nftables 기능추가 1. python에서 api사용시 python3-nftables패키지 설치 2. ip대역 입력시 x.x.x.x/24 이외에 x.x.x.10-x.x.x.20 포맷으로도 작성 가능 7. whois 패키지를 이용해 특정 도메인 이름 혹은 ip정보 검색 가능 8. Intel OPA(Omni-Path Archituecure)호스트 소프트웨어 지원 2. #### 주요 변경사항 1. 1. tc용 eBPF 지원 2. GCroup V2 기능 지원 1. CPU 가중치및 대역폭 제한 2. 사용자 영역 메모리 및 TCP 소켓버퍼 3. I/O 리소스 분배 3. LVM 캐싱방법 지원 1. 기존 dm-cache에서 dm-writecache방식 제공 2. dm-cache : 읽기 / 쓰기 모두 캐싱해서 자주 사용하는 데이터에 대해 액세스 속도 향상 3. dm-writecache : 쓰기작업만 캐싱, SSD혹은 PMEM 디스크와 같이 빠른 볼륨에 먼저 쓰기를 저장 후 백그라운드로 디스크에 마이그레이션 수행 4. nfs 클라이언트에서 per-op오류수 확인 가능 5. pcs에서 특정 리소스만 비활성화 가능 1. pcs resource disable --simulate : 지정한 리소스 비활성화 검증 2. pcs resource disable --safe : fail-over할때 마이그레이션하는것 같이 영향받는 다른 리소스가 없을때 지정한 리소스 비활성화 3. pcs resource disable --safe --no-strict : 다른 리소스가 중지되지 않을때만 지정된 리소스 비활성화 6. pcs 기능 추가 1. pcs resource relations : 클러스터 리소스간의 관계를 트리구조로 표시 2. pcs dr : backup노드를 사용하도록 클러스터 구성된 경우 해당명령어를 통해 active와 backup모두 상태를 표시 기능 추가 3. 노드 종료시 리소스가 fail-back하지 않고 노드복구 될때까지 중지된 상태로 유지할 수 있도록 클러스터 설정값 지원 4. 단일 노드에서 클러스터 환경을 구성할 수 있도록 구성 7. samba 1. python2지원 종료 2. ctdbd서비스는 CPU thread가 90%이상 사용할때 기록 8. Wayland 기능향상 - multi GPU인식가능 9. Cockpit 기능향상 1. 15분동안 활동이 없는 경우 자동 로그아웃 기능 추가 (/etc/cockpit/cockpit.conf 파일에 timeout 설정가능) 2. SSH과 비슷하게 로그인 화면에 배더파일 내용 선택가능 (/etc/cockpit/cockpit.conf 파일에서 설정 가능) 10. 가상화 기능 향상 1. 스토리지 볼륨 생성은 모든 libvirt 유형에서 작동 2. 스토리지 풀은 LVM이나 iSCSI모두 생성 가능 3. Intel Platinum 9200시리즈 프로세스에서 KVM 사요 ㅇ가능패키지 변경사항컨테이너 기능 향상 11. 기본 레지스트리 검색 리스트 변경 (/etc/containers/registries.conf) 2. 커널 파라미터 1. NVMe장치에 대해 Hotswap 지원 가능 (커널 4.18.0-193.13.2 이상) 2. kvm.nx\_huge\_pages\_recovery\_radio= \[KVM\] 주기적으로 재핑되는 4Kib페이지수를 제거 (0은 복구 비활성화, 1이상(초단위)마다 페이지의 1/N정보 삭제 3. page\_alloc.shuffle= 페이지 할당자가 사용가능한 목록을 랜덤하게 작동하는제 제어 4. panic print = 커널패닉 발생시 시스템 정보를 출력하기 위한 비트 0 : 모든 작업정보 출력 1 : 시스템 메모리 정보 3: 타이머 정보 3: CONFIG\_LOCKDEP 기능이 켜져있는 경우 시스템 lock 정보 출력 4: ftrace 버퍼 정보 출력 5: printk 버퍼에 있는 모든 메시지 출력 5. tsx = Intel 프로세서의 TSX기능 제어 on : TSX 기능 활성화 off : TSX기능 비활성화 (기본값) auto : TSX가 있는 경우 비활성화하고, 그렇지 않으면 TSX활성화 6. tsx\_async\_abort = TAA; TSX Async Abort 취약성 안화를 제어 특정 CPU모델에서 내부 버퍼 공격에 취약하기 때무넹 설정 full : TSX가 활성화된 경우 CPU에서 TAA기능을 완화 full,nosmt : 취약한 CPU에서는 TAA완화를 활성화하고, 동시 다중쓰레딩(SMT)를 비살화ㅅ화 off : 무조건 TAA완화를 비활성화 (mds=off도 활성화 필요) 7. intel\_iommu = sm\_on (기본은 off) Intel IOMMU드라이버 DAR;Direct Memory Access Remapping 사용여부 8. mds = full : 기본 off : TAA 영향을 받는 시스템에서 MDS를 OFF할경우 동일한 CPU취약점이 완화가능 (비활성화 할경우 tsx\_async\_abort=off로도 설정필요) 9. mem\_encrypt= AMD 보안 메모리 암호화(SME) 제어, OFF할경우 시스템 성능이 향상될수 있지만 CPU취약점 노출가능성 존재 10. max thread fork 항수가 생성할 수 있는 최대 스레스수 제어 3. 버그 수정 1. qdisc\_run 함수 lock시 커널 충돌 부분 해소 pfifo\_fast트래픽을 대기열에서 처리하는 과정중에 비정상적으로 종료되는 문제 해결 2. tcp\_wrappers 정보 제거 /etc/hosts.allow, /etc/hosts.deny 파일에 tcp\_wrapper패키지 정보 삭제 3. SCSI 드라이버에서 메모리 사용량 감소 일부 SCSI 드라이버가 RHEL(Cehtos)7버전보다 많은 양의 메모리를 사용했고, HBA나 vPort같은 경우에는 더 증가. 대기열 스케쥴링 개선 4. make 시 속도저하 개선 병렬 빌드시 대기하는 과정에서 응답없는 경우가 발생하는 문제 해소 5. Wayland에서 속도 저하 개선 소프퉤어 렌더러 사용할때 캐시 프레임 서버를 사용하지 않기 때문에 렌더링처리가 지연되는 문제 해결 6. Intel 10세대 CPU 지원 10세대 Intel 프로세스기반에서 VM 구동시 실패 7. RHEL7호스트에서 RHEL8 VM구성시 해당소 문제로 그래픽 출력 오류 발생 → QXL드라이버 조정을 통해 문제 해결 8. 컨테이너 레지스트리에서 quay.io 기본 경로 삭제 3. #### 주요 버전업데이트 / 추가된 패키지 리스트
패키지명
버전정보
python3.8
maven3.6
HotSopt JVM용 JMC7.1.1
rsyslog8.1911.0
audit3.0-0.14
sudo1.8.29-3.el8
firewalld0.8
nftables0.9.3
php7.3
GCC Toolset9
LLVM Toolset9.0.1
Rust Toolset1.41
GO Toolset1.13
grafana6.3
samba4.11.2
3. #### **드라이버 변경사항** 1. #### 추가된 드라이버
드라이버 종류
모델명
네트워크gVNC드라이버
네트워크Broadcom UnuMAC MDIO버스 컨트롤러
네트워크iWARP드라이버
그래픽+기타DRM VRAM메모리 관리 모두미
그래픽+기타stoppoll거버너용 cpuidle드라이버
그래픽+기타Radeon RX5600 / RX5700
그래픽+기타Nvidia GTX 1650 / 1660 (TU 116 / 3D 가속지원 불가)
그래픽+기타Matrox mgag2000
그래픽+기타ASPEED ast
그래픽+기타Intel i915
그래픽+기타stm\_ftrace / console / core / dummy / heartbeart 드라이버
그래픽+기타인텔 Tracking hub관련 드라이버
그래픽+기타Device DAX 드라이버
그래픽+기타PMEM DAX 드라이버
그래픽+기타Intel RAPL 코드
스토리지MD cluster
2. #### 업데이트 드라이버
드라이버 종류
업데이트 버전
VMware vmxnet31.4.17.0-k
Intel 10G virtual4.1.0-k-rh8
Intel 10G PC-E5.1.0-k-rh8
Intel Ethernet E800 시리즈0.8.1-k
NFP 드라이버4.18.0-185
Elastic Network Adapter2.1.0k
HPE watchdog2.0.3
Intel I/OAT DMA5.0.0
Emulex LightPulse Fibre Channel SCSI0.12.6.0.2
LSI MPT Fusion SAS 3.032.100.00.00
HP Smart Array Controller3.4.20-170-RH4
QLosic Fibre HBA10.01.00.21.08.2-k
QLogic FastLinQ 4xxx FCoE8.42.3.0
QLogic FastLinQ 4xxx ISCSI8.37.0.20
Broadcom MegaRAID SAS07.710.50.00-rc1
#### *reference* - *[https://access.redhat.com/documentation/en-us/red\_hat\_enterprise\_linux/8/html-single/8.2\_release\_notes/index](https://access.redhat.com/documentation/en-us/red_hat_enterprise_linux/8/html-single/8.2_release_notes/index)* # RHEL/Centos 8.3 Release Note RHEL / Centos 8.3출시에 따른 릴리즈 노트 확인 프리뷰를 포함한 전체 내용을 기재하진 않았고, 주로 사용하는 하는 기능 및 패키지 정보들에 한해 작성 1. #### **릴리즈 정보**
출시일자
커널버전
20.114.18.0-240
2. #### **주요변경사항** 1. #### 새로운 기능 1. 원격으로 설치하기 위한 Edge기능 도입 image builder를 사용해서 구성가능. 2. Flaypak 패키지를 이용한 그래픽 어플리케이션을 컨테이너로 실행(firerox / gimp / thunderbird 등) 3. 비활성화된 Intel TSX(Transactional Synchronization Extensions) 기술 적용 (활성화시 커널파라미터에 tsx=on 적용) 4. 페이지 소유자 추적기능 사용 가능 (dirty --args="pgage\_owver=on" --update=kernel=0 명령어 수행시 적용) 5. mlxsw 새로운 기능 적용 : layer 2 / layer 3, tunnel에서 패킷 드롭 모니터링 가능, LLDP에이전트를사용한 기본포트 우선순위 구성 가능, ETS / TBF대기열 규칙 오프로딩 지원 6. lshw 결과에서 cpu version 필드가 세부적으로 출력 7. .NET 5 사용 가능 2. #### 주요 변경사항 1. 패키지 변경사항 1. rsyslog와 elasticsearch 연동 가능 2. podman 컨테이너 이미지 url 변경 (k8s.gcr.io/pause) 3. podman 업데이트 1. docker 호환볼륨 API 사용 가능(create, inspectm list, remove, prune) 2. podman play kube를 사용해 컨테이너에 cpu / 메모리 제한설정 가능, 영구 볼륨 클레임, k8s configmap 지원 가능 3. podman image 명령어를 사용해서 이미지를 읽기 전용으로 마운트 후 내용 검사 확인 가능 4. podman save / load를 사용해서 이미지 아카이빙 및 로드 가능 5. podman 네트워크 오류로 인해 image pull fail되는 경우 최대 3번까지 재시작 수행함 4. Buildah 업데이트 1. buildah inspect 명령어를 통해 manifests 지원 2. buildah push 명령어 지원 가능 3. 사용자가 stdin을 특정 컨테이너에 지정 가능 4. timestamp대신에 omit-timestamp로 플래그 변경 5. 마운트 옵션시 ro 기능 추가 5. SKopeo 업데이트 1. 동기화된 dijest 추가 2. 동기화 플래그 추가 : --all 3. skopeo inspect 명령어에 --format 옵션 추가 6. 설치 절차 변경 1. 설치 시작전에 root 암호 및 계정 생성 절차로 변경 7. image builder 이미지 변경 1. osbuild-compose에서 osbuild-composer로 변경 : tar / qcow2 / vmdk / ami / vhd / qcow2 2. 단, ext4, 파티션 구성된 디스크, alibaba cloud / GCE는 제외) 8. Mmcached 업데이트 1. TLS 활성화 2. inline\_ascii\_response옵션 제거 9. NetworkManager 버전업데이트 1. 장치 비활성화시 link aggreation 초기화 2. 모든 NIC가 연결되지 않으면 wifi프로필이 자동 실행 3. VRF(Virtual Route Forwading) 지원 추가 10. LVM에서 VDO 볼륨 관리 1. LVM구성시 VDO(Virtual Data Optimizer)유형 지원 2. VDO는 block 수준의 중복제거, 압축, thin provisioning 게농 11. LVM에서 메타데이터 디버그 적용 1. 메타데이터 추출시 pvck --dump / 복구시 pvck --repair 명령을 통해 메타 데이터 관리 2. LVM RAID구성에서 무결성 추가 12. Public Cloud에서 GFS2지원가능 1. AWS / Azure / 알리바바 클라우드에서 공유 블록장치 지원 13. NFS 동시연결 가능 1. nconnect 기능을 사용해 NFS동시에 멀티 동시 연결이 가능 (최대 16개) 14. samba 기능 변경 1. 내장 암호화 기능이 GnuTLS로 대체 (SMB3) 성능과 복사속도 향상 2. python 3.5 이상만 지원 3. write cache size 파라미터 제거 (성능저하) 4. vfs\_netatalk 모듈 제거 15. XWayland에서 디스플레이 확장 활성 1. Xpresent를 사용해서 디스플레이 확장기능 향상 16. virsh 기능 추가 1. iothreadset 기능 추가해서 동적으로 I/O쓰레드 폴링을 구성 2. guestinfo 기능 추가해서 OS및 파일시스템 정보, 활성사용자, 시간대 정보 확인 가능 ```shell VM XML에 아래내용ㅣ 추가되어 있어야 함     ```
3. pool-capabilities 기능 추가해서 각 pool내의 스토리지 볼륨과 풀 생성하는데 확인할 수 있는 정보 표시 17. UMIP(User-Mode Instruction Prevention) 기능은 Intel 10세대 (Ice Lake)에서 지원 18. libvirt라이브러리 개선 1. 메모리 대역폭 할당을 지원 <memorytune> 항목 추가 2. Broadwell에서 제공하는 CQE(Cache QoS Enforcement)확장인 MBA를 사용 19. qemu 로깅 포맷 추가 1. qemu이벤트에 timestamp 추가 2. /var/log/libvirt/qemu 디렉토리에 저장된 로그를 사용하여 VM문제 확인 가능 20. stdvga장치보다 더 안전한 boch장치 적용 1. bochs-display와 호환되는 모든VM은 stdvga보다 boch 디스플레이를 기본으로 사용 21. RADOS 블록장비에서 QCOW2디스크 이미지 생성 가능 (Write성능은 떨어짐) 22. VFIO를 사용하는 PCI 디바이스 갯수가 최대 64개까지 증가 23. Windows 드라이버 업데이트 가능 1. QEMU기반에서 SMBIOS를 통해 Virtio드라이버 업데이트 가능 2. Windows 10이상, Windows Server 2016이상 2. 커널 파라미터 1. Crash kernel 메모리 용량 확장 1. crashkernel=auto 적용시 기존보다 더 많은 메모리를 예약해서 crash dump 수행 가능 2. eBPF(Extended Berkeley Packet Filter; 제한된 기능의 샌드박스환경의 커널에서 코드 실행을 허용하는 커널 내부의 가상머신) 기능 제공 1. BPF Compile Collection(BCC) : 네트워킹을 사용하는 OS 모니터링, I/O 분석도구 제공 2. BCC Tool Package 제공 3. Traffic Control eBPF : 커널 네트워크 경로의 내부 프로그래밍이 패킷처리 3. 새로운 파라미터 추가 1. acpi\_no\_watchdog=\[HW,ACPI,WDT\] 해당값 사용시 ACPI(고급 구성 및 전원 인터페이스) 기반의 WDAT(워치독 인터페이스)를 무시하고 native 드라이버가 워치독 장치 제어 2. split\_lock\_detect=\[X86\] 분할 잠금 감지 활성화 (하드웨어 지원시 캐싱 된 데이터를 넘어 액세스 하는 경우 해당 명령은 저열 검사 예외처리) off - 활성화하지 않음 warn - 응용프로그램에 대해 속도 제한 경고 signal 보냄 (기본값) fatal - 응용프로그램에 대해 SIGBUS 신호 발생 3. usbcore.authorized\_default=\[USB\] USB장치 인증 -1 : 무선 USB를 제외한 인증 (기본값) -2 : 승인되지 않음 1 : 승인 2 : 장치에 내부 포트에 연결되어 있는 경우에만 인증 3. 클러스터 구성 1. pacemaker 구성시 prioity-fencing-delay 속성지원되어 split brain이 발생한 경우 리소스가 가장 적은 노드가 차단됨 2. 클러스터 리소스에 대그 지정 가능 3. fail-over수행시 대상장비는 완전히 중지하지 않고 읽기 전용모드 기능으로 전환 4. 버그 수정 1. firewald 서비스 중지시 ipsets 정보가 초기화되지 않는 문제 수정 2. entropy 부족으로 부팅되지 시간 초과 혹은 느린 부팅시간 수정 3. nouveau 그래픽 드라이버가 절전모드 진입 후 전원이 켜지지 않는 문제 수정 3. #### 주요 버전업데이트 / 추가된 패키지 리스트
패키지명
버전정보
tuning2.13
nginx1.18
node.js14
perl5.30
php7.4
ruby2.7
git2.27
Squid4.11
GCC Toolset10
LLVM Toolset10.0.1
Rust Toolset1.45.2
GO Toolset1.14.7
OpenJDK11
Podman2.1
Buildah1.19
SKopeo1.2.1
memcached1.5.22
libssh-lib0.9.4
NetworkManager1.26.0
pacemaker2.0.4
grafana6.7.3
samba4.12.3
Cockpit4
TigerVNC1.10.1
3. #### **드라이버 변경사항** 1. #### 추가된 드라이버
드라이버 종류
모델명
네트워크Mellanox ConnectX-6
네트워크Kvaser CAN/USB 용 CAN드라이버
네트워크Theobroma System UCAN 드라이버
네트워크Pensando NIC 드라이버
그래픽+기타원격 프로세서 프레임 워크
그래픽+기타Intel 340x 드라이버
그래픽+기타Radeon RX5300
그래픽+기타Rizen3 4300U / 4500U / 4600U(H) / 4700U / 4800U(H)
그래픽+기타AMD 애슬론 실버 3050U / 골드 3150U / Rizen3 3250U
그래픽+기타Intel Tiger Lake GPU
그래픽+기타virtio 장치용 vDPA드라이버
2. #### 업데이트 드라이버
드라이버 종류
업데이트 버전
megaraid\_sas07.713.01.00-RC1
VMware vmxnet31.5.0.0-k
Realtek RTL8152/8153 USB드라이버1.09.10
Broadcom BCM573XX1.10.1
인텔 이더넷 스위치 호스트0.27.1-ㅏ
인텔 이더넷 E800 시리즈0.8.2-ㅏ
Emulex LightPulse Fibre Channel SCSI0.12.8.0.1
LSI MPT Fusion SAS 3.034.100.00.00
HP Smart Array Controller3.4.20-170-RH5
QLosic Fibre HBA10.01.00.25.08.3-k
Broadcom MegaRAID SAS07.714.04.00-rh1
VMware SVGA 2.17.0.0
#### *reference* - *[https://access.redhat.com/documentation/en-us/red\_hat\_enterprise\_linux/8/html-single/8.3\_release\_notes/index](https://access.redhat.com/documentation/en-us/red_hat_enterprise_linux/8/html-single/8.3_release_notes/index)* # RHEL/Centos 8.4 Release Note RHEL / Centos 8.4출시에 따른 릴리즈 노트 확인 프리뷰를 포함한 전체 내용을 기재하진 않았고, 주로 사용하는 하는 기능 및 패키지 정보들에 한해 작성 1. #### **릴리즈 정보**
출시일자
커널버전
21.44.18.0-305
2. #### **주요변경사항** 1. #### 새로운 기능 1. nmstate 패키지를 통해 네트워크 설정 가능 2. iproute2 명령어를 이용해 traffic control(tc)에서 제공하는 mac\_push, push\_eth, pop\_eth 에 이더넷 헤더를 만들거나 삭제 기능 추가 3. cgoups를 통해 slab 메모리 활용을 개선하고, 메모리 계정을 페이징수준에서 개체 수준으로 전환하여 커널이 점유하는 메모리 공간 감소 가능 4. 사전 압축 기능이 적용되어 정기적으로 메모리 압축작업을 수행하게 되어 특정 메모리의 할당시간이 빨라짐 (기본값은 OFF) 5. Intel CPU 8세대(커피레이크), 9세대(커피레이크 리프레쉬)에 설정된 EDAC을 지원 6. pacemaker 에이전트에서 장애를 감지한 경우 interval과 상관없이 장애로 판단하고, 각 작업별 health check를 호출하지 않아 오버헤드 감소 7. virtio\_balloon 장치를 사용하는 경우 VM에서 사용하지 않는 메모리 페이지 반환 가능 2. #### 주요 변경사항 1. 패키지 변경사항 1. NetworkManager 기능추가 1. ipv4.dhcp-reject-servers 파라미터 추가 : ip release시 거부하기 위한 값 2. active\_slave옵션사용 불가, primary 컨트롤러에서 옵션을 설정 3. NetworkManager-wait-online 시간초과시간을 60초로 변경 4. ethtool 오프로드 기능 추가 2. 성능관련 1. perf Toolset에서 timestamp기록 및 표시 2. Cockpit 번역률 증가 - 번역 가능한 문자열이 50% 미만인 경우 영문으로 출력 3. 파일 / 스토리지 1. Swap파티션 구성시 128GB → 16TiB까지 생성 가능 2. NVMe 장치의 hot swap 지원 3. XFS / EXT4 마운트시 dax 옵션 추가 1. dax=inode : 기본값 2. dax=never : dax 비활성 3. dax=always : dax 활성화 2. 커널 파라미터 1. eBPF(Extended Berkeley Packet Filter; 제한된 기능의 샌드박스환경의 커널에서 코드 실행을 허용하는 커널 내부의 가상머신) 기능 제공 1. BPF Compile Collection(BCC) : 네트워킹을 사용하는 OS 모니터링, I/O 분석도구 제공 2. BCC Tool Package 제공 3. Traffic Control eBPF : 커널 네트워크 경로의 내부 프로그래밍이 패킷처리 3. 드라이버 지원 1. igc(인텔 2.5G NIC 드라이버) 정식 지원 4. 버그 수정 1. snmpbulket - 존재하지 않는 pid에 대해 결과를 찾을수 없다는 출력과 실패메시지 제공 2. cron - ReaR(Relax and Recovery)구성이 잘못된 경우 Cron명령이 관리자에게 이메일 발송해서 트리거링, ReaR 구성이 수행되지 않은 경우에도 관리자는 이메일 수신하게 되는데 트리커 조건에 따라 이메일이 전송되도록 수정 3. OpenSCAP - 적은용량의 RAM환경에서 파일 시스템 검사할때 메모리 점유율이 부족해지는 문제 해소 4. NetworkManager - /etc/hostname이 설정되어 있지 않은 경우 기본경로가 있는 NIC를 통해서만 DNS조회해서 호스트네임 확인수행 하는데 사용가능한 모든 NIC를 통해서 호스트네임을 확인하도록 수정 5. pmlogger과 NetworkManager의 충돌로 인해 pmlogger가 구동되어 있는 경우 NetworkManager가 구동되지 않는 문제 수정 6. Container - 컨테이너내의 I/O 혹은 메모리 제한이 적용되는 경우 메모리 회수작업시 lock-up 발생, OOM이 여러번 종료되어 컨테이너가 잠기고 hanup발생하게 되는 문제 수정 7. Memory - 처음에는 정상이였으나 이휴에 오프라인으로 인식된 메모리에 엑세스 할 경우 커널 패닉이 발생하는 문제 수정 8. SMB - 마운트 옵션시 cifsacl 옵션을 사용하는 경우 EREMOTE오류로 인해 마운트 실패 오류 수정 9. NFS - 100,000개 이상의 파일이 있는 디렉토리 리스트 나열시 완료되지 않는 문제 수정 10. Corosync - 기본토큰 timeout이 1초에서 3초로 변경 11. Virtualization - Windows Server 2019호스트에서 RHEL8게스트 연결속도 지연되는 문제 수정 12. Wayland - 가상머신의 멀티 모니터 인식 가능 3. #### 주요 버전업데이트 / 추가된 패키지 리스트
패키지명
버전정보
python3.9
swig4.0
subversion1.14
redis6
postgresSQL13
Mariadb10.5
GCC Toolset10
LLVM Toolset11.0.0
Rust Toolset1.49.0
GO Toolset1.15.7
OpenJDK11
kabi\_whitlistkabi\_stablelist
3. #### **드라이버 변경사항** 1. #### 추가된 드라이버
드라이버 종류
모델명
네트워크Realtek 802.11ac (8822\*)
네트워크Interface for UDP Encapsulated traffic
그래픽 + 기타Regmap SoundWire
그래픽 + 기타Intel Quick Assist / Data Accelerator
그래픽 + 기타Oracle VM VirtualBox Graphics
그래픽 + 기타AMD Energy repotring
그래픽 + 기타Elastic Fabric Adapter
그래픽 + 기타AMD PIC-E Non-Transparent Bridge
그래픽 + 기타PCIe NTPB Performance Measurement Tool / Simple Pingpong Client / Debugging Tool)
그래픽 + 기타Software Queue-Pair Trsnport over NTB
그래픽 + 기타Intel Elkhart Lake PHC pinctrl/GPIO Driver
그래픽 + 기타Dell platform setting Control interface
2. #### 업데이트 드라이버
드라이버 종류
업데이트 버전
VMware SVGA drm2.18.0.0
Cisco FCoE HBA1.6.0.53
HP Smart Array Controller3.4.20-220-RH1
Emulex LightPulse Fibre Channel SCSI0.12.8.0.5
LSI MPT Fusion SAS 3.035.101.00.00
QLosic Fibre HBA10.02.00.104-k
HPE Watcgdig2.0.4
#### *reference* - *[https://access.redhat.com/documentation/en-us/red\_hat\_enterprise\_linux/8/html-single/8.4\_release\_notes/index](https://access.redhat.com/documentation/en-us/red_hat_enterprise_linux/8/html-single/8.4_release_notes/index)* # RHEL/Centos 8.5 Release Note RHEL 8.5출시에 따른 릴리즈 노트 확인 프리뷰를 포함한 전체 내용을 기재하진 않았고, 주로 사용하는 하는 기능 및 패키지 정보들에 한해 작성 1. #### **릴리즈 정보**
출시일자
커널버전
21.114.18.0-348
2. #### **주요변경사항** 1. #### 새로운 기능 1. NetworkManager(nmcli)를 통해서 트래픽 제어 가능 2. Timesync에서 NTS(Network Time Security)옵션 추가 3. UDF(Universal Disk Format) 파일시스템 조작을 위한 유틸리티 제공 (udftools 2.3) 1. cdrwtool → DVD-R, CD-R/RW등 미디어 쓰기 등의 작업수행 2. mkfs.udf, mkudffs → UUID(Univeral Disk Format) 파일시스템 생성 3. pktsetup → 패킷 장치 설정하고 해제 4. udfinfo → UDF 파일시스템 정보 표시 5. udflabel → 파일시스템 레이블 관리 6. wrudf → cp, rm, mkdir 등 대화형 쉘 제공 4. 지원 Intel CPU 지원 - Sapphire Rapids, Alder Lake, Rocket Lake 2. #### 주요 변경사항 1. 패키지 변경사항 1. ethtool에서 옵션 추가 1. TX / RX 버퍼를 관리하기 위한 ring 옵션 기능 추가 2. rx - 링 항목 수 변경 3. RX - jumby - Rx 점보 링의 링 항목수 변경 4. RX - mini - RX Mini 링의 링 항목수 변경 5. tx - tx링 항목 수 변경 2. VDO 사용시 볼륨크기를 퍼센트로 표시 1. LVM 볼륨 크기를 백분율로 표시하도록 표시 기능 추가 3. Ansible 버전 만료 1. Ansible 2.9이하버전은 미 지원 (2.9버전 이상사용 가능) 4. Cockpit 기능 추가 1. Cockpit을 이용해 VM상태, 디스크, 네트워크 정보 표기 2. 실시간 마이그레이션 기능 추가 3. VM NIC MAC주소 변집 가능 5. 컨테이터 관리 1. 오버레이 파일 시스템 지원이 되어 컨테이너를 rootless를 실행할때도 기본 오버레이 성능을 보유. 2. Podmna 컨테이너 이미지 제공 완성 (기존릴리즈는 프리뷰로 제공) 3. Podman rootless모드에서 CNI플러그인 사용 가능 2. 커널 파라미터 1. iommu.forcedac = 0 / 1 1. PCI 장치에 대한 입/출력 가상 주소 할당 제어 2. 0 → 필요한 경우 전체 범위로 대체하기 전에 DMA주소를 먼저 할당 3. 1 → 사용 가능한 전체 범위에서 직접 할당 2. page\_posion = off / on 1. 부팅시 버디 메모리 할당(가능한 적당하게 메모리 요청을 하도록 여러 부분을 나누는 알고리즘) 2. off = 기능해제 (기본값) 3. on = 기능 활성화 3. rcuscale.gp\_async\_max 1. 스레드당 최대 콜백수 지정, 초과하게 되는 경우 이전에 할당한 콜백이 드레이닝 될 수 있도록 호출 3. 버그 수정 1. /var/lib/chrony의 폴더 권한이 root및 chrony사용자에 대해서만 액세스 하도록 권한 변경 2. slab메모리 컨트롤러에서 slab당 메모리 회계 작업 빈도가 늘리고 있어 성능 저하 발생. 메모리 계정 작업이 최대한 많은 캐싱과 원자성 작업 하도록 간소화 3. BCC 유틸리티에서 macro redefined 경고 메시지 미출력 4. kdump는 ssh / NFS대상에서 vmcore 덤프 실패 문제 수정 5. AWS에서 ARM인스턴스에서 실행되는 VM을 RHEL8로 선택하는 경우 iommu.strict=1로 설정하는 경우 네트워크 성능이 지연 3. #### 주요 버전업데이트 / 추가된 패키지 리스트
패키지명
버전정보
Ruby3.0
nginx1.20
Node.js16
php7.4.19
squid4.15
rsyslog8.2102.0-5
OpenJDK1111.0.13
OpenJDK88.0.312
chrony4.1
NetworkManager1.32.10
Cmake3.20.2
Gcc11.2
podman3,3,1
3. #### **드라이버 변경사항** 1. #### 추가된 드라이버
드라이버 종류
모델명
네트워크SYNOPSYS DESIGNWARE Ethernet XPCS
네트워크INTEL 10/100/1000 이더넷 PCI
네트워크STMMAC 10/100/1000 Ethernet
네트워크Chelsio 종료 카드의 암호화 IPSEC
네트워크Chelsio NIC TLSD 드라이버
네트워크Microsoft Azure Network Adapter
네트워크Qualcomm Atheros 802.11ax 무선 LAN 카드를 위한 코어 모듈
네트워크Qualcomm Technologies 802.11ax WLAN PCIe
네트워크MAC ~ 선택 PY 연결
그래픽 + 기타In-Band ECC를 사용하는 Intel 클라이언트 SoC 용 MC
그래픽 + 기타RegmapPodWire MBQ 모듈
그래픽 + 기타Intel 플랫폼 모니터링 기술 PMT 드라이버
그래픽 + 기타Intel PMT Crashlog 드라이버
그래픽 + 기타sysfs 시스템용 sysfs 구조
그래픽 + 기타Intel PMT Telemetry Driver
그래픽 + 기타Intel PMT 클래스 Driver
그래픽 + 기타AMD PMC Driver
그래픽 + 기타MHI 호스트 인터페이스
그래픽 + 기타MHI(Modem Host Interface) PCI 컨트롤러 Driver
그래픽 + 기타블록 장치에 대한 vDPA 장치 시뮬레이션
그래픽 + 기타네트워킹 장치에 대한 vDPA 장치 시뮬레이터
그래픽 + 기타Mellanox VDPA 드라이버
그래픽 + 기타기본 STM framing 프로토콜
그래픽 + 기타MIPI SyS-T STM framing protocol driver
그래픽 + 기타QMI 인코딩/디코더 도우미
그래픽 + 기타ACPI DPTF 플랫폼 전원 드라이버
그래픽 + 기타ACPI 플랫폼 프로파일 sysfs 인터페이스
그래픽 + 기타Intel Emmitsburg PCH pinctrl/GPIO 드라이버
그래픽 + 기타Intel Alder Lake PCH pinctrl/GPIO 드라이버
그래픽 + 기타MPI3 스토리지 컨트롤러 장치 드라이버
그래픽 + 기타장치 매퍼 측정 서비스
2. #### 업데이트 드라이버
드라이버 종류
업데이트 버전
Mellanox 5세대 네트워크 어댑터18.0-348
Realtek RTL8152/RTL8153 기반 USB 이더넷 어댑터1.11.11
LSI MPT Fusion SAS 3.0 장치 드라이버37.101.00.00
Emulex LightPulse Fibre Channel SCSI 드라이버 0:12.8.0.10
Qlogic 파이버 채널 HBA 드라이버10.02.00.106-k
Microsemi Smart Family Controller2.1.8-045
Broadcom RAID SAS Driver07.717.02.00-rh1
#### *reference* - *[https://access.redhat.com/documentation/ko-kr/red\_hat\_enterprise\_linux/8/html/8.5\_release\_notes/index](https://access.redhat.com/documentation/ko-kr/red_hat_enterprise_linux/8/html/8.5_release_notes/index)* # RHEL/Centos 8.6 Release Note RHEL 8.5출시에 따른 릴리즈 노트 확인 프리뷰를 포함한 전체 내용을 기재하진 않았고, 주로 사용하는 하는 기능 및 패키지 정보들에 한해 작성 1. #### **릴리즈 정보**
출시일자
커널버전
22.054.18.0-372
2. #### **주요변경사항** 1. #### 새로운 기능 1. RHEL 9용 XFS이미지 사용 가능 2. HA기능 구현 1. 리소스 이동 (pcs resource move) 리소스 이동시 현재 실행중인 노드에서 실행되지 않도록 기능 구현 2. pacemkaer가 리소스를 실행할 수 없는 경우 자세한 종료 이슈 표시 3. 패키지 추가 1. nginx-mod-devel 패키지 추가되어 .NET용 외부 모듈을 빌드할때 필요한 파일 제공 2. Mariadb Galera에 garbd와 garbd-wrapper 스크립트 포함 4. 하드웨어 추가 1. Intel Alder Lake-P GPU 지원 (IntelCore i7-1260, 1270, 1280P, IntelCore i5-1240, 1250P, Intel Core i3 - 1220P) 2. 커널 파라미터 추가 필요(기본값은 비활성화)
3. 시스템 모니터링 및 이벤트 처리 유틸리티 제공 (rig) ``` i915.force_probe= PCI_ID ``` 2. #### 주요 변경사항 1. pcp 버전 업데이트 1. CPU 및 디스크 포화상태 규칙 추가 (pmieconf) 2. Nvidia GPU 메트릭 추가 3. Linux 커널 및 KV, 네트워킹 메트릭 추가 4. MongoDB 메트릭 에이전트 추가 2. Grafana 1. MS SQL 대시보드 추가 2. PCP 벡터값 추가 3. PCP Redis의 메트릭 이름을 반환하지 않는 문제 수정 3. Container 1. NFS스토리지 사용 가능 2. podman v3 이하버전에서 생성된 컨테이너는 podman 4.0에서 사용 불가. 4. VGA디스플레이 오류수정 1. Matrox MGA G200, VGA 컨트롤러가 연결된 디스플레이, 레거시 모드로 전환된 환경 에서 그래픽 출력시 표시되지 않는 문제 수정 3. #### 주요 버전업데이트 / 추가된 패키지 리스트
패키지명
버전정보
php8.0
perl5.32
GCC Toolset11
LLVM toolset13.0.1
javajava-1.8.0 java-11 java-17
bind9.16
audit3.0.7
pcp5.3.5
grafana7.5.11
grafana-pcp3.2.0
container-tools4.0
### *reference* - *[https://access.redhat.com/documentation/ko-kr/red\_hat\_enterprise\_linux/8/html/8.6\_release\_notes/index](https://access.redhat.com/documentation/ko-kr/red_hat_enterprise_linux/8/html/8.6_release_notes/index)* # RHEL8 기본소개 1. ### OS종류별 테스트 의견 1. Oracle / Rocky / Alma 3종 모두 RHEL의 Fork버전의 OS로 대부분 비슷한 기능을 구현하고 있음 2. 단, Oralce의 경우 자체 개발한 UEK커널을 사용하고 있는데, 수동으로 커널 드라이브에 올려야 하는 경우(ex. drbd / vdo) 커널 모듈에 올라가지 못하는 이슈가 있음 3. docoker-compose기반으로 container를 사용할 경우 AWX의 구동 제약조건 확인. 2. #### 하드웨어 최대 인식 용량 1. cpu / 메모리 정보
RHEL6 (x86_64)
RHEL7
RHEL8
cpu (core / Thread)448768768
최대 지원 메모리12TB12TB (7.2이상)24TB
최소 요구 메모리1GB(cpu당 1GB필요)1GB(cpu당 1GB필요)1.5GB(cpu당 1.5GB필요)
2. 디스크 용량
RHEL6 (x86_64)
RHEL7
RHEL8
최소 디스크 용량1GB10GB10G
권장 디스크 용량5GB20GB20G
3. 파일시스템별 용량 1. EXT3
RHEL6 (x86_64)
RHEL7
RHEL8
최대 파일크기2TB2TB2TB
최대 파일시스템 크기16TB16TB16TB
최대 생성 디렉토리 수320003200032000
최대 심볼릭링크 크기888
2. EXT4
RHEL6 (x86_64)
RHEL7
RHEL8
최대 파일크기16TB16TB16TB
최대 파일시스템 크기50TB50TB50TB
최대 생성 디렉토리 수650006500065000
최대 심볼릭링크 크기888
3. XFS
RHEL6 (x86_64)
RHEL7
RHEL8
최대 파일크기100TB500TB8EB
최대 파일시스템 크기300TB500TB1PB
최대 생성 디렉토리 수무제한무제한무제한
최대 심볼릭링크 크기888
4. 최대 부트 크기
RHEL6 (x86_64)
RHEL7
RHEL8
BIOS2TB2TB2TB
UEFI16TB50TB8EB
5. 커널 및 OS기능
RHEL6 (x86_64)
RHEL7
RHEL8
커널버전2.6.32 ~ 2.6.343.14.18
GCC4.44.8.28.2.1
GraphicX.org 7.4X.org 7.7Wayland 1.15
3. 확인된 주요 변경사항 1. OS 영역 1. tcp wrapper를 사용하지 않기 때문에 /etc/hosts.allow, /etc/hosts.deny 정책이 없음 2. NetworkManager기반으로 네트워크 사용 (network script 사용하지 않고, 네트워크 설정시 nmcli, nmtui를 사용해서 네트워크 구성) NIC 이중화 구성은 nmcli를 통해서 team, bond 드라이브 구현이 가능한데, RHEL9버전에서는 Team을 사용하지 않기 때문에 8버전에서도 bond구성 3. selinux on/off를 커널 파라미터로 조정 (파일내용으로 조정시 부팅과정에서 memory leak 가능성 존재) ```shell $> grubby --update-kernel ALL --args selinux=0 ```
4. 기본적으로 설치되는 container 런타임은 podman으로 구성 5. 기본적으로 rsyslog에 elasticsearch 연동 6. VDO 볼륨관리 지원 (중복제거, 압축 기능이 포함된 스토리지 기능, Oracle linux에서는 제공안함) 2. 네트워크 설정 1. NIC이름을 ethX로 일괄 설정 방법 ```shell $> grubby --update-kernel ALL --args net.ifnames=0 $> cat /etc/default/grub ... GRUB_CMDLINE_LINUX="resume=UUID=da0bac52-eef8-413d-ba2b-904962752f57 rhgb quiet net.ifnames=0" ... ```
2. nmcli기반으로 본딩 구성 ```shell #1. NIC 연결상태 확인 $> nmcli device status DEVICE  TYPE      STATE          CONNECTION eth0    ethernet  연결됨         eth0 eth1    ethernet  연결됨         eth1 lo      loopback  관리되지 않음  --   #2. 본딩 구성하기 (bond NIC이름 설정하고 네트워크 정보 설정) $> nmcli connection add type bond con-name bond0 ifname bond0 bond.options "mode=1,miimon=100" $> nmcli connection mod bond0 ipv4.addresses 192.168.10.100/24 $> nmcli connection mod bond0 ipv4.gateway 192.168.10.1 $> nmcli connection mod bond0 ipv4.method manual $> nmcli connection mod bond0 ipv6.method disabled    #eth0과 eth1을 본딩 맴버용 NIC 추가 $> nmcli connection add type ethernet con-name eth0 ifname eth0 master bond0 $> nmcli connection add type ethernet con-name eth1 ifname eth1 master bond0    #본딩 NIC 활성화 $> nmcli connection up bond0   #본딩 모드 변경 $> nmcli connection mod bond0 +bond.options "mode=0,miimon=100" $> nmcli connection up bond0 ```
3. nmcli로 네임서버 설정 ``` $> nmcli connection modify eth0 ipv4.dns "8.8.8.8,219.250.36.130" $> nmcli connection up eth0 $> cat /etc/resolv.conf # Generated by NetworkManager nameserver 8.8.8.8 nameserver 219.250.36.130 ```
3. 가상화 / 컨테이너관련 1. GuestOS 사용할때 Spice를 사용하지 않고, VNC 권장 2. 컨테이너 레지스트리(skopeo / container, podman 기능 추가, 8.2 이상 지원) 3. Intel cpu 10세대 (코멧레이크지원, 8.2 이상 지원) 4. S/W 1. Graphic 드라이버가 Xorg → Wayland로 변경 2. Wayland 비활성화 (서버 재부팅 혹은 세션 로그아웃 필요) ```shell $> vi /etc/gdm/custom.conf ... WaylandEnable=false ... ```
3. GCC 업데이트되어 nginx 1.14 설치 불가 4. Wayland 다중모니터 인식 가능(8.4 이상 지원) # RHEL8계열의 root 패스워드 초기화절차 RHEL8계열 Root패스워드 초기화 절차 1. 장비 부팅할때 grub화면이 출력회면 e키를 눌러서 부팅과정 중지 2. 부팅하는 커널 버전 선택 후 e 눌러서 편집모드 3. linux로 시작하는 행의 맨 끝으로 이동 후 rd.break 문자열 입력 -> Ctrl + x키 눌러서 부팅 4. Emergency mode 진입 5. write모드로 마운트 후 root 패스워드 패스워드 설정 6. 패스워드 설정절차 ```shell $> mount -o remount,rw /sysroot $> chroot /sysroot $> passwd ```
패스워드 입력 2회 \# selinux를 사용할 경우 레이블 변경 프로세스 설정
```shell $> touch /.autolabel $> exit $> exit ```
# RHEL8에서 selinux OFF하는방법 기존에는 /etc/selinux/config에서 SELINUX=disabled로 설정했는데 RHEL8에서 해당 파일로 변경시 부팅과정 중에 memory leak이 발생할 수 있어 다른 방법으로 변경하라고 합니다. 1. 기존 절차 ```shell $> cat /etc/selinux/config # This file controls the state of SELinux on the system. # SELINUX= can take one of these three values: # enforcing - SELinux security policy is enforced. # permissive - SELinux prints warnings instead of enforcing. # disabled - No SELinux policy is loaded. SELINUX=enforcing # SELINUXTYPE= can take one of these three values: # targeted - Targeted processes are protected, # minimum - Modification of targeted policy. Only selected processes are protected. # mls - Multi Level Security protection. SELINUXTYPE=targeted ``` 1. 변경절차 (커널 파라미터에서 selinux를 off하도록 설정 ```shell $> grubby --update-kernel ALL --args selinux=0 $> cat /etc/default/grub ... GRUB_CMDLINE_LINUX="resume=123 rhgb quiet selinux=0" ``` 시스템 반영을 위해 재부팅 필요. # RHEL환경에서 ssh 접속시 locale warning 메시지 출력시 조치사항 1. RHEL8 버전에서 ssh접속시 아래내용으로 setlocale 메시지가 출력하는 경우 해당서버에 필요한 언어팩이 없어서 발생한 것. ```shell Last login: Tue Sep 28 15:36:49 2021 from 192.168.0.10 -bash: warning: setlocale: LC_ALL: cannot change locale (en_US.utf-8) /bin/sh: warning: setlocale: LC_ALL: cannot change locale (en_US.utf-8) /bin/sh: warning: setlocale: LC_ALL: cannot change locale (en_US.utf-8) /bin/sh: warning: setlocale: LC_ALL: cannot change locale (en_US.utf-8) ``` 2. 조치사항 ```shell $> yum install glibc-langpack-en -y Failed to set locale, defaulting to C.UTF-8 Last metadata expiration check: 1:14:53 ago on Tue Sep 28 14:35:14 2021. Dependencies resolved. ===========================================================================================================================================================================================================  Package                                                Architecture                                Version                                              Repository                                   Size =========================================================================================================================================================================================================== Installing:  glibc-langpack-en                                      x86_64                                      2.28-151.el8                                         baseos                                      825 k Transaction Summary =========================================================================================================================================================================================================== Install  1 Package Total download size: 825 k Installed size: 6.0 M Downloading Packages: glibc-langpack-en-2.28-151.el8.x86_64.rpm                                                                                                                                  8.0 MB/s | 825 kB     00:00 ----------------------------------------------------------------------------------------------------------------------------------------------------------------------------------------------------------- Total                                                                                                                                                                      2.2 MB/s | 825 kB     00:00 Running transaction check Transaction check succeeded. Running transaction test Transaction test succeeded. Running transaction   Preparing        :                                                                                                                                                                                   1/1   Installing       : glibc-langpack-en-2.28-151.el8.x86_64                                                                                                                                             1/1   Running scriptlet: glibc-langpack-en-2.28-151.el8.x86_64                                                                                                                                             1/1   Verifying        : glibc-langpack-en-2.28-151.el8.x86_64                                                                                                                                             1/1 Installed:   glibc-langpack-en-2.28-151.el8.x86_64 Complete! ``` # RockyLinux OS설치 절차 1. Rockylinux8버전에 대해 GUI기반의 OS설치 절차확인 2. 지원 H/W 1. AMD 및 x86서버에서 설치가 가능하며, 32bit는 제공되지 않음 3. 최소 파티션 용량 1. /boot : 커널버전별로 약 60MB(kdump 활성화시 +40MB)추가 2. /var: 최소 3GB 이상 ~ 3. /usr: 최소10GB 이상 ~ 4. NVDIMM(Non-Volatile Dual In-line Memory Module)을 스토리지로 사용시 제약사항 1. RHEL 7.6 이상 제공 가능 2. 부팅 장치로 사용시 UEFI를 사용해야 함 5. 설치 절차 1. Install Rocky Linux~로 시작하는 메뉴 선택 2. 언어 선택 : 한국어 3. 설치 요약 [![image.png](http://igoni.kr/uploads/images/gallery/2024-03/scaled-1680-/4YYimage.png)](http://igoni.kr/uploads/images/gallery/2024-03/4YYimage.png) 4. 소프트웨어 → 소프트웨어 선택 [![image.png](http://igoni.kr/uploads/images/gallery/2024-03/scaled-1680-/Yvbimage.png)](http://igoni.kr/uploads/images/gallery/2024-03/Yvbimage.png) 1. 기본환경 : 서버 2. 추가소프트웨어: 개발용 툴 5. 디스크 파티션 용량 설정 1. 시스템 → 설치 목적지 선택 후 OS설치할 디스크 선택 [![image.png](http://igoni.kr/uploads/images/gallery/2024-03/scaled-1680-/DVGimage.png)](http://igoni.kr/uploads/images/gallery/2024-03/DVGimage.png) 6. 기타 설정 1. Kdump 활성화 (용량은 자동으로 설정) 2. 보안정책 미사용 3. root 비밀번호 입력 # Bash 임의코드 실행 취약점 보안업데이트 Bash 보안업데이트하세요~~ 1. 취약내용 : 공격자가 Bash를 사용하여 구현된 기능을 악용하여 임의의 코드를 실행시킬수 있으므로 업데이트 권고 2. 대상 : GNU Bash를 사용하는 서버 (RHEL계열 4이하 버전은 지원이 끝났기 때문에 업데이트 불가능합니다.) 3. RHEL4이하버전은 yum으로 업데이트 불가하고, 대신에 수동으로 패치를 진행해야 합니다. 4. Bash는 리눅스에서 기본으로 사용하고 있는 쉘이기 때문에 대부분 업데이트를 진행하셔야 할것 같습니다. 패치작업 진행 1. 취약점 대상 시스템 여부 ```shell [root@localhost ~]# env x='() { :;}; echo vulnerable' bash -c "echo this is a test" vulnerable this is a test (vulnerable메시지가 출력되면 업데이트가 필요한 버전입니다.) ``` 2. 보안업데이트 방법 ```shell [root@localhost ~]# yum update bash -y ``` 3. 조치완료여부 확인 ```shell [root@localhost ~]# env x='() { :;}; echo vulnerable' bash -c "echo this is a test"  this is a test ``` 4. bash업데이트 이후 서비스의 재시작/재부팅은 필요없으나, 재시작이 필요한 서비스를 확인하고 싶으면 명령어 실행 ```shell [root@localhost ~]# grep -l -z '[^)]=() {' /proc/[1-9]*/environ | cut -d/ -f3 ``` *Reference* - [https://rhn.redhat.com/errata/RHSA-2014-1293.html](https://rhn.redhat.com/errata/RHSA-2014-1293.html) - *[https://access.redhat.com/articles/1200223////](https://access.redhat.com/articles/1200223////)* # centos bonding Active 인터페이스 변경 Bonding이 설정된 환경에서 Active 인터페이스 변경방법 1. eth0으로 통신이 되어야 하는데 eth1로 통신되고 있어서 eth0으로 원복하기를 원함 ```shell [root@localhost ~]# cat /proc/net/bonding/bond0 Ethernet Channel Bonding Driver: v3.7.1 (April 27, 2011) Bonding Mode: fault-tolerance (active-backup) Primary Slave: None Currently Active Slave: eth1 MII Status: up MII Polling Interval (ms): 100 Up Delay (ms): 0 Down Delay (ms): 0 Slave Interface: eth0 MII Status: up Speed: 1000 Mbps Duplex: full Link Failure Count: 0 Permanent HW addr: 00:00:00:00:00:00 Slave queue ID: 0 Slave Interface: eth1 MII Status: up Speed: 1000 Mbps Duplex: full Link Failure Count: 0 Permanent HW addr: 00:00:00:00:00:01 Slave queue ID: 0 ``` 2. bond0활성화된 인터페이스 바꾸기 eth1 -> eth0 ```shell [root@localhost ~]# ifenslave -c bond0 eth0 [root@localhost ~]# cat /proc/net/bonding/bond0 Ethernet Channel Bonding Driver: v3.7.1 (April 27, 2011) Bonding Mode: fault-tolerance (active-backup) Primary Slave: None Currently Active Slave: eth0 MII Status: up MII Polling Interval (ms): 100 Up Delay (ms): 0 Down Delay (ms): 0 Slave Interface: eth0 MII Status: up Speed: 1000 Mbps Duplex: full Link Failure Count: 0 Permanent HW addr: 00:00:00:00:00:00 Slave queue ID: 0 Slave Interface: eth1 MII Status: up Speed: 1000 Mbps Duplex: full Link Failure Count: 0 Permanent HW addr: 00:00:00:00:00:01 Slave queue ID: 0 ``` # Centos UUID확인방법 1. disk uuid 값 확인 법 ```shell $> ls -l /dev/disk/by-uuid $> blkid ``` 2. UUID생성명령어 ``` $> uuidgen 1234-5678-9010 ``` 3. 생성된UUID변경 ```shell $> tune2fs /dev/sda1 -U ****** ``` # centos기반에서 사용자 세션 킬 방법 1. 특정 계정명 강제로 아웃시키기
\#연결된 세션 중 계정명이 gogo인 계정 아숫
```shell $ skill -KILL gogo ```
2. 특정 터미널에 연결된 사용자 강제 아웃
\# pts/10 터미널에 연결된 세션 아웃
```shell $ skill -KILL -v pts/10 ```
# Centos에서 본딩구성하기 ### 시작하는말 안녕하세요, 고니입니다. 기존에 작성했던 컨텐츠들 업데이트를 하면서 문서의 리팩토링(Refactoring)을 진행해보려고 합니다. ### Bonding 소개 여려개의 NIC를 논리적인 NIC로 묶어서 대역폭을 확장하거나 Active/Standby 형태로 가용성을 보장하기 위해 사용하는 기술이고 가상화환경에 올라간 VM이나 Public Cloud환경에서는 대부분 사용할 필요는 없으나, Bare-metal환경에서는 아직 유용하게 활용되고 있는 방법입니다. 1. #### Bonding 구성
**모드****방 식**
0 - Balance-Round robin - 설정된 모든 NIC가 활성화가 되어 NIC별로 순차적으로 데이터를 전송하는 방식 - 장점 : 모든 NIC의 대역폭을 합산하기 때문에 높은 대역폭을 유지, - 단점 : NIC의 link상태를 고려하는 방식은 없기 때문에 특정 NIC의 링크가 끊어진 경우 패킷손실 가능성이 존재합니다
1 - Active-Standby - 하나의 NIC가 활성화, 나머지는 Standby로 구성되어 데이터를 전송하는 방식 - 장점 : 높은 고가용성을 보장 - 단점 : 하나의 NIC만 활성화가 되기 때문에 네트워크 대역폭이 증가하진 않습니다.
2 - balance-xor - 기본적인 데이터 전송은 Bonding mode 0과 비슷하지만 xor연산을 이용해 특정 해시 알고리즘을 사용하여 링크에 분산시키는 방식 - bonding mode 0과 동일한 장/단점을 지니고 있습니다.
3 - broadcast - 모든 트래픽을 모든 NIC로 전송하는 방식입니다. - 장점 : 특정 NIC가 Down되어도 활성화된 NIC에서 데이터 전송을 할 수 있기 때문에 높은 고가용성 보장 - 단점 : 동일한 데이터의 중복전송이 이루어지기 때문에 높은 네트워크 비용이 발생할 수 있습니다.
4 - 802.3ad, LACP(Link Aggregation Control Protocol)를 사용하여 NIC를 묶고, 트래픽을 분산합니다. - 장점 : 높은 고가용성을 제공하여, 링크상태를 감지하여 조절합니다. - 단점 : LACP를 지원하는 Switch장비가 필요합니다. (Switch장비에서 논리적으로 Group으로 구성이 필요합니다)
### Bonding 구성하기
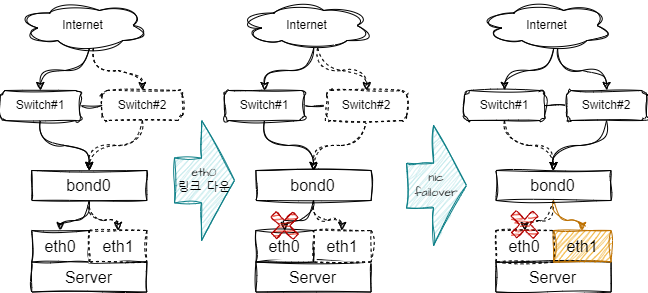
- Bonding Mode 1(Active / Standby)로 구성 - Active NIC : eth0, Standby NIC : eth1, Bond NIC : bond0
1. 커널에 boding module 인식 확인 ```bash # 본딩정보 커널 인식 $> modprobe bonding # 본딩정보 확인 $ lsmod  | grep bond bonding               152979  0 ``` 2. eth0에 본딩 선언 ```bash $> vi /etc/sysconfig/network-scripts/ifcfg-eth0 DEVICE=eth0 ONBOOT=yes MASTER=bond0 SLAVE=yes USERCTL=no BOOTPROTO=none ``` 3. eth1에 본딩 선언 ```bash $> vi /etc/sysconfig/network-scripts/ifcfg-eth1 DEVICE=eth1 ONBOOT=yes MASTER=bond0 SLAVE=yes USERCTL=no BOOTPROTO=none ``` 4. 본딩 NIC 설정 ```bash $> vi /etc/sysconfig/network-scripts/ifcfg-bond0 DEVICE=bond0 BOOTPROTO=static ONBOOT=yes IPV6INIT=no IPADDR=192.168.10.221 NETMASK=255.255.255.0 BONDING_OPTS="mode=1 miimon=100" #mode값을 원하는 값으로 변경하면 됨. ``` 5. 네트워크 서비스 재시작 ```bash $> systemctl restart network (Centos7 이상 버전인 경우 사용) $> /etc/init.d/network restart (Centos 6이하 버전인 경우에만 사용) ``` 6. 본딩구성정보 확인 ```bash $> cat /proc/net/bonding/bond0 Ethernet Channel Bonding Driver: v3.1.2 (January 20, 2007) Bonding Mode: fault-tolerance (active-backup) Primary Slave: None Currently Active Slave: eth0 MII Status: up MII Polling Interval (ms): 80 Up Delay (ms): 0 Down Delay (ms): 0 Slave Interface: eth0 MII Status: up Link Failure Count: 0 Permanent HW addr: 00:XX:XX:XX:XX:c2 Slave Interface: eth1 MII Status: up Link Failure Count: 0 Permanent HW addr: 00:XX:XX:XX:XX:c4 ``` ### *Reference* - *[https://access.redhat.com/documentation/ko-kr/red\_hat\_enterprise\_linux/6/html/deployment\_guide/s2-networkscripts-interfaces-chan](https://access.redhat.com/documentation/ko-kr/red_hat_enterprise_linux/6/html/deployment_guide/s2-networkscripts-interfaces-chan)* # centos에서 NIC 브릿지 인터페이스 구성 Bridge는 두개의 Network을 하나처럼 쓸때 사용하고 Linux머신에서 두개의 NIC가 꽂혀 있을 때 다음과 같이 설정한다. 두개의 NIC를 eth0, eth1로 구성되어 있고 br0라는 bridge를 만든다.
1. Bridge Device 생성 ```shell # vi /etc/sysconfig/network-script/ifcfg-br0 DEVICE=br0 ONBOOT=on TYPE=Bridge BOOTPROTO=static IPADDR=192.168.1.2 NETMASK=255.255.255.0 USRCTL=no ``` 2. 물리 Device 설정
\#eth0 브릿지 설정
```shell $ vi /etc/sysconfig/network-script/ifcfg-eth1 DEVICE=eth1 ONBOOT=yes BOOTPROTO=none BRIDGE=br0 USRCTL=no ```
\#eth1 브릿지 설정
```shell $ vi /etc/sysconfig/network-script/ifcfg-eth1 DEVICE=eth1 ONBOOT=yes BOOTPROTO=none BRIDGE=br0 USRCTL=no ```
3. ip\_forward 설정 ```shell $ vi /etc/sysctl.conf net.ipv4.ip_forward = 1 ``` 4. Bridge 적용 확인 ```shell $ brctl show bridge name    bridge id                STP enabled    interfaces br0                 8000.0800271b0b5f    no                   eth1                                                                        eth0 ``` # gzip 압축률 확인 gzip으로 압축된 파일의 압축율을 확인하고 싶으면 gzip -l \[Filename\]을 사용하면 됩니다. ```shell [root@~]# gzip  -l back_data.tar.gz         compressed        uncompressed  ratio uncompressed_name          198177633           364257280  45.6% back_data.tar ``` - 압축된 파일용량(byte) : 198177633 - 압축전 파일용량(byte) : 364257280 - 압축비율 : 45.6% - 압축되기 전 파일명 : back\_data.tar # gzip으로 압축된 파일 내용 보기 bzip으로 압축한 단일 파일의 경우 bzcat이라는 명령어를 통해서 압축을 풀지않고도 파일 내용을 볼 수 있는데, gzip의 경우 별도의 명령어로 압축을 풀 수 없기 때문에 gzip의 아규먼트를 통해서 파일 내용을 볼 수 있어요. tar으로 묶은 경우 tar을 통해서 볼 수 있고요 ```shell [root@localhost ~]# ls -l -rw-r--r-- 1 root root 1643736570 May 10 03:00 db_backup.sql.gz ``` (사전에 설명을 해드리면 10G DB백업파일을 압축하니 저렇게 나오네요.)
gzip아규먼트는 dc를 넣어서 표준출력으로 압축을 해제하기 때문에 디스크에 백업파일을 만들이 않아요. 거기에서 cat이나 more 파이프를 넣으면 화면으로 볼 수 있어요 ```shell [root@localhost ~]# gzip -dc db_backup.sql.gz | more ... 파일내용 ``` # iptables에서 icmp차단 iptables 기반으로 외부에서 ICMP 패킷 차단방법 ```shell $ iptables -A INPUT -p icmp --icmp-type echo-request -j REJECT ``` # Linux 디스크 스케쥴링 1. 디스크 스케쥴러 소개
**스케쥴정보****설명****비고**
noneFIFO(선입선출) 스케쥴링
mq-deadline대기중인 I/O요청을 읽기 / 쓰기로 배치로 정렬 후 스케줄러에 도달하는 시점의 요청에 대해 처리 읽기 작업은 쓰기 작업보다 우선(어플리케이션에서 읽기가 지연될 경우 차단될 가능성이 높음) 대부분 적합하나, 쓰기 작업은 비동기식으로 사용
bfq단일 어플리케이션이 모든 대역폭을 사용하지 않도록 설정, 스토리지는 항상 유휴상태인ㄱ덧처럼 반응, 가장 낮은 대기 시간을 전달하는게 목표 대용량 파일을 복사하는데 적합하고, 시스템이 응답하지 않을 수 있음
kyber모든 I/O요청 대기시간을 계산해서 각 대기시간 목표를 달성하도록 자체조정NVMe, SSD는 IOPS가 높은 스토리지에 적합
2. 스케쥴러 정보 확인 방법 (활성화된 스케쥴은 \[\]로 표시) ```shell $ cat /sys/block/sda/queue/scheduler noop [deadline] cfq ``` 3. 스케쥴 변경 방법 (재부팅하면 기존설정값으로 복원됨) ```shell $ echo cfq > /sys/block/sda/queue/scheduler $ cat /sys/block/sda/queue/scheduler noop deadline [cfq] ``` 4. 영구로 변경시 (Centos7이상) ```shell $ grubby --update-kernel=ALL --args="elevator=cfq" ``` # lvm 볼륨 확장 및 파일시스템 용량 확장 작업 xfs로 만들어진 경로의 데이터 사용량 증가하고 있어 추가로 디스크 장착 ~ 용량 확장하려고 합니다. #### 사전정보 1. 현재 알람이 발생한 디스크 사용량 정보 ```bash $> df -Th /data Filesystem Type Size Used Avail Use% Mounted on /dev/mapper/content_vg-content_lv xfs 3.6T 3.3T 346G 91% /data ``` 흠.. 3.6T 디스크인데 3.3T사용하고 있어서 총 사용율 91%네요. ㅠ^ㅠ 2. 굴러다니는 디스크 500G짜리 를 하나 더 붙였습니다. ```bash $> fdisk -l ... Disk /dev/sdc: 500 GiB, 536870912000 bytes, 1048576000 sectors Units: sectors of 1 * 512 = 512 bytes Sector size (logical/physical): 512 bytes / 512 bytes I/O size (minimum/optimal): 512 bytes / 512 bytes ``` 3. vg 이름은 content\_vg, lv 이름은 content\_lv로 구성이 되어 있어요. #### lvm 볼륨 확장 1. sdc 디스크를 pv 구성해줍니다. (저는 디스크 전체를 lvm으로 사용할꺼라 따로 파티션을 나누진 않았어요) ```bash $> pvcreate /dev/sdc Physical volume "/dev/sdc" successfully created. ``` 2. pv 정보 확인 1. 확장 후 ```bash $> pvdisplay --- Physical volume --- PV Name /dev/sdb VG Name content_vg PV Size <3.64 TiB / not usable <1.72 MiB Allocatable yes (but full) PE Size 4.00 MiB Total PE 953479 Free PE 0 Allocated PE 953479 PV UUID QnstsS-xBJ0-Qv0l-RFan-SgaA-z3Fg-RJrZK8 ``` 2. 확장 전 ```bash $> pvdisplay --- Physical volume --- PV Name /dev/sdb VG Name content_vg PV Size <3.64 TiB / not usable <1.72 MiB Allocatable yes (but full) PE Size 4.00 MiB Total PE 953479 Free PE 0 Allocated PE 953479 PV UUID QnstsS-xBJ0-Qv0l-RFan-SgaA-z3Fg-RJrZK8 --- Physical volume --- PV Name /dev/sdc VG Name content_vg PV Size 500.00 GiB / not usable 4.00 MiB Allocatable yes (but full) PE Size 4.00 MiB Total PE 127999 Free PE 0 Allocated PE 127999 PV UUID Bsm9b5-DZTB-2iWr-6RH0-6uIy-canP-SOhMeC ``` 3. Volume Group 확장 ```bash $> vgextend content_vg /dev/sdc Volume group "content_vg" successfully extended ``` 1. 확장 전 ```bash $> vgdisplay --- Volume group --- VG Name content_vg System ID Format lvm2 Metadata Areas 1 Metadata Sequence No 5 VG Access read/write VG Status resizable MAX LV 0 Cur LV 1 Open LV 1 Max PV 0 Cur PV 1 Act PV 1 VG Size <3.64 TiB PE Size 4.00 MiB Total PE 953479 Alloc PE / Size 943718 / <3.60 TiB Free PE / Size 9761 / <38.13 GiB VG UUID IiEZ8G-kbcL-l8MD-Ax6m-dWSZ-ZTCd-OvBWff ``` 2. 확장 후 ```bash $> vgdisplay --- Volume group --- VG Name content_vg System ID Format lvm2 Metadata Areas 2 Metadata Sequence No 6 VG Access read/write VG Status resizable MAX LV 0 Cur LV 1 Open LV 1 Max PV 0 Cur PV 2 Act PV 2 VG Size <4.13 TiB PE Size 4.00 MiB Total PE 1081478 Alloc PE / Size 943718 / <3.60 TiB Free PE / Size 137760 / 538.12 GiB VG UUID IiEZ8G-kbcL-l8MD-Ax6m-dWSZ-ZTCd-OvBWff ``` vg Size가 기존 3.64에서 500G를 확장했기 때문에 4.13T로 설정되었어요. lv를 확장하지 않은 상태이기 때문에 Alloc PE가 3.6T, Free PE가 538.12 Gib가 존재하고 있다고 알려주네요. 4. LV 확장 ```bash $> lvextend -l +100%FREE /dev/content_vg/content_lv Size of logical volume content_vg/content_lv changed from <3.60 TiB (943718 extents) to <4.13 TiB (1081478 extents). Logical volume content_vg/content_lv successfully resized. ``` 남은 공간 모두를 사용할꺼라서 100%FREE라는 옵션을 넣어주면 됩니다. 1. 확장전 ```bash $> lvdisplay --- Logical volume --- LV Path /dev/content_vg/content_lv LV Name content_lv VG Name content_vg LV UUID fhIWVB-0zNY-IcfO-qhu2-iNqV-hk73-0Nwl0N LV Write Access read/write LV Creation host, time container.igoni.kr, 2023-01-08 17:53:28 +0900 LV Status available # open 1 LV Size <3.60 TiB Current LE 943718 Segments 1 Allocation inherit Read ahead sectors auto - currently set to 256 Block device 253:0 ``` 2. 확장 후 ```bash $> lvdisplay --- Logical volume --- LV Path /dev/content_vg/content_lv LV Name content_lv VG Name content_vg LV UUID fhIWVB-0zNY-IcfO-qhu2-iNqV-hk73-0Nwl0N LV Write Access read/write LV Creation host, time container.igoni.kr, 2023-01-08 17:53:28 +0900 LV Status available # open 1 LV Size <4.13 TiB Current LE 1081478 Segments 2 Allocation inherit Read ahead sectors auto - currently set to 256 Block device 253:0 ``` 자, 여기까지 진행되었으면 lvm 볼륨을 확장하는것까지 되었고요, 이제 파일시스템 확장을 할 껍니다. 여기까지만 진행되었다면, df -h 쳐도 용량이 늘진 않았어요.. 1. 파일시스템 확장 ```bash $> xfs_growfs -d /dev/content_vg/content_lv meta-data=/dev/mapper/content_vg-content_lv isize=512 agcount=4, agsize=241591808 blks = sectsz=512 attr=2, projid32bit=1 = crc=1 finobt=1, sparse=1, rmapbt=0 = reflink=1 bigtime=0 inobtcount=0 data = bsize=4096 blocks=966367232, imaxpct=5 = sunit=0 swidth=0 blks naming =version 2 bsize=4096 ascii-ci=0, ftype=1 log =internal log bsize=4096 blocks=471859, version=2 = sectsz=512 sunit=0 blks, lazy-count=1 realtime =none extsz=4096 blocks=0, rtextents=0 data blocks changed from 966367232 to 1107433472 ``` 2. 파일시스템 용량 확장 확인 (3.6T -> 4.2T로 용량 증설) ```bash $> df -Th /data Filesystem Type Size Used Avail Use% Mounted on /dev/mapper/content_vg-content_lv xfs 4.2T 3.3T 881G 80% /data ``` ##### Reference - [https://m.blog.naver.com/hanajava/220779211465](https://m.blog.naver.com/hanajava/220779211465) - [https://devinegrace.tistory.com/40](https://devinegrace.tistory.com/40) - [https://access.redhat.com/documentation/ko-kr/red\_hat\_enterprise\_linux/9/html/managing\_file\_systems/assembly\_increasing-the-size-of-an-xfs-file-system\_managing-file-systems](https://access.redhat.com/documentation/ko-kr/red_hat_enterprise_linux/9/html/managing_file_systems/assembly_increasing-the-size-of-an-xfs-file-system_managing-file-systems) - # make multithread 옵션 Compile 후 make 할때, 기본은 단일 thread로 작동한다더라…. 멀티 Thread를 사용하려면, make -j{n} 옵션을 주면 되는데, {n}의 최대 코어수와 동일해야 한다더라… 요새 compile 할일이 없는데, 한번 해봐야겠음.
*reference* - *[http://www.linux-databook.info/?page\_id=2319](http://www.linux-databook.info/?page_id=2319)* # 리눅스에서 스타도전기. 예전부터 리눅스에서 윈도우기반의 어플리케이션 구동을 위한 시도는 여러번 있었죠. 그 중에 대표적인게 Wine, playonlinux 정보다 있을것 같네요. 저는 bottle이라는 app을 이용해 스타를 시도할 예정입니다. 1. flatpak으로 bottle 설치 ``` $> flatpak install com.usebottles.bottles -y ``` 2. 설치가 완료되면 ![image.png](http://igoni.kr/uploads/images/gallery/2023-05/scaled-1680-/OBOimage.png) 요건 아이콘이 생성될꺼예요 3. bottle 실행
[![image.png](http://igoni.kr/uploads/images/gallery/2023-05/scaled-1680-/rcDimage.png)](http://igoni.kr/uploads/images/gallery/2023-05/rcDimage.png)
4. 새로운 Bottle생성. (좌측 상단 + 버튼 누르시면 되요) 5. bottle생성할때, 게임별로 생성해야 했는데, 굳이 그럴필요는 없더라구요.. 예를들어 스타1, 스타2를 하나의 bottle으로 실행할수 있어요. 일단 저는 star라는 이름으로 새로운 bottle을 생성할꺼예요
[![image.png](http://igoni.kr/uploads/images/gallery/2023-05/scaled-1680-/24Eimage.png)](http://igoni.kr/uploads/images/gallery/2023-05/24Eimage.png)
6. 생성된 bottle 선택해서 프로그램 설치 버튼을 누르면 설치할 수 있는 어플리케이션 리스트가 나오는데, 스타는 블리자드에서 만든거라, 블리자드 배틀넷을 설치하시면 됩니다.
[![image.png](http://igoni.kr/uploads/images/gallery/2023-05/scaled-1680-/6USimage.png)](http://igoni.kr/uploads/images/gallery/2023-05/6USimage.png)
7. 설치가 완료되면 실행할 수 있는 프로그램 리스트가 나오게 되요. 플레이 버튼 누르면
[![image.png](http://igoni.kr/uploads/images/gallery/2023-05/scaled-1680-/3xdimage.png)](http://igoni.kr/uploads/images/gallery/2023-05/3xdimage.png)
8. 배틀넷 프로그램이 실행되면서 로그인 절차 진행해주시면 됩니다. 계정연동까지 완료되면 짜잔~~~
[![image.png](http://igoni.kr/uploads/images/gallery/2023-05/scaled-1680-/Zznimage.png)](http://igoni.kr/uploads/images/gallery/2023-05/Zznimage.png)
9. 짜잔~~~
[![스크린샷, 2023-05-24 03-25-25.png](http://igoni.kr/uploads/images/gallery/2023-05/scaled-1680-/2023-05-24-03-25-25.png)](http://igoni.kr/uploads/images/gallery/2023-05/2023-05-24-03-25-25.png)
10. 즐겜 하시면 됩니다. ps. 한글이 정상적으로 출력되지 않는 경우 3가지를 확인해주세요. 1. 실행기 설정 - 저는 soda로 설정되어 있습니다. wine으로 변경하는 경우 fonts를 넣어도 안되더라구요
[![image.png](http://igoni.kr/uploads/images/gallery/2023-05/scaled-1680-/6HZimage.png)](http://igoni.kr/uploads/images/gallery/2023-05/6HZimage.png)
2. 의존성에 allfonts라고 있어요. 선택해서 설치하시면 됩니다.
[![image.png](http://igoni.kr/uploads/images/gallery/2023-05/scaled-1680-/jJDimage.png)](http://igoni.kr/uploads/images/gallery/2023-05/jJDimage.png)
3. 둘다 안될 경우.... 1. 마지막 수단으로 윈도우에서 사용했던 폰트(c:\\windows\\fonts)폴더에 있던 폰트를 복사하고 2. bottle에서 프로그램 에서 점세개 버튼을 누르면 Browse Path라는 버튼있는데 버튼 선택하면 브라우져 창 나올꺼예요
[![image.png](http://igoni.kr/uploads/images/gallery/2023-05/scaled-1680-/jWVimage.png)](http://igoni.kr/uploads/images/gallery/2023-05/jWVimage.png)
3. 브라우져창 상위 경로중 drive\_c 경로로 이동해서 Windows\\Fonts 경로로 이동하시면 됩니다.
[![image.png](http://igoni.kr/uploads/images/gallery/2023-05/scaled-1680-/jbkimage.png)](http://igoni.kr/uploads/images/gallery/2023-05/jbkimage.png)
4. 3.1절차에서 복사한 파일을 3.3 경로에 붙여넣고 다시 실행하시면 되어요~~ # ntp를 ipv4만 사용해서 시간 동기화 하기 ntp클라이언트를 ipv4만 사용하고자 할 때 ```shell $> vi /etc/sysconfig/ntpd # Drop root to id 'ntp:ntp' by default. ... OPTIONS="-u ntp:ntp -p /var/run/ntpd.pid -g -4" ... ``` # 예전버전 패키지(커널) 보관갯수 설정 어느날 /boot파티션의 데이터 사용율이 95%인것을 깨달았다.😨😨😨 ```bash $>> df -h /boot Filesystem Size Used Avail Use% Mounted on /devr/nvme0n1p2 507M 495M 12M 97% /boot ``` 보아라..ㅋㅋ 12M정도만 남은 위엄을.-\_-;; 물론 efi를 사용하면서도 /boot파티션의 용량을 최소한으로 잡았으니 이런일이 생길꺼라는 예상은 했기 때문에... (좋아, 자연스러웠어) /boot파티션에는 부팅을 위한 커널만 적재되어 있기 때문에, 예전버전의 커널은 삭제해주어야 할 필요성이 생겼다. ```bash $>ls -lh /boot/vmlinuz-* -rwxr-xr-x. 1 root root 12M 4월 4 22:53 /boot/vmlinuz-0-rescue-b9821e263b234b19ad6aa74b4699e99f -rwxr-xr-x. 1 root root 12M 3월 16 03:58 /boot/vmlinuz-5.14.0-162.22.2.el9_1.x86_64 -rwxr-xr-x 1 root root 12M 3월 24 09:32 /boot/vmlinuz-5.14.0-162.23.1.el9_1.x86_64 -rwxr-xr-x 1 root root 12M 4월 13 00:06 /boot/vmlinuz-5.14.0-284.11.1.el9_2.x86_64 ``` 현재는 rescue를 제외하고 3가지 버전의 커널을 담고 있다. 자, 이제 2가지만 남겨놓고 (업데이트된 커널때문에 부팅이 안될수도 있으니 보험은 들어놔야지.) 삭제해보도록 하자. ```bash $> cat /etc/yum.conf [main] gpgcheck=1 installonly_limit=3 clean_requirements_on_remove=True best=True skip_if_unavailable=False ``` /etc/yum.conf를 보면 installonly\_limit이라는 값이 있는데, 이건 기본값으로 3이다.(즉, 하위3버전까지는 보관하겠다는 거다) 자, 이제 저 값을 2로 바꾼다음. yum update를 해보자. ```bash $> cat /etc/yum.conf [main] gpgcheck=1 installonly_limit=2 clean_requirements_on_remove=True best=True skip_if_unavailable=False ``` ```bash $> yum update -y ... .. 삭제 중: kernel x86_64 5.14.0-162.22.2.el9_1 @rhel-9-for-x86_64-baseos-rpms 0 kernel x86_64 5.14.0-162.23.1.el9_1 @rhel-9-for-x86_64-baseos-rpms 0 kernel-core x86_64 5.14.0-162.22.2.el9_1 @rhel-9-for-x86_64-baseos-rpms 84 M kernel-core x86_64 5.14.0-162.23.1.el9_1 @rhel-9-for-x86_64-baseos-rpms 84 M kernel-devel x86_64 5.14.0-162.22.2.el9_1 @rhel-9-for-x86_64-appstream-rpms 60 M kernel-devel x86_64 5.14.0-162.23.1.el9_1 @rhel-9-for-x86_64-appstream-rpms 60 M kernel-modules x86_64 5.14.0-162.22.2.el9_1 @rhel-9-for-x86_64-baseos-rpms 31 M kernel-modules x86_64 5.14.0-162.23.1.el9_1 @rhel-9-for-x86_64-baseos-rpms 31 M ... ``` 현재 사용중인 커널이 5.14.0-284.11.1 인데, 커널업데이트가 되면서 5.14.0-284.18 버전과 5.14.0-284.11.1만 보관하고 이하 버전은 삭제하도록 한것이다. 요로케. ``` $> ls -l /boot/vmlinuz-* -rwxr-xr-x. 1 root root 11649784 4월 4 22:53 /boot/vmlinuz-0-rescue-b9821e263b234b19ad6aa74b4699e99f -rwxr-xr-x 1 root root 12176920 4월 13 00:06 /boot/vmlinuz-5.14.0-284.11.1.el9_2.x86_64 -rwxr-xr-x 1 root root 12192792 5월 31 23:44 /boot/vmlinuz-5.14.0-284.18.1.el9_2.x86_64 ``` # samba messages read_data failure /var/log/messages에 read\_data failure 메시지가 반복적으로 나오는 경우 메시지 내용 ```shell $> tail -f /var/log/messages ... read_data: read failure for 4 bytes to client ... ``` 조치방법 ```shell $> vi /etc/samba/smb.conf ... [global] smb ports = 139 ... ``` # 재부팅 없이 임시로 호스트네임 변경 1. /etc/hostname에 호스트네임 적용 (재부팅 후 적용) ```shell $ vi /etc/hostname 13.test.kr ``` 2. cli로 호스트네임 변경 (재부팅 없이 적용 가능, 재부팅시 초기화) ```shell $ cat "13.test.kr" >  /proc/sys/kernel/hostname ``` 3. 호스트네임 명령어로 변경 ```shell $ hostname l4.test.co.kr ``` # sar와 ksar를 이용한 서버성능 확인 ---
1. sysstat 패키지 설치 ```shell $> yum install sysstat -y ``` 2. sysstat정보가 수집되려면 최소 10분 이상을 기다려야 합니다. 10분주기로 말고 변경하고 싶을 경우 /etc/cron.d/sysstat 파일을 수정하면 되요. ```shell [root@localhost ~]# cat /etc/cron.d/sysstat # Run system activity accounting tool every 10 minutes */10 * * * * root /usr/lib64/sa/sa1 1 1 # 0 * * * * root /usr/lib64/sa/sa1 600 6 & # Generate a daily summary of process accounting at 23:53 53 23 * * * root /usr/lib64/sa/sa2 -A ``` 3. 서버 로그 export (3일에 저장된 서버 상태) ```shell [root@localhost ~]# unset LANG [root@localhost ~]# sar -A -f  /var/log/sa/sa03 > localhost.txt ```
4. ksar내려받기 - [ksar내려받기](http://sourceforge.net/projects/ksar/) 5. ksar 실행하기 (윈도우PC에 자바가 설치되어 있어야 함) 6. 서버에 저장된 파일 불러오기 ![image-20220428033140-1.png](http://www.igoni.kr:8090/xwiki/bin/download/%EC%9D%B4%EA%B3%A4%EC%95%84%EC%9D%B4.kr/%EA%B8%B0%EC%88%A0%EB%85%B8%ED%8A%B8/%5BLinux%5D%EA%B8%B0%EC%88%A0%EB%85%B8%ED%8A%B8/1.%20OS%EA%B8%B0%EC%88%A0%EC%A0%95%EB%B3%B4/sar%EC%99%80%20ksar%EB%A5%BC%20%EC%9D%B4%EC%9A%A9%ED%95%9C%20%EC%84%9C%EB%B2%84%EC%84%B1%EB%8A%A5%20%ED%99%95%EC%9D%B8/WebHome/image-20220428033140-1.png?rev=1.1) 7. 서버 정보 확인하면 끝!
# ssh 패스워드 없이 로그인 하기 client장비에서 sshkey 생성
$> ssh-keygen
```shell Generating public/private rsa key pair.  Enter file in which to save the key (/root/.ssh/id_rsa): Created directory '/root/.ssh'.  Enter passphrase (empty for no passphrase): #엔터키 입력 Enter same passphrase again:                #엔터키 입력 Your identification has been saved in /root/.ssh/id_rsa.  Your public key has been saved in /root/.ssh/id_rsa.pub.  The key fingerprint is:  SHA256:123123 root@client  The key's randomart image is:  +---[RSA 2048]----+  |                 |  |         . .     |  |        . =      |  |       . +.+     |  |        S.o=o. . |  |          o= + .| |        .+.o=o+o|  |       .oo=oB*+oE|  |        o==B+o+==|  +----[SHA256]-----+ ``` 2\. server 1~3까지 ssh 키 복사
```shell $> ssh-copy-id  192.168.10.101 /bin/ssh-copy-id: INFO: Source of key(s) to be installed: "/root/.ssh/id_rsa.pub"  The authenticity of host '192.168.10.101 (192.168.10.101)' can't be established.  ECDSA key fingerprint is SHA256:123412ss.  ECDSA key fingerprint is MD5:01:15:23:36:78:47:11:ca:19:7a:20:30:e7:41:77:b2.  Are you sure you want to continue connecting (yes/no)? yes #최초접속의 경우 yes 입력  /bin/ssh-copy-id: INFO: attempting to log in with the new key(s), to filter out any that are already installed  /bin/ssh-copy-id: INFO: 1 key(s) remain to be installed -- if you are prompted now it is to install the new keys  root@192.168.10.101's password: #server장비의 root패스워드 입력 Number of key(s) added: 1  Now try logging into the machine, with:   "ssh 'root@192.168.10.101'"  and check to make sure that only the key(s) you wanted were added. ``` # Centos에서 네이버 웨일설치하기 [![image.png](http://igoni.kr/uploads/images/gallery/2023-05/scaled-1680-/image.png)](http://igoni.kr/uploads/images/gallery/2023-05/image.png) 네이버에서 개발한 웹브라우져. 네이버 웨일을 리눅스에서 배포하는 버전은 deb(우분투계열)에서만 사용할수 있습니다. rpm으로 제공하면 제일 좋긴하지만 그건 개발자의 정책이라....ㅎㅎ (Microsoft Edge던, 네이버 whale이던, 크로미움 기반이기 때문에 안되진 않을꺼예요..) 서론이 길었고. 실제로 써보면 rpm으로 패키지 전환해서 설치하는건 더이상의 방법이 없을때 최후의 수단으로 사용하는게 맞을것 같습니다.. 종속된 패키지가 있는 경우 호환성 에러가 있거든요.. (웨일도 마찬가지로 패키지 호환성에 문제가 있어서 무시하고 설치해야 했습니다.) deb패키지를 rpm으로 전환하기 위해서는.. 아래의 절차대로 진행하면 될것 같네요. 1. epel 리포지터리를 활성화 한다(이미 되어 있는 경우는 안해도 될듯) ```bash $> yum install epel-release -y ``` 2. alien 패키지를 설치한다. ```bash $> yum install alien -y ``` 3. 네이버 웨일 패키지를 다운로드 한다. - [https://whale.naver.com/ko/](https://whale.naver.com/ko/) 4. deb패키지를 rpm으로 전환한다. ```bash $> alien -r naver-whale-stable_amd64.deb $> ls -l naver-whale-stable_amd64.deb naver-whale-stable-3.20.182.14-2.x86_64.rpm ``` 5. 전환된 rpm으로 설치한다. (종속패키지 호환성 문제가 있어서 force옵션이 추가되어야 함) ```bash $> rpm -Uvh naver-whale-stable-3.20.182.14-2.x86_64.rpm --force ... ``` 6. Centos에서도 웨일 사용가능~~ [![image.png](http://igoni.kr/uploads/images/gallery/2023-05/scaled-1680-/M7Cimage.png)](http://igoni.kr/uploads/images/gallery/2023-05/M7Cimage.png) # Traffic Control 기반의 트래픽 제어 ### TC소개 - TC ≠ Test Case, TC = Traffic Control - 기본적으로 데이터 전송시, 최대 성능을 위해 커널에서는 대역폭의 제한을 설정하지 않음 - 스위치 장비에서 대역폭 제한을 설정할 경우 10/100M, Half/Full 형식으로만 제한작업이 가능 - 하지만, NIC의 link auto negotiation 기능 때문에 스위치 or 서버장비에서만 설정하면 Link Down 현상 발생 - 운영자가 원하는 세밀한 대역폭 제한 설정 불.가.능. - tc설정상태는 메모리에 저장되기 때문에, 장비를 재부팅하면 원래상태로 되돌아옴 - 이런문제를 해소하기 위한 방안, TC - Iproute rpm에 포함된 명령어(iproute는 기본 패키지) Iproute 패키지에는 netstat, ifconfig, arp 의 명령어가 포함 ### Linux Traffic 처리 방식 [![image-1659585695104.png](http://igoni.kr/uploads/images/gallery/2022-08/scaled-1680-/image-1659585695104.png)](http://igoni.kr/uploads/images/gallery/2022-08/image-1659585695104.png)
PREROUTING : 외부에서 내부로 패킷이 유입될 때 적용받는 라우팅 POSTROUTING : 내부에서 외부로 나갈 때 적용받는 라우팅
### Traffic Shaping 방식 소개 - Shaping? 1. Traffic Shaping : 정의한 포트/트래픽을 조절하여, 네트워크 속도를 지연시키는 방법 2. 트래픽 방향에 따라서 TBF / HTB 방식을 이용, - TBF (Token Bucket Filter) 1. Packet을 Bucket에 담아 트래픽을 지연시키고, 정의한 양만큼 Traffic Shaping 적용 2. Inbound 트래픽에 대해 적용 가능 3. TBF Data Flow [![image-1659585599440.png](http://igoni.kr/uploads/images/gallery/2022-08/scaled-1680-/image-1659585599440.png)](http://igoni.kr/uploads/images/gallery/2022-08/image-1659585599440.png) - HTB (Hierarchy Token Bucket) 1. 기본 방식은 TBF와 동일 2. 다중 Class를 생성이 가능하기 때문에 특정 IP 혹은 특정 포트 정책을 2개 이상 생성 가능 3. Outbound 트래픽에 대해 적용 가능 HTB Data Flow [![image-1659585630252.png](http://igoni.kr/uploads/images/gallery/2022-08/scaled-1680-/image-1659585630252.png)](http://igoni.kr/uploads/images/gallery/2022-08/image-1659585630252.png) 4. HTB Queue의 상관관계 [![image-1659585644477.png](http://igoni.kr/uploads/images/gallery/2022-08/scaled-1680-/image-1659585644477.png)](http://igoni.kr/uploads/images/gallery/2022-08/image-1659585644477.png) Qdisc를 통해 특정 인터페이스의 Queue를 생성하고, 하위 Class를 통해 대역폭을 설정 하위 Filter를 통해 특정IP, 특정 포트에 대해서 정책 생성 Class는 Qdisc의 종속되어 있고 Filter는 class의 종속되어 Queue처리함 ### TBF 방식의 구성 테스트 1. TBF 방식의 Traffic Shaping (eth0 인터페이스에 최대 10Mbps, 데이터 전송간 최대 70ms의 지연 발생) ```shell $ tc qdisc add dev eth0 root tbf rate 10mbit latency 70ms burst 1540 ``` 2. Shaping 적용 확인 ```shell $ tc qdisc show  dev eth0 qdisc tbf 8012: root refcnt 2 rate 10000Kbit burst 1540b lat 70.0ms ``` 3. Shaping 변경 ```shell $ tc qdisc change dev eth0 root tbf rate 20mbit latency 70ms burst 1540 ``` 4. 변경 적용 확인 ```shell $ tc qdisc show  dev eth0 qdisc tbf 8012: root refcnt 2 rate 20000Kbit burst 1540b lat 70.0ms ``` 5. tc정보 삭제 ```shell $ tc qdisc del dev eth0 root ``` ### HTB 방식의 구성 테스트 1. eth0 인터페이스에 최대 Limit는 100Mbps으로 설정 ```shell $ tc qdisc add dev eth0 root handle 1:0 htb default 10 $ tc class add dev eth0 parent 1: classid 1:1 htb rate 100mbit $ tc class add dev eth0 parent 1:0 classid 1:10 htb rate 50mbit ceil 50mbit burst 10k prio 0 $ tc class add dev eth0 parent 1:0 classid 1:11 htb rate 20mbit ceil 20mbit burst 10k prio 0 $ tc filter add dev eth0 protocol ip parent 1:0 prio 0 u32 match ip dport 2049 0xffff flowid 1:10 $ tc filter add dev eth0 protocol ip parent 1:0 prio 0 u32 match ip dport 22 0xffff flowid 1:11 ``` - destination port가 tcp/80인 경우 최대 50Mbps으로 제한 - destination port가 tcp/22인 경우 20Mbps으로 제한 - rate : 최대 허용 대역폭 - ceil : 허용가능한 버킷양 - prio : 우선순위 설정 0부터 가능하고 낮은숫자가 우선순위를 갖음 1. 적용 확인
\# qdisc 적용확인
```shell $> tc qdisc show dev eth0 qdisc htb 1: root refcnt 2 r2q 10 default 10 direct_packets_stat 17 ```
\# Class 적용확인
```shell $> tc class show  dev eth0 class htb 1:11 root prio 0 rate 20000Kbit ceil 20000Kbit burst 10Kb cburst 1600b class htb 1:10 root prio 0 rate 50000Kbit ceil 50000Kbit burst 10Kb cburst 1600b class htb 1:1 root prio 0 rate 100000Kbit ceil 100000Kbit burst 1600b cburst 1600b ```
\#Filter 적용 확인 \# Match (Destination 포트 정보)는 16진수로 출력
```shell $> tc filter show  dev eth0 filter parent 1: protocol ip pref 49151 u32 filter parent 1: protocol ip pref 49151 u32 fh 801: ht divisor 1 filter parent 1: protocol ip pref 49151 u32 fh 801::800 order 2048 key ht 801 bkt 0 flowid 1:11   match 00000016/0000ffff at 20 filter parent 1: protocol ip pref 49152 u32 filter parent 1: protocol ip pref 49152 u32 fh 800: ht divisor 1 filter parent 1: protocol ip pref 49152 u32 fh 800::800 order 2048 key ht 800 bkt 0 flowid 1:10   match 00000801/0000ffff at 20 ```
2. 정책 변경(20Mbit -> 200Mbit) ```shell $> tc class change dev eth0 parent 1:0 classid 1:11 htb rate 200mbit ceil 200mbit burst 10k prio 0 ``` 3. 변경 정책 적용 확인 ```shell $> tc class show  dev eth0 class htb 1:11 root prio 0 rate 200000Kbit ceil 200000Kbit burst 10200b cburst 1600b class htb 1:10 root prio 0 rate 50000Kbit ceil 50000Kbit burst 10Kb cburst 1600b class htb 1:1 root prio 0 rate 100000Kbit ceil 100000Kbit burst 1600b cburst 1600b ``` ### NMS 연동한 Traffic Shaping 적용 확인 1. Traffic Shaping 적용전 (최대 610Mbps까지 트래픽 발생) [![image-1659585668716.png](http://igoni.kr/uploads/images/gallery/2022-08/scaled-1680-/image-1659585668716.png)](http://igoni.kr/uploads/images/gallery/2022-08/image-1659585668716.png) 2. Taffic Shaping 적용 후 (100Mbps 적용시 최대 77.84Mbps 까지 나옴) [![image-1659585679519.png](http://igoni.kr/uploads/images/gallery/2022-08/scaled-1680-/image-1659585679519.png)](http://igoni.kr/uploads/images/gallery/2022-08/image-1659585679519.png) ### TC의 알려진 문제점 실제 트래픽 양을 설정해도, 트래픽이 처리 과정 사이에 Queue처리 하는 절차가 추가되기 때문에 설정한 양보다 전송속도가 떨어짐 TBF 설정 후 유입되는 Packet양이 Bucket양보다 클 경우 Packet Drop하는 문제가 존재 # valgrind를 이용한 메모리 체크 valgrind는 프로그램 설능을 프로파일링 후 메모리 할당 / 초기화 되지 않은 메모리 영역 을 검색할 수 있는데, Redhat 문서를 참고하며 다음과 같은 리포트를 받을 수 있다고 합니다. - 실행하지 않아야 하는 메모리 액세스 - 지정되지 않았거나 초기화되지 않은 값 사용 - 잘못된 힙 메모리 해제 - 포인터 중복 - 메모리 누수 memcheck로 실행되는 어플리케이션은 메모리 사용량 을 확인해야 하기 때문에 일반적으로 실행하는것보다 10~30배 가량 느리게 실행된다고 합니다. ### 메모리 누수 프로파일링 1. 패키지 설치 ```shell $> yum install valgrind -y ``` 2. valgrind를 이용한 메모리 누수 여부 체크 /usr/bin/test라는 임의 프로그램을 실행하되 하위 라이브러리들도 같이 실행하도록 합니다. ```shell $ valgrind --tool=memcheck --leak-check=summary --trace-children=yes /usr/bin/test ... ==21297== Memcheck, a memory error detector ==21297== Copyright (C) 2002-2017, and GNU GPL'd, by Julian Seward et al. ==21297== Using Valgrind-3.15.0 and LibVEX; rerun with -h for copyright info ==21297== Command: /usr/sbin/test ==21297== ERROR: Please define server type (local and/or TCP). ==21298== ==21298== HEAP SUMMARY: ==21298== in use at exit: 101,185 bytes in 3,410 blocks ==21298== total heap usage: 5,613 allocs, 2,203 frees, 286,292 bytes allocated ==21298== ==21298== LEAK SUMMARY: ==21298== definitely lost: 0 bytes in 0 blocks ==21298== indirectly lost: 0 bytes in 0 blocks ==21298== possibly lost: 0 bytes in 0 blocks ==21298== still reachable: 101,185 bytes in 3,410 blocks ==21298== suppressed: 0 bytes in 0 blocks ==21298== Rerun with --leak-check=full to see details of leaked memory ==21298== ==21298== For lists of detected and suppressed errors, rerun with: -s ==21298== ERROR SUMMARY: 0 errors from 0 contexts (suppressed: 0 from 0) ``` - leak 옵션은 summary(기본값) / full 둘중하나 선택 가능한듯 하고, full로 실행하게 되면 summary보다는 좀 더 자세한 정보가 보이네요 ### 캐시 사용량 프로파일링 1. 캐시 사용량은 다음 기능을 하고 있다 합니다. - 첫번째 레벨 지시 캐시 읽기 / 읽기 미스 / - 데이터 캐시 읽기 (메모리 읽기), 읽기 미스, - 데이터 캐시 쓰기 (메모리 쓰기), 쓰기 미스 - 실행 및 잘못 예측된 조건 분기 - 실행 및 잘못 예측된 간접 분기 - 패키지 설치 ```shell $ yum install valgrind -y ``` - valgrind 를 이용한 캐쉬 사용량 확인 ```shell $ valgrind --tool=cachegrind --trace-children=yes /usr/sbin/test ==21906== Cachegrind, a cache and branch-prediction profiler ==21906== Copyright (C) 2002-2017, and GNU GPL'd, by Nicholas Nethercote et al. ==21906== Using Valgrind-3.15.0 and LibVEX; rerun with -h for copyright info ==21906== Command: /usr/sbin/clamd ==21906== --21906-- warning: L3 cache found, using its data for the LL simulation. ERROR: Please define server type (local and/or TCP). ==21907== ==21907== error: can't open cache simulation output file '/root/cachegrind.out.21907' ==21907== ... so simulation results will be missing. ==21907== I refs: 0 ==21907== I1 misses: 0 ==21907== LLi misses: 0 ==21907== I1 miss rate: 0.00% ==21907== LLi miss rate: 0.00% ==21907== ==21907== D refs: 0 (0 rd + 0 wr) ==21907== D1 misses: 0 (0 rd + 0 wr) ==21907== LLd misses: 0 (0 rd + 0 wr) ==21907== D1 miss rate: 0.0% (0.0% + 0.0% ) ==21907== LLd miss rate: 0.0% (0.0% + 0.0% ) ==21907== ==21907== LL refs: 0 (0 rd + 0 wr) ==21907== LL misses: 0 (0 rd + 0 wr) ==21907== LL miss rate: 0.0% (0.0% + 0.0% ) ``` 1. cache 내용 확인\* IL / D / 정보
- I캐시 읽기 (Ir, 실행된 명령어 수), I1, 캐시 읽기 미스 (I1mr), LL캐시 명령어 읽기 미스 (ILmr) - D캐시 읽기 (Dr, 메모리 읽기 수), D1 캐시 읽기 미스 (D1mr), LL 캐시 데이터 읽기 미스 (DLmr) - D캐시 쓰기 (Dw, 메모리 쓰기 수), D1 캐시 쓰기 누락 (D1mw), LL 캐시 데이터 쓰기 누락 (Dlmw) - 전체 프로그램에 대한 요약 통계 ```shell ——————————————————————————– Ir I1mr ILmr Dr D1mr DLmr Dw D1mw DLmw ——————————————————————————– 6,122,264 3,538 2,481 1,725,087 79,539 16,924 655,284 10,140 8,215 PROGRAM TOTALS ```
- 기능별 통계 ```shell ——————————————————————————– Ir I1mr ILmr Dr D1mr DLmr Dw D1mw DLmw file:function ——————————————————————————– 2,074,204 48 14 699,500 46,437 1,226 284,276 70 12 ???:do_lookup_x ```
*reference* - *[https://valgrind.org/docs/manual/cg-manual.html](https://web.archive.org/web/20210418104231/https://valgrind.org/docs/manual/cg-manual.html)* - *[https://access.redhat.com/documentation/ko-kr/red\_hat\_enterprise\_linux/7/html/performance\_tuning\_guide/sect-red\_hat\_enterprise\_linux-performance\_tuning\_guide-performance\_monitoring\_tools-valgrind](https://web.archive.org/web/20210418104231/https://access.redhat.com/documentation/ko-kr/red_hat_enterprise_linux/7/html/performance_tuning_guide/sect-red_hat_enterprise_linux-performance_tuning_guide-performance_monitoring_tools-valgrind)* # yum changelog 사용하기 yum 패키지의 changelog를 확인하고 싶을때 1. yum changelog 플러그인 설치 ```shell $> yum install yum-plugin-changelog -y ``` 2. changelog 확인하고 싶은 패키지 입력 (최근 변경된 정보 1개만 출력예재) ```shell $> yum changelog 1 vsftpd Loaded plugins: changelog, fastestmirror, security Loading mirror speeds from cached hostfile  * base: centos.tt.co.kr  * extras: centos.tt.co.kr  * updates: centos.tt.co.kr base/other_db                                                                                                                                                             | 2.8 MB     00:00   Listing 1 changelog   ==================== Available Packages ==================== vsftpd-2.2.2-14.el6.x86_64               base * Wed Mar  4 21:00:00 2015 Martin Osvald - 2.2.2-14 - Resolves: #1092877 - The vsftpd hangs in a SIGCHLD handler when the pam_exec.so is used in pam.d configuration   changelog stats. 1 pkg, 1 source pkg, 1 changelog ```
# yum update 주소 변경하기 yum을 통한 패키지 관리시, 기본적인 구성은 centos.org로 udp 통신 이후에, 가장 빨리 응답하는 미러사이트를 연결해주는 것이 기본알고리즘. 허나, centos.org 자체가 해외에 있는 서버이므로 네트워크 환경의 불가피한 상황에 의해, 해외에 있는 서버 접근이 불가능할때에는 국내에 있는 미러 사이트로 url을 변경하면된다. 개인적으로 가장 빠르게 다운로드 되는 ftp.daum.net으로 정했고, 다른 미러사이트를 하단 URL에 맞게 수정하시면 됩니다. 다만, 국내 미러사이트의 경우, 최근버전의 OS만 가지고 있습니다. 예전 이미지를 원할경우 [http://vault.centos.org](http://vault.centos.org/) 로 하시면 되는데, 요것도서버는 해외에 있어요. [![image-1654615509874.png](http://igoni.kr/uploads/images/gallery/2022-06/scaled-1680-/image-1654615509874.png)](http://igoni.kr/uploads/images/gallery/2022-06/image-1654615509874.png)
```shell $> vi /etc/yum.repos.d/CentOS-Base.repo [base] name=CentOS-$releasever – Base #mirrorlist=http://mirrorlist.centos.org/?release=$releasever&arch=$basearch&repo=os baseurl=http://ftp.daum.net/centos/$releasever/os/$basearch/ gpgcheck=1 gpgkey=file:///etc/pki/rpm-gpg/RPM-GPG-KEY-CentOS-6 ``` \[updates\], \[extras\], \[centosplus\], \[contrib\] 항목을 모두 같은 방법으로 baseurl의 mirror.centos.org의 경로를 ftp.daum.net으로 수정하면 되요. # yum update시 커널빼고 업데이트 하기 커널에서 기본적으로 제공되지 않는 드라이버나 솔루션이 적용되어 있을경우 커널업데이트가 되면 추가로 적용된 내용이 보이지가 않는데 업데이트된 커널로 다시 재컴파일해주던지, 아니면 커널 업데이트를 제외하는 방법이 있는데요. 그 중에 가장 간편한![help](http://www.igoni.kr:8090/xwiki/resources/icons/silk/help.png?cache-version=1649846704000) 방법으로 yum update할때, 커널은 빼고 하는 방법을 알려드릴께요. /etc/yum.repos.d/CentOS-Base.repo 파일 내의 각 항목에 \[base\],\[updates\]… exclude=kernel\* 를 추가 시켜주시면 yum을 가지고 업데이트를 꾸준히 해 주어도 커널 업데이트를 하지 않습니다.
```shell $> vi /etc/yum.repos.d/CentOS-Base.repo   name=CentOS-$releasever – Base mirrorlist=http://mirrorlist.centos.org/?release=$releasever&arch=$basearch&repo=os #baseurl=http://mirror.centos.org/centos/$releasever/os/$basearch/ gpgcheck=1 gpgkey=file:///etc/pki/rpm-gpg/RPM-GPG-KEY-CentOS-5 exclude=kernel* ``` # Bottle에서 한글 입력 이상할때 Bottle 설치 - [리눅스에서 스타도전기. ](http://igoni.kr/books/1-os/page/757b5)에 적어두었던 Bottle 사용하다보니 아쉬운 이슈? 버그가 하나 있어요. 바로 한글 입력 문제인데 카카오톡에서 안녕하세요라고 입력하고 싶었는데 이렇게.... ㅠㅠ [![image.png](http://igoni.kr/uploads/images/gallery/2023-07/scaled-1680-/DGUimage.png)](http://igoni.kr/uploads/images/gallery/2023-07/DGUimage.png) 해결할 수 있는 방법은 bottle에 설정된 레지스트리 값을 바꾸면 됩니다. 1. Bottle -> 도구 -> 레지스트리 편집기 [![image.png](http://igoni.kr/uploads/images/gallery/2023-07/scaled-1680-/tQ4image.png)](http://igoni.kr/uploads/images/gallery/2023-07/tQ4image.png) 2. HKEY\_CURRENT\_USER\\Software\\Wine까지 가신다음에 1. X11 Driver 이름으로 키 생성 2. 문자열에 inputStyle 데이터는 root로 입력 [![image.png](http://igoni.kr/uploads/images/gallery/2023-07/scaled-1680-/ms3image.png)](http://igoni.kr/uploads/images/gallery/2023-07/ms3image.png) 3. 한글입력 문제 해결 [![image.png](http://igoni.kr/uploads/images/gallery/2023-07/scaled-1680-/SAqimage.png)](http://igoni.kr/uploads/images/gallery/2023-07/SAqimage.png) Reference - [https://www.bddungsblog.com/2022/10/linux.html](https://www.bddungsblog.com/2022/10/linux.html) # 좀비 프로세스 종료 방법 시스템 운영중 부모프로세스가 없이 비정상적으로 떠 있는 프로세스를 좀비(defunct)가 떠 있을수 있는데 해당 프로세스가 직접적인 성능 저하의 원인이 되진 않을수 있겠으나, 어쨌거나 정상적인 상태가 아니기 때문에 종료해주는게 맞을것 같네요. 1. 좀비 프로세스 존재 여부 확인방법 (5개의 좀비프로세스가 있음) ```bash $> ps -ef | grep defunct | egrep -v grep | wc -l 5 ``` 2. 해당 프로세스들 강제종료 ```bash $> ps -ef | grep defunct | egrep -v grep | awk '{print $1}' | xargs kill -9 ``` 3. 재확인 (좀비프로세스 사라졌어요~) ```bash $> ps -ef | grep defunct | egrep -v grep | wc -l 0 ``` # 특정버전의 rpm 패키지 설치하기 1. 리포지터리에서 설치가능한 버전 확인 (ex. vsftpd) ```bash $> yum --showduplicates list vsftpd 마지막 메타자료 만료확인 0:13:03 이전인: 2022년 08월 12일 (금) 오후 01시 15분 11초. 사용 가능한 꾸러미 vsftpd.x86_64 3.0.3-28.el8 Centos8 vsftpd.x86_64 3.0.3-31.el8 Centos8 vsftpd.x86_64 3.0.3-32.el8 Centos8 vsftpd.x86_64 3.0.3-33.el8 Centos8 vsftpd.x86_64 3.0.3-34.el8 Centos8 vsftpd.x86_64 3.0.3-35.el8 ``` 2. 설치할 버전 명시해서 패키지 설치 (설치할 버전 선택은 패키지명-버전정보 순으로 입력하면 됩니다.) ```bash $> yum install vsftpd-3.0.3-32.el8 -y 서브스크립션 관리 레포지터리를 업데이트하고 있습니다. 마지막 메타자료 만료확인 0:16:09 이전인: 2022년 08월 12일 (금) 오후 01시 15분 11초. 종속성이 해결되었습니다. ======================================================================================================================================================================================================== 꾸러미 구조 버전 레포지터리 크기 ======================================================================================================================================================================================================== 설치 중: vsftpd x86_64 3.0.3-32.el8 rhel-8-for-x86_64-appstream-rpms 180 k 연결 요약 ======================================================================================================================================================================================================== 설치 1 꾸러미 총계 내려받기 크기: 180 k 설치된 크기 : 343 k ``` # emmc 드라이브에서 linux 설치 에러 #### 상황 1. emmc를 쓰는 완전 초초초초초초초저가 모델을 버리긴 아깝고 2. 윈도우 10을 설치해보았으나 예전 486에 윈도우98을 깔았던 PTSD가 다시 오는듯한..ㅠ\_ㅠ 3. 그래서 리눅스를 설치해보려고 했는데. 이런 X장.ㅠ #### 발견사항 1. gui에서 설치모드시 파일시스템 생성 후 복사가 에러나길래, 패키지가 문제있나 싶어서, 애꿏은 usb이미지만 다시 복사했는데, 우분투에서 조금 더 명확한 원인을 확인했고, Centos에서는 복사실패라고만... 우분투에서는 파일시스템 생성 오류 2. 그래서 centos로 다시 배포하면서 콘솔로그를 들어가보니 cqe recovery, i/o error 메시지가 잔뜩... (아.. 미리 볼껄.ㅠㅠ) 3. 찾아보니 emmc드라이버와 호환성 문제가 있는것으로 보여지는... 4. 그리고 파일시스템을 xfs로 구성시 meta가 계속 깨지는 문제가 있어 ext4로 구성했을때는 정상적으로 작동하네요 #### 해결방법 1. 설치할때 gui모드밖으로 잠깐 나와서 커널 모듈 다시 인식시키기 ```bash modprobe -r sdhci_pci modprobe -r sdhci modprobe sdhci debug_quirks=0x20000 modprobe sdhci_pci ``` #### 설치한다음에 적용해야할 것들 1. 커널 파라미터값 반영 ``` $> grubby --update-kernel=ALL --args="sdhci.debug_quirks=0x65168080 ``` 2. modprobe 설정 (파일없으니 생성하면 됨) ```bash $> cat /etc/modprobe.d/sdhci.conf options sdhci debug_quirks=0x20000 ``` #### reference - [https://superuser.com/questions/1688659/128gb-emmc-drive-on-asus-laptop-unable-to-format-to-ext4](https://superuser.com/questions/1688659/128gb-emmc-drive-on-asus-laptop-unable-to-format-to-ext4) # 저널로그에서 Data hash table of /run/log/journal/... 의 반복적인 출력 이슈 #### 이 글을 쓴이유 서버 점검중에 로그데이터중 반복적으로 출력시키는 것을 확인했죠 ```bash $> dmesg -T [일 12월 10 18:20:06 2024] systemd-journald[655]: Data hash table of /run/log/journal/8d8bce04dde6433198c5ff39a2265dd4/system.journal has a fill level at 75.0 (19207 of 25607 items, 8388608 file size, 436 bytes per hash table item), suggesting rotation. [일 12월 10 18:20:06 2024] systemd-journald[655]: /run/log/journal/8d8bce04dde6433198c5ff39a2265dd4/system.journal: Journal header limits reached or header out-of-date, rotating. [일 12월 10 19:30:37 2024] systemd-journald[655]: Data hash table of /run/log/journal/8d8bce04dde6433198c5ff39a2265dd4/system.journal has a fill level at 75.0 (19206 of 25607 items, 14749696 file size, 767 bytes per hash table item), suggesting rotation. [일 12월 10 19:30:37 2024] systemd-journald[655]: /run/log/journal/8d8bce04dde6433198c5ff39a2265dd4/system.journal: Journal header limits reached or header out-of-date, rotating. [일 12월 11 19:40:48 2024] systemd-journald[655]: Data hash table of /run/log/journal/8d8bce04dde6433198c5ff39a2265dd4/system.journal has a fill level at 75.0 (19206 of 25607 items, 8388608 file size, 436 bytes per hash table item), suggesting rotation. ``` 처음에 화들짝. 😳 (디스크 깨졌나...) 자세히 보니 info레벨의 로그였고 저널(journald)데몬에 의해 기록된 내용이였어요. 내용자체는 로테이트 했다는 info성 메시지였죠 #### Journald? 1. systemd서비스의 로그데이터를 저널(Journal)이라는 형태로 저장을 하게 되는데, OS 부팅이후 발생하는 서비스 및 OS로그들을 확인할 수 있는 기능입니다. (약간... rsyslog와 좀 비슷한 역활을 하고 있는녀석이겠네요) 2. 바이너리 형태로 저장되다 보니 vi로는 확인이 안되고 journalctl 이라는 별도의 바이너리를 통해 데이터 확인을 할 수 있어요 3. dmesg에 나왔던 이유는 journald.conf 파일에 ForwardToWall값이 yes(디폴트)로 되어 있어서 출력된 이벤트예요. #### 해결방법 1. journald.conf 파일에서 ForwardToWall값을 no로 바꾼 후 데몬 재기동 해주면 됩니다. ```bash $>vi /etc/systemd/journald.conf ... ForwardToWall=no ... ``` 2. 하나만 더 찾아봤어요. 왜냐하면 관리하고 있는서버가 상당히 많은데 일부 서버에서만 저런 유사한 로그데이터를 출력하고 있었거든요.(로그 용량이 차서 로테이트 돌은건 OK, 그래도 너무 빈번한게 왜 그럴까..였죠) 1. 서버 상태 점검 : 이상무 2. 하드웨어 상태 점검 : 이상무 3. 디스크 사용량(+inode값 포함) : 어? 저널로그경로의 데이터가 너무 크네요. ```bash $> du -hs /run/log/journal/8d8bce04dde6433198c5ff39a2265dd4 50G . ``` 시스템 로그를 50G나 먹고 있었다니.. (배부르냐?!) 4. uptime을 확인해보니 이제 겨우 40일 지났습니다... 5. journald는 시스템 로그를 기록하는 데몬이라고 했죠.? 관련된 시스템 로그를 보다 보니.... 아니나 다를까. cron에 관련된 용량이 엄청 났던거죠. ```bash $>journalctl --file=xxxxxx ... crond crond crond crond crond ... ``` 6. 네.. 그렇습니다. Crontab에 시간단위로 실행하는 스크립트가 있는데 표준 출력+에러 까지 모두 기록하다보니 저렇게 어마어마한 용량을 자랑하고 있었네요. 7. 해당 스크립트의 표준출력은 뺐습니다. (어짜피 들여다보고 분석할 필요가 없었거든요) #### 반영하기 1. systemd-journald 데몬을 재실행해주면 됩니다. 1. 자.. 지금 구동상태를 한번 볼까요? ```bash $> systemctl status systemd-journald ● systemd-journald.service - Journal Service Loaded: loaded (/usr/lib/systemd/system/systemd-journald.service; static) Active: active (running) since Sat 2023-01-09 22:54:40 KST; 6 days ago TriggeredBy: ● systemd-journald.socket ● systemd-journald-dev-log.socket Docs: man:systemd-journald.service(8) man:journald.conf(5) Main PID: 655 (systemd-journal) Status: "Processing requests..." Tasks: 1 (limit: 35765) Memory: 91.2M CPU: 36.469s CGroup: /system.slice/systemd-journald.service └─655 /usr/lib/systemd/systemd-journald [일 12월 10 18:20:06 2024] systemd-journald[655]: Data hash table of /run/log/journal/8d8bce04dde6433198c5ff39a2265dd4/system.journal has a fill level at 75.0 (19207 of 25607 items, 8388608 file size, 436 bytes per hash table item), suggesting rotation. [일 12월 10 18:20:06 2024] systemd-journald[655]: /run/log/journal/8d8bce04dde6433198c5ff39a2265dd4/system.journal: Journal header limits reached or header out-of-date, rotating. [일 12월 10 19:30:37 2024] systemd-journald[655]: Data hash table of /run/log/journal/8d8bce04dde6433198c5ff39a2265dd4/system.journal has a fill level at 75.0 (19206 of 25607 items, 14749696 file size, 767 bytes per hash table item), suggesting rotation. [일 12월 10 19:30:37 2024] systemd-journald[655]: /run/log/journal/8d8bce04dde6433198c5ff39a2265dd4/system.journal: Journal header limits reached or header out-of-date, rotating. [일 12월 11 19:40:48 2024] systemd-journald[655]: Data hash table of /run/log/journal/8d8bce04dde6433198c5ff39a2265dd4/system.journal has a fill level at 75.0 (19206 of 25607 items, 8388608 file size, 436 bytes per hash table item), suggesting rotation. ``` \* 아까 dmesg에서 봤던 로그데이터가 여기서 보이네요. 2. 서비스 재기동 파파팟! ```bash $> systemctl restart systemd-journald ``` 3. 재기동 후 잘 뜨고 있는지 확인 ```bash $> systemctl status systemd-journald ● systemd-journald.service - Journal Service Loaded: loaded (/usr/lib/systemd/system/systemd-journald.service; static) Active: active (running) since Mon 2024-01-15 23:07:33 KST; 1s ago TriggeredBy: ● systemd-journald.socket ● systemd-journald-dev-log.socket Docs: man:systemd-journald.service(8) man:journald.conf(5) Main PID: 127119 (systemd-journal) Status: "Processing requests..." Tasks: 1 (limit: 35765) Memory: 1.4M CPU: 14ms CGroup: /system.slice/systemd-journald.service └─127119 /usr/lib/systemd/systemd-journald 1월 15 23:07:33 systemd-journald[127119]: Journal started 1월 15 23:07:33 systemd-journald[127119]: Runtime Journal (/run/log/journal/8d8bce04dde6433198c5ff39a2265dd4) is 108.9M, max 112.5M, 3.5M free. ``` #### 결론 제 경우는 그랬습니다. 한시간 단위로 실행하는 스크립트 배포 후 cron에 관련된 시스템 로그용량 증가 -> 증가속도가 빈번하게 journald 에서 잦은 로그 순환 (결국 info성 로그.?? ) #### Reference - [https://sysops.tistory.com/115](https://sysops.tistory.com/115) - [https://access.redhat.com/documentation/ko-kr/red\_hat\_enterprise\_linux/8/html/automating\_system\_administration\_by\_using\_rhel\_system\_roles/configuring-persistent-logging-by-using-the-journald-system-role\_configuring-the-systemd-journal-by-using-the-journald-rhel-system-role](https://access.redhat.com/documentation/ko-kr/red_hat_enterprise_linux/8/html/automating_system_administration_by_using_rhel_system_roles/configuring-persistent-logging-by-using-the-journald-system-role_configuring-the-systemd-journal-by-using-the-journald-rhel-system-role) - [https://access.redhat.com/documentation/ko-kr/openshift\_container\_platform/4.6/html/logging/cluster-logging-systemd](https://access.redhat.com/documentation/ko-kr/openshift_container_platform/4.6/html/logging/cluster-logging-systemd) - [https://m.blog.naver.com/PostView.naver?isHttpsRedirect=true&blogId=nahejae533&logNo=221270596126](https://m.blog.naver.com/PostView.naver?isHttpsRedirect=true&blogId=nahejae533&logNo=221270596126)