WEB&WAS기술정보
- 아파치 트래픽 제한- CBAND 설치하기
- 업로드폴더 웹실행 차단.
- 웹로그 분석 Awstats 설치하기
- Apache Benchmark 테스트
- apache2 컴파일 정보 확인
- Centos7에서 apache+perl 연동하기
- php 경로별 모듈 인식 오류
- php컴파일 정보 확인하기
- roundcube 업데이트 후 로그인 ui변경
- webalizer 설치하기
- Wildfly 기본정보
아파치 트래픽 제한- CBAND 설치하기
- souceforge.net에서 다운로드
- 내려받은 패키지 컴파일
$> cd mod-cband-0.9.7.5 $> configure --with-apxs=/usr/local/apache2/bin/apxs $> make; make install - 아파치 모듈 설정여부 확인
$> vi /usr/local/apache2/conf/httpd.conf ... LoadModule cband_module modules/mod_cband.so ... - 아파치 설정파일에 아래 내용 추가
$> vi /usr/local/apache2/conf/httpd.conf ... CBandLimit 1Mi #허용할 용량, ex 100MB CBandPeriod 1D #초기화 기준, ex 1일 SetHandler cband-status-me SetHandler cband-status-me SetHandler cband-status-me Order Deny,Allow Deny from all Allow from 192.168.10. #cband 접속 허용할 ip입력 ... - 확인
- 서버에서 /cband-stauts 폴더로 들어가면 확인 가능.
- 초기화하려면 아파치 내렸다가 올리면 초기화 가능
- Apache 2.x에서 CBAND를 사용하며 Apache 1.x일 경우에는 throttle을 사용하면 됨.
- 대역폭 제한은 다음과 같이 설정
- CBandSpeed 1024 10 30 가상호스트 도메인의 최대 속도, 요청수, 접속수 설정
문법 : CBandSpeed kbps rps max_conn - CBandRemoteSpeed 20kb/s 3 30 접속자(IP)의 최대속도, 요청수, 접속수 제한 (CBandSpeed와 비슷하나, 접속자당 설정)
문법 : CBandRemoteSpeed kbps rps max_conn
- CBandSpeed 1024 10 30 가상호스트 도메인의 최대 속도, 요청수, 접속수 설정
업로드폴더 웹실행 차단.
웹에서 사용중인 폴더권한을 부득이하게 777로 설정해야할 때,
보안때문에 우려된다면 해당 폴더에서 실행하는 html이나 php 실행을 차단하게 설정.
업로드 디렉토리에 다음 코드를 .htaccess 로 작성해서 파일을 돌리면
기재한 확장자에 대해서는 실행하지 않음.
$> vi .htaccess
<FilesMatch "\.(phtml|html|htm|ph|php|php3|php4|txt|pl|cgi|inc)">
Order allow,deny
Deny from all
</FilesMatch>
웹로그 분석 Awstats 설치하기
Awstats설치하기
- 다운로드 URL - https://awstats.sourceforge.io/
- 압축풀기&툴 이동
$> tar -zxvf awstats-7.3.tar.gz $> mv awstats-7.3 /usr/local/awstats/ - awstats 설정
$> cd usr/local/awstats/
$> mkdir etc; mkdir logs
$> cp wwwroot/cgi-bin/awstats.model.conf ./etc/test.kr
* /usr/local/awstats/tools/awstats_configure.pl 파일로도 설정파일 생성가능합니다. - 설정내용 수정하기
$> vi test.kr # 원본 아파치 로그 경로설정 LogFile="/usr/local/apache2/logs/test.kr-access_log" # 로그형태 설정 LogType=W (웹로그=W, 메일로그=M, FTP전송로그=F) # 로그포맷설정 LogFormat=1 (아파치로그=1, IIS로그=2) # 사이트 메뉴에서 보일 도메인명 SiteDomain="test.kr" # 호스트 별칭설정 HostAliases="awstats.test.kr" # Awstats 로그 경로설정 DirData="/usr/local/awstats/logs" # 자동업데이트 설정 EnableLockForUpdate=0 (자동업데이트=0, 수동업데이트=1) - 아파치 설정하기
*아파치 로그는 combined 형태로 저장되어 있어야 분석이 가능하며, common으로 되어 있을경우, 호환성 문제로 경고메시지 출력함.
# 아파치 설정파일 샘플CustomLog "logs/access_log" combined Alias /awstatsclasses "/usr/local/awstats/wwwroot/classes/" Alias /awstatscss "/usr/local/awstats/wwwroot/css/" Alias /awstatsicons "/usr/local/awstats/wwwroot/icon/" ScriptAlias /awstats/ "/usr/local/awstats/wwwroot/cgi-bin/" AllowOverride all Order allow,deny Allow from all Options ExecCGI - 레포트 출력하기 & Crontab에 추가하기
$> /usr/bin/perl /usr/local/awstats/wwwroot/cgi-bin/awstats.pl -config=test.kr -update
$> crontab -l
* * * * * /usr/bin/perl /usr/local/awstats/wwwroot/cgi-bin/awstats.pl -config=test.kr -update > /dev/null
Apache Benchmark 테스트
[root@root ~]# ab -c 한번에수행할 다중요구 수 -n 페이지요청수 -t 테스트허용최대시간 URL
예)
[root@root ~]# ab -c 1000 -n 1000 -t 10 http://localhost/- 1000의 유저가 동시에 1000개의 페이지를 최대 10초동안 호출하는 테스트
- 측정결과 분석
| Server Software | 아파치 버전을 표시 |
|---|---|
| Server Hostname | 사이트의 이름 |
| Server Port | 웹서비스 사용 포트 번호 |
| Document Path | 초기 문서가 존재하는 웹문서 root위치 |
| Time take for tests | 응답시간(매우 중요한 결과 값) |
| Document Length | 초기문서의 크기 |
| Complete requests | 요구에 응답완료한 세션 수 |
| Failed requests | 요구에 응답실패한 세션 수 |
| Broken pipe errors | 실패한 에러 수 |
| Total transferred | 총 전송 바이트 수 |
| HTTP transferred | 총 전송한 HTML 바이트 수 |
| Requests per second | 초당 응답 요구 수 |
| Time per request | 요구에 응답한 시간(단위 micro second, 중요한 결과값) |
| Time per request | 요구에 응답한 시간 |
| Transfer rate | 초당 전송 가능한 용량 |
apache2 컴파일 정보 확인
아파치 컴파일했던 정보 확인할때.
(아파치는 /usr/local/apache2에 설치되었다는 가정하에.)
[ root@localhost ~]# cat /usr/local/apache2/build/config.nice
#! /bin/sh
#
# Created by configure
"./configure" \
"--prefix=/usr/local/apache2" \
"--enable-mods-shared=all" \
"--enable-modules=shared" \
"--enable-rewrite" \
"--enable-ssl" \
"--with-ssl" \
"--with-mpm=prefork" \
"$@"
Centos7에서 apache+perl 연동하기
Centos7에서 apache와 perl 연동하기
- Mod_Perl 소스 다운로드
- Dependency 패키지 설치
$> yum install -y perl apr-devel perl-devel - 압축 해제 후 컴파일
$> tar -zxvf mod_perl-2.0.8.tar.gz
$> perl Makefile.PL MP_APXS=/usr/local/apache2/bin/apxs MP_APR_CONFIG=/usr/bin/apr-1-config
$> make
* make단계에서 여러가지 오류를 접할 수 있는데, 오류를 잡아도 되지만, 그 전에 이미 아파치라이브러리인 so파일이 생성되기 때문에 생성된 so파일을 아파치에 연동해도 됨. - 라이브러리 복사후 apache와 연동하기
$> cp ./src/modules/perl/mod_perl.so /usr/local/apache2/modules/ $> vi /usr/local/apache2/conf/httpd.conf LoadModule perl_module modules/mod_perl.so - 아파치&perl모듈 연동 확인
$> /usr/local/apache2/bin/apachectl -M | grep perl perl_module (shared) - perl_module (shared)가 보이면 정상적으로 모듈연동이 된 것이기 때문에 아파치 재시작 해주면 됨.
$> apachectl restart
php 경로별 모듈 인식 오류
- php경로에 따라서 모듈을 못읽는 경우
[root@localhost ~]# php -m

PHP Warning:  PHP Startup: Unable to load dynamic library '/usr/local/php/lib/php/extensions/no-debug-zts-20060613//usr/local/php/lib/mssql.so' - /usr/local/php/lib/php/extensions/no-debug-zts-20060613//usr/local/php/lib/mssql.so: cannot open shared object file: No such file or directory in Unknown on line 0

[PHP Modules]
bcmath - 해결방안
$> vi /usr/local/php/lib/php.ini
;extension_dir = "./"
내용을
extension_dir = "/usr/local/php/lib/php/extensions/no-debug-zts-20060613/" --> extension실제 경로 로 변경하면 됨.
php컴파일 정보 확인하기
php명령어를 통한 컴파일 정보 확인방법
- php 명령어로 확인
[root@localhost ~]# php -i | more phpinfo() PHP Version => 5.3.10 System => Linux localhost 2.6.18-274.18.1.el5PAE #1 SMP Thu Feb 9 13:25:50 EST 2012 i686 Build Date => Feb 10 2012 16:00:07 Configure Command => './configure' '--prefix=/usr/local/php' '--with-mysql=/usr/local/mysql' '--with-mysqli=/usr/local/mysql/bin/mysql_config' '--with-apxs2=/usr/local/apache2/bin/apxs' '--enable-sysvshm=yes' '--enable-sysvsem=yes' '--enable-debug=no' '--with-iconv' '--with-gmp' '--with-pic' '--with-curl' '--with-png-dir' '--with-zlib-dir' '--with-jpeg-dir' '--with-gd' '--with-gdbm' '--with-bz2' '--enable-gd-native-ttf' '--enable-ftp' '--enable-mbstring' '--enable-sockets' '--enable-wddx' '--with-freetype-dir' '--enable-bcmath' '--enable-mbregex' '--ena ble-exif' '--enable-calendar' '--with-openssl=/usr' '--with-libxml-dir' '--with-xmlrpc' - 웹브라우저를 통한 확인
[root@localhost ~]# cat /var/www/html/test.php

roundcube 업데이트 후 로그인 ui변경
roundcube 업데이트 후 로그인 UI가 변경되는 경우.
- 원인 & 조치사항
- roundcube config에 정의된 skin값이 larry (이전버전부터 사용한 UI)값이였기 때문에 해당 skin으로 변경된것.
- roundcube가 설치된 경로에서 설정 파일 열면
라고 되어 있는데. skin을 elastic 으로 바꾸면 업데이트 전 UI로 돌아올 수 있어요.$ vi config.inc.php ... $config['skin'] = 'larry'; ...
roundcube ui는 3가지 종류가 있는데, roundcube 로그인 -> 환경설정 -> 사용자 인터페이스에 등록된 인터페이스 스킨 중 1개를 선택하면 되요.
webalizer 설치하기
- 패키지 설치하기
$> yum install -y gd-devel png-devel - webalizer 설치하기
$> tar xvzf webalizer-2.23-05.tgz $> ./configure --prefix=/usr/local/webalizer --with-language=korean $> make; make install $> cd /usr/local/webalizer/etc $> cp -a webalizer.conf.sample webalizer.conf - 설정하기
$> vi webalizer.conf
LogFile        /usr/local/apache2/logs/access_log
OutputDir      /home/test/public_html/
Incremental     yes
IncrementalName         webalizer.current
ReportTitle    test Web Analyzer DEMO!
HostName        localhost
* 참조로 OutputDir은 아파치의 Document Root로 설정된 하위에 위 패스와 동일하게 만들어줘야 한다
- 실행
$> /usr/local/webalizer/bin/webalizer -c /usr/local/webalizer/etc/webalizer.conf > /var/log/webalizer.log
Wildfly 기본정보
개요
- wildfly가 tomcat을 대체할 수 있는지 기술검토
Wildfly 이해
- Redhat이 2006sus Jboss inc 인수
- Java EE(Enterprise Edition)을 모두 지원
- 상용 솔루션으로는 JBoessEAP가 있고, Wildfly (구 JBoss AS)는 커뮤니티 성 솔루션
-
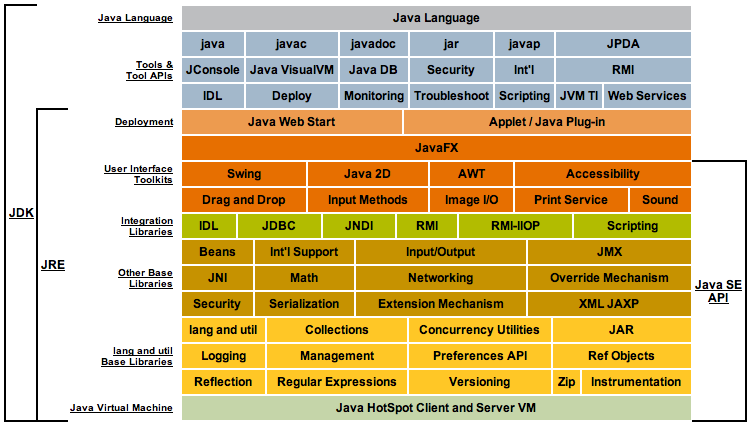
java EE 의 전체 Stack은 다음 Diagram으로 대체

1.Wildfly와 Tomcat의 stack 비교
항 목 Wildfly Tomcat 제공기능 Application Server (Tomcat 내장) Servlet Container (web server) 메모리 사용량 Tomcat대비 많음(2~300M) 상대적으로 적음 (6~70M) DB Connection 내장 없음(별도 라이브러리 사용필요) 장/단점 JAVA EE를 포함하고 있기 때문에 다양한 기능 제공
메모리 점유율이 높음J2EE전체 기능이 필요없는 경우 사용
상대적으로 가볍게 작동함Link https://www.wildfly.org/downloads/ https://tomcat.apache.org/ - 구동모드 설정
구동모드 상세설명 standalone 단일 인스턴스로 실행
인스턴스단위로 프로파일 및 설정파일이 개별적으로 작동domain 도메인 컨트롤러 포함
다수 인스턴스가 그룹으로 구성, 인스턴스별 그룹지정이 가능하고, 그릅단위로 설정 - Wildfly 프로파일 설명
프로파일명 설정파일 제공기능 default standalone infinispan, ee, ejb3 ha standalone-ha jgroup, modcluster, infinispan, ee, ejb3 full standalone-full jacorb, messagging, webservice, infinispan, ee, ejb3 full-ha standalone-full-ha jacorb, messagging, webservice, jgroup, modcluster, infinispan, ee, ejb3 - 디렉토리 구조
디렉토리 설명 appclient 클라이언트용 홈디렉토리 bin 스크립트 파일 docs xml / 설정파일 docs/examples/configs 예시 구성파일 domain domain 홈디렉토리 modules 추가 모듈 디렉토리 standalone standalone 모드 홈 디렉토리 standalone/configuration standalone 모드 설정파일 standalone/data standalone 모드 생성파일 standalone/deployments app배포 standalone/lib/ JAVA EE / SE 라이브러리 standalone/log 로그파일 저장소 standalone/tmp 임시파일 저장소 welcome-content 첫 페이지 경로
Wildfly 설치
- java (1.8이상 설치 필요)
$ yum install java-1.8.0 -y
...
$ which java
/usr/bin/java
$ /usr/bin/java -version openjdk version "1.8.0_292" OpenJDK Runtime Environment (build 1.8.0_292-b10) OpenJDK 64-Bit Server VM (build 25.292-b10, mixed mode) - 바이너리 다운로드 후 압축해제
$> wget https://download.jboss.org/wildfly/24.0.0.Final/wildfly-24.0.0.Final.tar.gz $> tar -zxvf wildfly-24.0.0.Final.tar.gz -C /usr/local/ $> ln -s /usr/local/wildfly-24.0.0.Final/ /usr/local/wildfly - 외부 접속 허용하기
vi /usr/local/wildfly-24.0.0.Final/standalone/configuration/standalone.xml ... <interface name="public"> <inet-address value="${jboss.bind.address:0.0.0.0}"></inet-address> </interface> ... - management user 생성
./add-user.sh What type of user do you wish to add? a) Management User (mgmt-users.properties) b) Application User (application-users.properties) (a): a Enter the details of the new user to add. Using realm 'ManagementRealm' as discovered from the existing property files. Username : {{ 계정명 }} Password recommendations are listed below. To modify these restrictions edit the add-user.properties configuration file. - The password should be different from the username - The password should not be one of the following restricted values {root, admin, administrator} - The password should contain at least 8 characters, 1 alphabetic character(s), 1 digit(s), 1 non-alphanumeric symbol(s) Password : {{ 계정 패스워드 }} Re-enter Password : {{ 계정 패스워드 }} What groups do you want this user to belong to? (Please enter a comma separated list, or leave blank for none)[ ]: About to add user '{{ 계정명 }}' for realm 'ManagementRealm' Is this correct yes/no? yes Added user '{{ 계정명 }}' to file '/usr/local/wildfly-24.0.0.Final/standalone/configuration/mgmt-users.properties' Added user '{{ 계정명 }}' to file '/usr/local/wildfly-24.0.0.Final/domain/configuration/mgmt-users.properties' Added user '{{ 계정명 }}' with groups to file '/usr/local/wildfly-24.0.0.Final/standalone/configuration/mgmt-groups.properties' Added user '{{ 계정명 }}' with groups to file '/usr/local/wildfly-24.0.0.Final/domain/configuration/mgmt-groups.properties' Is this new user going to be used for one AS process to connect to another AS process? e.g. for a slave host controller connecting to the master or for a Remoting connection for server to server Jakarta Enterprise Beans calls. yes/no? yes To represent the user add the following to the server-identities definition <secret value="Y3MxMjMhQCM=" ></secret> - 실행하기
./bin/standardalone.sh & - 접속하기
- 브라우져 로그인 : http://{{ 서버IP }}:8080/
- 관리자 콘솔 로그인 : http://{{ 서버IP }}:9990/console/index.html>>http://서버ip:9990/console/index.html]] (로그인 계정은 4. management user 생성 참고)
Site Link