4. DBMS 정보기록
- Mysql&MariaDB
- centos6에 mysql 5.7설치하기
- centos7 galera cluster설치
- extrabackup을 이용한 mysql 백업 수행
- keepalived기반의 DB이중화 구현
- MariaDB 컴파일 후 초기설치할때 에러
- mariadb기반의 galera 구성 오류메시지 조치
- mariadb에서 패스워드 없이 로그인할때
- maxscale기반의 DB 이중화 운영
- my.cnf를 이용한 mysql바이너리 로그 관리
- mysql 5.5 리플리케이션 구성하기
- mysql 기반의 리플리케이션 및 mmm 설치
- mysql 데이터값 변경하기
- mysql 리플리케이션 UUID오류문제
- mysql 백업데이터에서 일부 데이터만 적용하기
- Mysql Audit 기능 설정
- mysql grant실행시 access denied 발생시 조치방법
- Mysql innodb컴파일
- mysql replication 설정
- Mysql root 사용자 패스워드 재설정 방법
- mysql utf8설정
- mysql에서 binlog 삭제
- mysqlcheck 유틸리티 사용법
- mytop 설치하기
- corosync / pacemaker 기반의 DB이중화
- OracleDB
- Centos에서 Oracle 10G 설치
- Centos에서 oracle 11g 설치
- Centos에서 oracle 12c 설치하기
- oracle 10g 실행시 failed to auto-start… vikrkuma_new/oracle 메시지 출력할때
- oracle 10g 아카이브 모드 설정
- oracle 10g dbstart에러 조치방법
- Oracle 몇가지 사용쿼리들
- Oracle 실행절차
- Oracle10g업데이트 후 에러
- Oracle에서 사용자Lock풀기
- postgresSQL
Mysql&MariaDB
centos6에 mysql 5.7설치하기
mysql 5.7을 컴파일 하기 위해서는 boost 1.5.9이상이 설치되어야 합니다.
centos6 기본 리포지터리에 설치된 boost버전은 1.4버전이기 때문에 boost1.5.9버전을 내려받아서 설치해야 합니다..ㅎㅎ
- boost내려받기
$> wget http://sourceforge.net/projects/boost/files/boost/1.59.0/boost_1_59_0.tar.gz $> tar -zxvf boost_1_59_0.tar.gz $> cd boost_1_59_0. $> ./configure; make; make install - mysql 컴파일
$> tar -zxvf mysql-5.7.9.tar.gz
$> cd mysql-5.7.9
$> cmake -DCMAKE_INSTALL_PREFIX=/usr/local/mysql -DWITH_EXTRA_CHARSETS=all -DMYSQL_DATADIR=/usr/local/mysql/var -DENABLED_LOCAL_INFILE=1 -DWITH_INNOBASE_STORAGE_ENGINE=1 -DMYSQL_UNIX_ADDR=/tmp/mysql.sock -DSYSCONFDIR=/etc -DDEFAULT_CHARSET=utf8 -DDEFAULT_COLLATION=utf8_general_ci -DWITH_EXTRA_CHARSETS=all -DMYSQL_TCP_PORT=3306 -DWITH_BOOST=/usr/local/boost/include -DENABLE_DOWNLOADS=off
$> make;make install
centos7 galera cluster설치
DBMS교체(Mysql → Mariadb)를 추진하면서 이중화 구성을 replication 에서 galera_cluster로 전환하기 위해 구축하기 위한 문서
시스템 소개
- Replication 기반의 데이터 동기화 방식
- WEB/WAS → DB#1 DDL 유입 (insert / modify / delete / ...)
- DB#1서버는 binlog에 저장.
- DB#2 서버는 IO Thread가 master서버로 접속해서 변경내용 확인 후 변경사항이 있으면 replication 로그에 저장
1*.DB#2 서버는 SQL Thread가 replication 로그를 읽어서 변경사항 저장
- Galera Cluster기반의 데이터 동기화
- wsrep api를 통해 DB#1, DB#2 접속 및 데이터 복제하기 위한 인터페이스 생성
- WEB/WAS → DB#1 DDL 유입 (insert / modify / delete / ...)
- DB#1은 DB#2에도 DDL적용하라는 요청 후 모든 노드가 정상응답하면 DDL 저장
- 각 데이터 동기화 방식 비교
|
|
replication |
galera |
|---|---|---|
|
동기화 방식 |
비동기 |
동기식 |
|
단 점 |
|
|
|
운영노드 |
2대(Active / Standby 권장) |
3대이상 홀수 수량으로 사용 권장 |
-
서비스용 통신포트
포트정보
사용용도
통신방향
tcp/3306
DB데이터 통신포트
WEB/WEB → DBMS
tcp/4567, udp/4567
DB노드별 연동상태 확인, 멀티캐스트로 복제시 해당 포트 사용(tcp/upd)
DB1 ↔ DB2
tcp/4568
Galera 증분 데이터 전송
DB1 ↔ DB2
tcp/4444
Galera 전체 데이터 전송
DB1 ↔ DB2
Galera 용어 설명
- 데이터 동기화 방식
- WSREP; Write Set REPlication - Innodb 엔진내부에서 Write Set(트랜잭션을 기록하는 데이터 그룹)
1*.SST; State Snapshot Transfer - 전체 데이터 전송 (처음 클러스터 구성할 때 사용) - IST; Incremental State Transfer - 변경된 데이터 전송 (평상시 운영중일 때 사용)
- WSREP; Write Set REPlication - Innodb 엔진내부에서 Write Set(트랜잭션을 기록하는 데이터 그룹)
- 클러스터 맴버
- Donor : 전체 데이터를 가진 DB
- Joiner : Donor로부터 데이터를 제공받는 노드
- 데이터 동기화 엔진
- rsync : rsync기반으로 파일전송, 데이터 동기화 속도는 빠르나 데이터 동기화를 위해 Donor 서버에 데이터 Lock을 수행함
- mariabackup ( 해당방식 권장) : mariabackup 유틸리티를 사용해 SST 수행, 백업 스트리밍을 위해 socat 패키지가 설치되어 있어야 함 Donor Lock를 최소화 한 방식,
- xtrabackup (Mariadb 10.3이후로 제공암함, mariabackup 사용 권장)
시스템 구축하기
- 설치환경
- OS : Centos 7.5
- DBMS : Mariadb 10.4.7
- Galera : 4.26-4.2.1
- 작업순서
- galera rpm 설치(이슈사항 : Mariadb에 포함된 galera 플러그인 사용시 OPENSSL1.0.0이 없다는 에러메시지 발생
#> yum install libaio socat Judy ./galera-4-26.4.2 1.rhel7.el7.centos.x86_64 - /etc/my.cnf에 아래내용 적용
[client]
port            = 3306
socket          = /tmp/mysql.sock

[mysqld]
user = mysql
port            = 3306
socket          = /tmp/mysql.sock
skip-external-locking
key_buffer_size = 384M
max_allowed_packet = 1M
table_open_cache = 512
sort_buffer_size = 2M
read_buffer_size = 2M
read_rnd_buffer_size = 8M
myisam_sort_buffer_size = 64M
thread_cache_size = 8
query_cache_size = 32M
#thread_concurrency = 8
expire_logs_days = 30
wait_timeout = 60
#skip-name-resolve
basedir=/usr/local/mysql
datadir=/data/db_data

max_heap_table_size = 190M
max_allowed_packet =  16M
tmp_table_size = 64M
join_buffer_size = 64M
innodb_buffer_pool_size = 950M
#innodb_doublewrite = 0
innodb_flush_log_at_timeout = 3
#innodb_read_io_threads = 32
#innodb_write_io_threads = 16
#character_set_client = utf8mb4

#log-bin=mysql-bin

server-id       = 2


[galera]
wsrep_on=ON
#wsrep_provider=/usr/lib64/galera/libgalera_smm.so
wsrep_provider=/usr/lib64/galera-4/libgalera_smm.so
wsrep_cluster_address="gcomm://172.21.113.109,172.21.113.69" #클러스터 구성할 IP
binlog_format=row
default_storage_engine=InnoDB
innodb_autoinc_lock_mode=2
wsrep_cluster_name=cluster
wsrep_node_address="172.21.113.109"  #자기 IP가 작성되어 있으면 됨
bind-address=0.0.0.0
wsrep_sst_method=mariabackup
wsrep_sst_auth="root:root"
wsrep_provider_options="pc.bootstrap=YES"
- mysql_install_db 실행
#> /usr/local/mysql/scripts/mysql_install_db Installing MariaDB/MySQL system tables in '/data/db_data' ... wsrep loader: [INFO] wsrep_load(): loading provider library 'none' OK To start mysqld at boot time you have to copy support-files/mysql.server to the right place for your system Two all-privilege accounts were created. One is root@localhost, it has no password, but you need to be system 'root' user to connect. Use, for example, sudo mysql The second is mysql@localhost, it has no password either, but you need to be the system 'mysql' user to connect. After connecting you can set the password, if you would need to be able to connect as any of these users with a password and without sudo See the MariaDB Knowledgebase at http://mariadb.com/kb or the MySQL manual for more instructions. You can start the MariaDB daemon with: cd '/usr/local/mysql' ; /usr/local/mysql/bin/mysqld_safe --datadir='/data/db_data' You can test the MariaDB daemon with mysql-test-run.pl cd '/usr/local/mysql/mysql-test' ; perl mysql-test-run.pl Please report any problems at http://mariadb.org/jira The latest information about MariaDB is available at http://mariadb.org/. You can find additional information about the MySQL part at: http://dev.mysql.com Consider joining MariaDB's strong and vibrant community: https://mariadb.org/get-involved/ - Mysql Secuinstall 구성
# /usr/local/mysql/bin/mysql_secure_installation NOTE: RUNNING ALL PARTS OF THIS SCRIPT IS RECOMMENDED FOR ALL MariaDB SERVERS IN PRODUCTION USE! PLEASE READ EACH STEP CAREFULLY! In order to log into MariaDB to secure it, we'll need the current password for the root user. If you've just installed MariaDB, and haven't set the root password yet, you should just press enter here. Enter current password for root (enter for none): OK, successfully used password, moving on... Setting the root password or using the unix_socket ensures that nobody can log into the MariaDB root user without the proper authorisation. You already have your root account protected, so you can safely answer 'n'. Switch to unix_socket authentication [Y/n] n ... skipping. You already have your root account protected, so you can safely answer 'n'. Change the root password? [Y/n] y New password: Re-enter new password: Password updated successfully! Reloading privilege tables.. ... Success! By default, a MariaDB installation has an anonymous user, allowing anyone to log into MariaDB without having to have a user account created for them. This is intended only for testing, and to make the installation go a bit smoother. You should remove them before moving into a production environment. Remove anonymous users? [Y/n] y ... Success! Normally, root should only be allowed to connect from 'localhost'. This ensures that someone cannot guess at the root password from the network. Disallow root login remotely? [Y/n] y ... Success! By default, MariaDB comes with a database named 'test' that anyone can access. This is also intended only for testing, and should be removed before moving into a production environment. Remove test database and access to it? [Y/n] y - Dropping test database... ... Success! - Removing privileges on test database... ... Success! Reloading the privilege tables will ensure that all changes made so far will take effect immediately. Reload privilege tables now? [Y/n] y ... Success! Cleaning up... All done! If you've completed all of the above steps, your MariaDB installation should now be secure. Thanks for using MariaDB! - 클러스터 구성(최초로 구성하는 서버에서만 진행하면 됨
# /usr/local/mysql/support-files/mysql.server start  --wsrep-new-cluster
Starting MariaDB SUCCESS!
190911 13:43:35 mysqld_safe Logging to '/data/db_data/localhost.err'.
190911 13:43:35 mysqld_safe Starting mysqld daemon with databases from /data/db_data
- DB접속계정 권한 설정
MariaDB [(none)]> grant all privileges on *.* to root@'localhost' identified by 'root' with grant option; - 2번 서버에서 mysql 프로세스 실행
# /usr/local/mysql/support-files/mysql.server start Starting MariaDB.190911 13:51:30 mysqld_safe Logging to '/data/db_data/localhost.err'. 190911 13:51:30 mysqld_safe Starting mysqld daemon with databases from /data/db_data ................ SUCCESS! - Glaracluster 재실행시 마지막으로 종료된 노드를 찾아서 해당 노드에 new-cluster를 추가하면 된다
$> cat /data/db_data/grastate.dat
# GALERA saved state
version: 2.1
uuid:    fbb2c143-8b5e-11ec-8ea1-36a72f3e94f3
seqno:   -1
#마지막에 종료된 노드가 1로 표기되어 있다.
safe_to_bootstrap: 1
-
- bootstrap을 1로 기재된 서버에 --wsrep-new-cluster를 붙여서 실행하고, 아닌 서버는 그냥 실행시키면 된다.
Maxscale에서 서버관리
- 클러스터 서버 맴버제외절차 (Maxscale이 설치된 서버에서 수행)
- 현재 구성된 모니터 정보확인
$> maxctrl list monitors ┌─────────────────┬─────────┬──────────────────┐ │ Monitor │ State │ Servers │ ├─────────────────┼─────────┼──────────────────┤ │ MariaDB-Monitor │ Running │ server1, server2 │ └─────────────────┴─────────┴──────────────────┘ - server2를 제외하기
$> maxctrl unlink monitor MariaDB-Monitor server2 OK - 모니터에서 제외된 서버 확인
$> maxctrl list monitors ┌─────────────────┬─────────┬─────────┐ │ Monitor │ State │ Servers │ ├─────────────────┼─────────┼─────────┤ │ MariaDB-Monitor │ Running │ server1 │ └─────────────────┴─────────┴─────────┘ - 2번서버 다시 투입
$> maxctrl link monitor MariaDB-Monitor server2 OK - 모니터에서 다시 등록된 부분 확인
$>  maxctrl list monitors
┌─────────────────┬─────────┬──────────────────┐
│ Monitor         │ State   │ Servers          │
├─────────────────┼─────────┼──────────────────┤
│ MariaDB-Monitor │ Running │ server1, server2 │
└─────────────────┴─────────┴──────────────────┘
- 현재 구성된 모니터 정보확인
Reference
extrabackup을 이용한 mysql 백업 수행
소 개
- 서비스 구동중에 Mysqldump를 이용한 백업 수행시 table lock이 발생하기 때문에 서비스 장애 가능성 존재.
- 대용량 DB의 경우 raw단위로 backup을 수행하기 때문에 수십분 ~ 수시간 소요
설치 & 실행
- 1차 서버는 정상, 2차 서버는 추가로 구성한 서버라고 가정하고..
- 전체서버대상 - extra backup 패키지 설치 - https://www.percona.com/downloads/Percona-XtraBackup-2.4/LATEST/
- 1차 서버 - 백업한 데이터 저장용 디렉토리 생성
$ mkdir /tmp/db_backup
- 1차 서버 - Full backup으로 백업 수행시
$ innobackupex ~-~-defaults-file=/etc/my.cnf ~-~-user root ~-~-password 'root암호' /tmp/db_backup/ \\.... innobackupex: MySQL binlog position: filename 'mysql-bin.000100', position 001 innobackupex: completed OK! # /tmp/db_backup/ 하위로 년-월-일-시-분-초 디렉토리 생성됨 # binlog 파일정보 확인 및 position정보를 가지고 있어야 함. - 백업된 데이터를 2차서버로 복사
$ scp -r /tmp/db_backup csadmin@1.2.3.4:/tmp/ - 2차서버 - mysql 종료
$ /etc/init.d/mysqld stop - 2서버 - DB 복원시 데이터 경로에 있는 파일 삭제
$ rm -rf /home/data/mysql/ - 2차 서버 - DB로그 복원
$ innobackupex ~-~-apply-log /home/mysqlxtra/2021-08-07_01-00-03 - 2차 서버 - DB데이터 복원
$ innobackupex ~-~-copy-back /home/mysqlxtra/2021-08-07_01-00-03 - 리플리케이션 재구성 (3-a과정에서 확인된 binlog 정보 기재하면 됨)
mysql> stop slave;
mysql> change master to master_log_file='mysql-bin.000100',master_log_pos=001;
mysql> start slave;
mysql> show slave status \G;
...
keepalived기반의 DB이중화 구현
시스템 구성도
- 서버정보
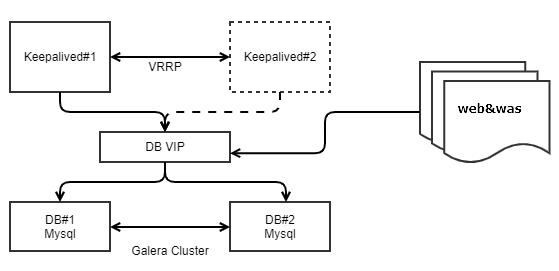
- 로드밸런싱 종류
알고리즘 종류 알고리즘 설명 설정값 라운드 로빈 하나씩 분배 rr 가중치 라운드 로빈 가중치가 큰 서버로 분배 wrr 최소 연결 접속수가 적은 서버로 분배 lc 가중치 최소연결 (접속수+1)/가중치 로 최소값 서버로 분배 wlc 지역 최소연결 접속수가 가중치를 넘기기전까지 한서버만 분배 lblc 복제기반의 지역 최소연결 가중치를 넘고 있을때 접속수가 가장 적은 서버 선택 (기본작동은 lblc와 동일) lblcr 목적지 해시 목적지 IP로 부터 해시값 계산해서 분배 dh 소스 해시 소스 IP로 부터 해시값 계산해서 분배 sh 응답속도 응답속도(Short Expected Delay)가 가장 짧은 서버로 분배
(실제로는 접속수가 가장 적은 서버로 분배)sed 큐 없음 Active 접속수r가 0인 서버를 우선 분배(기본작동은 sed알고리즘과 동일) nq

시스템 설치(전체서버)
- 패키지 설치
$> yum install keepalived ipvsadm -y
- keepalived 설정
$> vi /etc/keepalived/keepalived.conf
global_defs {
  router_id MARIA_HA
  script_user root
}

vrrp_instance DB_HA {
  state BACKUP
  interface eth0
  virtual_router_id 10
  priority 100
  lvs_sync_daemon_interface eth0

  authentication {
    auth_type PASS
    auth_pass mariadb
 }

  virtual_ipaddress {
   172.21.115.207
 }
}

virtual_server 172.21.115.217 3306 {
  delay_loop 3
  lb_algo dh
  protocol TCP
  real_server 172.21.115.218 3306 {
    weight 100
    MISC_CHECK {
      misc_path "/svc/mysql_check.sh 172.21.115.218"
      misc_timeout 3
   }
 }
  real_server 172.21.115.215 3306 {
    weight 100
    MISC_CHECK {
      misc_path "/svc/mysql_check.sh 172.21.115.215"
      misc_timeout 3
   }
 }
}
- 모니터 스크립트 설정
$> vi /svc/mysql_check.sh

#!/bin/bash

/svc/mysql/bin/mysql -u monitor -pmonitor -h $1 -Nse 'select now()'

$> chmod 755 /svc/mysql_check.sh
시스템 설치(DB#1서버)
- 접근을 위한 db계정설정
MariaDB [(none)]> grant process on *.* to monitor@'172.21.115.215' identified by 'monitor' with grant option; MariaDB [(none)]> grant process on *.* to monitor@'172.21.115.218' identified by 'monitor' with grant option; MariaDB [(none)]> flush privileges; - 커널 파라미터 수정 후 적용
$> vi /etc/sysctl.conf ... net.ipv4.ip_forward = 1 ... $> sysctl -p - 서비스 실행 후 VIP할당여부 확인
$> systemctl start keepalived
$> ip addr show | grep 32
    inet 172.21.115.217/32 scope global eth0   #실제로 Active된 노드에서만 VIP 할당됨
keepalived 운영
- 모니터링 방법
$> ipvsadm -Ln

IP Virtual Server version 1.2.1 (size=4096)
Prot LocalAddress:Port Scheduler Flags
  -> RemoteAddress:Port           Forward Weight ActiveConn InActConn
TCP  172.21.115.217:3306 sh
  -> 172.21.115.215:3306          Masq    100    2          0
  -> 172.21.115.218:3306          Masq    100    50         0
- 현재 연결된 세션 정보 확인
$> ipvsadm -Lnc
IPVS connection entries
pro expire state       source             virtual            destination
TCP 14:56  ESTABLISHED 172.21.114.22:52950 172.21.115.217:3306 172.21.115.218:3306
TCP 14:56  ESTABLISHED 172.21.114.22:52968 172.21.115.217:3306 172.21.115.218:3306
TCP 14:56  ESTABLISHED 172.21.114.22:52984 172.21.115.217:3306 172.21.115.218:3306
TCP 14:54  ESTABLISHED 172.21.114.22:52928 172.21.115.217:3306 172.21.115.218:3306
TCP 14:56  ESTABLISHED 172.21.114.22:52980 172.21.115.217:3306 172.21.115.218:3306
장애발생시 조치
-
장애구현 (DB#1 Mariadb 접근 불가시)
# Keepalived에서 Mysql 접근 불가 확인

$> vi /var/log/messages
...
Mar 11 14:36:43 dbms01 Keepalived_healthcheckers[666145]: Misc check for [[172.21.115.218]:tcp:3306 VS [172.21.115.217]:tcp:3306] by [/svc/mysql_check.sh] timed out with retry disabled.
Mar 11 14:36:43 dbms01 Keepalived_healthcheckers[666145]: Removing service [172.21.115.218]:tcp:3306 to VS [172.21.115.217]:tcp:3306
...
# ipvsadm에서 장애발생서버 제외$> ipvsadm IP Virtual Server version 1.2.1 (size=4096) Prot LocalAddress:Port Scheduler Flags -> RemoteAddress:Port Forward Weight ActiveConn InActConn TCP 172.21.115.217:3306 sh -> 172.21.115.215:3306 Masq 100 33 13 -
장애구현 (DB#1 서버 장애시)
#master 서버
$> vi /var/log/messages
Mar 11 14:19:21 dbms01 systemd[1]: Stopping LVS and VRRP High Availability Monitor...
Mar 11 14:19:21 dbms01 Keepalived[664420]: Stopping
Mar 11 14:19:21 dbms01 Keepalived_healthcheckers[664421]: Shutting down service [172.21.115.218]:tcp:3306 from VS [172.21.115.217]:tcp:3306
Mar 11 14:19:21 dbms01 kernel: IPVS: stopping master sync thread 664516 ...
Mar 11 14:19:21 dbms01 Keepalived_vrrp[664422]: (DB_HA) sent 0 priority
Mar 11 14:19:21 dbms01 Keepalived_vrrp[664422]: (DB_HA) removing VIPs.
Mar 11 14:19:21 dbms01 Keepalived_healthcheckers[664421]: Shutting down service [172.21.115.215]:tcp:3306 from VS [172.21.115.217]:tcp:3306
Mar 11 14:19:21 dbms01 Keepalived_healthcheckers[664421]: Stopped - used 0.011017 user time, 0.141106 system time
Mar 11 14:19:22 dbms01 Keepalived_vrrp[664422]: Stopped - used 0.011218 user time, 0.026105 system time
Mar 11 14:19:22 dbms01 Keepalived[664420]: CPU usage (self/children) user: 0.000000/1.222181 system: 0.001086/1.218784
Mar 11 14:19:22 dbms01 Keepalived[664420]: Stopped Keepalived v2.1.5 (07/13,2020)
Mar 11 14:19:22 dbms01 systemd[1]: keepalived.service: Succeeded.
Mar 11 14:19:22 dbms01 systemd[1]: Stopped LVS and VRRP High Availability Monitor.
1
2
3
4
5
6
7
8

#Standby 서버
$> vi /var/log/messages
Mar 11 14:20:41 dbms02 Keepalived_vrrp[666146]: (DB_HA) Backup received priority 0 advertisement
Mar 11 14:20:42 dbms02 Keepalived_vrrp[666146]: (DB_HA) Receive advertisement timeout
Mar 11 14:20:42 dbms02 Keepalived_vrrp[666146]: (DB_HA) Entering MASTER STATE
Mar 11 14:20:42 dbms02 Keepalived_vrrp[666146]: (DB_HA) setting VIPs.
Mar 11 14:20:42 dbms02 Keepalived_vrrp[666146]: (DB_HA) Sending/queueing gratuitous ARPs on eth0 for 172.21.115.217
Mar 11 14:20:42 dbms02 Keepalived_vrrp[666146]: Sending gratuitous ARP on eth0 for 172.21.115.217
reference
- https://access.redhat.com/documentation/en-us/red_hat_enterprise_linux/7/html/load_balancer_administration/index//
- https://www.slideshare.net/neoclova/maria-db-250919306//
MariaDB 컴파일 후 초기설치할때 에러
MariaDB일부버전에서 mysql 테이블 생성시 다음과 같은 오류
[ERROR] /usr/local/mysql/libexec/mysqld: ambiguous option '--o' (old-alter-table, optimizer_switch)
[ERROR] Aborting
메시지가 떠 있다면 /etc/my.cnf파일을 확인해서 124번줄 o#로 되어 있으면, o을 제거
mariadb기반의 galera 구성 오류메시지 조치
mariadb기반의에서 galera 구성할때 provider 에러메시지 나오면서 종료
2022-02-11  1:23:59 0 [ERROR] WSREP: provider interface version mismatch: need '26', found '25'
2022-02-11  1:23:59 0 [ERROR] WSREP: Failed to create a new provider '/usr/lib64/galera-3/libgalera_smm.so' with options '': Failed to load wsrep library
원인 - Galera cluster의 버전정보 확인필요
x.26버전을 설치해야 하는데 현재 x.25버전이 설치되어 있어서 구동 실패
별도 rpm으로 설치시 해당 URL에서 해당하는 버전 설치 필요 - http://releases.galeracluster.com/
mariadb에서 패스워드 없이 로그인할때
시작하는 말
안녕하세요, 고니입니다.
기존에 작성했던 컨텐츠들 업데이트를 하면서 문서의 리팩토링(Refactoring)을 진행해보려고 합니다.
이번엔 MariaDB 소켓인증 기술편입니다.
MariaDB 버전 업그레이드 후 localhost에서 접속시 패스워드 없이 로그인이 가능했는데 왜 그런지 확인해보려고 합니다.
|
|
| perplexity에서 생성한 AI이미지 |

발생현상
-
패스워드없이 root 로그인
# mysql -u root Welcome to the MariaDB monitor. Commands end with ; or \g. Your MariaDB connection id is 15 Server version: 10.4.7-MariaDB MariaDB Server Copyright (c) 2000, 2018, Oracle, MariaDB Corporation Ab and others. Type 'help;' or '\h' for help. Type '\c' to clear the current input statement. -
DML / DDL 테스트
MariaDB [(none)]> create database test123;
Query OK, 1 row affected (0.003 sec)

MariaDB [test123]> create table wow( name int);
Query OK, 0 rows affected (0.008 sec)
MariaDB [test123]> insert into wow values(123);
Query OK, 1 row affected (0.003 sec)
MariaDB [test123]> select * from wow;
+------+
| name |
+------+
| 123 |
+------+
1 row in set (0.001 sec)

--
MariaDB [(none)]> show databases;
+--------------------+
| Database |
+--------------------+
| information_schema |
| mysql |
| performance_schema |
+--------------------+
3 rows in set (0.001 sec)
왜?
- unux_socket 기능 활성화로 자동인증된 상태여서 그렇다고 하네요.
Unix_Socket을 사용하는 이유는
- unix_socket을 사용하는 이유
- 보안성 강화 : OS계정을 기준으로 사용하기 때문에 별도의 계정으로 mysql root로그인은 할 수 없다고 합니다,
- login 패스워드가 없기 때문에 무차별 대입(brute force) 공격에 유용합니다. 부수적으로 mysql root패스워드가 노출될수가 없다고 합니다. (패스워드 값이 없으니....)
- 단점
- MariaDB에서도 기술한대로 여러사용자가 접속하는 경우에는 적합하진 않습니다.
"The unix_socket authentication plugin is not suited to multiple Unix users accessing a single MariaDB user account." - 패스워드가 노출된 사용자가 sudo 명령어를 이용해 root 권한이 획득된 경우 DB접근도 자동으로 허용할 수 있습니다.
- MariaDB에서도 기술한대로 여러사용자가 접속하는 경우에는 적합하진 않습니다.
unix_socket 비활성화 방법
-
local socket 차단설정
$> vi /etc/my.cnf [mariadb] ... unix_socket=OFF -
root로 localhost 접근을 위한 DCL 적용
MYSQL> grants for *.* to root@localhost identified by '{{ root 패스워드 }}'; Query OK, 0 rows affected (0.011 sec) MYSQL> flush privileges; Query OK, 0 rows affected (0.001 sec) -
Mariadb 서비스 재시작
reference
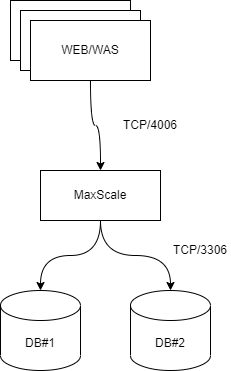
maxscale기반의 DB 이중화 운영
개 요
기존 Mysql + myql-mmm 구조기반에서의 DB이중화 구조에서의 문제점
- 비동기식 replication 구조에서 read / write가 많은 경우 replication이 깨지거나 지연되는 현상이 빈번함
- mmm의 버전 업데이트가 없음 ( latest버전인 2.2.1은 2012년 12월이 마지막)
- mmm 버그로 인한 failover / failback 이슈가 발생이 있음
Maxscale 소개
- Mariadb에서 제공하는 DB클러스터 구성
- glaera cluster를 이용한 데이터이중화, maxscale를 이용한 db proxy 구조로 되어 있음
- 기본적으로 BSD라이선스를 적용하고 있고, BSD라이선스의 경우 S/W 개발사가 적용한 날짜 이후에는 GPL 라이선스로 변경됨
- BSD 라이선스를 적용받는 경우 연동할 수 있는 노드수는 3대 미만, 즉 2대까지만 maxscale에 연결할 수 있고 그 수량을 넘는 경우 라이선스 비용 발생이 필요함
- GPL의 경우 연동 노드 수 제한없음
- '22년 2월 기준으로 확인된 메이저 버전별 BSD라이선스 유효기간은 다음과 같습니다.
- 2.0 → 2019-01-01 (BSD 라이선스 만료, 연결노드 수 제한없음)
- 2.1 → 2019-07-01 (BSD 라이선스 만료, 연결노드 수 제한없음)
- 2.2 → 2020-01-01 (BSD 라이선스 만료, 연결노드 수 제한없음)
- 2.3 → 2024-06-02
- 2.4 → 2026-01-04
- 2.5 → 2027-10-10
- 6.2 → 2026-03-08
- 6.3 - 2026-05-03
- 6.4 - 2027-11-30
- 23.0.8 - 2027-11-30
- 보다 상세한 내용은 https://github.com/mariadb-corporation/MaxScale 을 참고하면 됩니다
- 그외에 벤더사에서 제공하는 기능은 다음과 같다.
- scale out environment - 별도 DB 다운타임없이 스케일-아웃이 가능, read / write spilit이 가능
- High availability - 장애 모니터링을 위해 read transction을 라우딩
- Secure database - app이 DB에 접근하는것이 아니라 maxsale로 접근하기 때문에 서버 접근 정보 확보가 가능, 방화벽 필터 사용시 클러스터 연결을 제안해서 DDos 공격으로부터 서버 보호가 가능
- MMM / Maxscale 비교
| 항 목 | Mysql + Mysql-MMM | Mariadb + Maxscale |
| 서버 수량 | 2(DB) + 1(monitor) | 3(DB) + 1(Maxscale) |
| DB버전 | Mysql | Mariadb 10 이상 |
| 데이터 동기화 방식 | replication | galera cluster |
| 모니터링 방식 | monitor → agent로 db상태 확인 | maxscale → DB 방향으로 상태 확인 |
| failover절차 |
|
|
S/W 설치하기
- 시스템 구성도
- maxscale : 192.168.0.101
- db1 : 192.168.0.102
- db2 : 192.168.0.103
- Maxscale 설치 하기
- 리포지터리 구성
$>  vi /etc/yum.repos.d/mariadb.repo
[mariadb-main]
name = MariaDB Server
baseurl = https:~/~/downloads.mariadb.com/MariaDB/mariadb-10.5/yum/rhel/7/x86_64
gpgkey = file:~/~//etc/pki/rpm-gpg/MariaDB-Server-GPG-KEY
gpgcheck = 1
enabled = 1
[mariadb-maxscale]
# To use the latest stable release of MaxScale, use "latest" as the version
# To use the latest beta (or stable if no current beta) release of MaxScale, use "beta" as the version
name = MariaDB MaxScale
baseurl = https:~/~/dlm.mariadb.com/repo/maxscale/latest/yum/rhel/7/x86_64
gpgkey = file:~/~//etc/pki/rpm-gpg/MariaDB-MaxScale-GPG-KEY
gpgcheck = 1
enabled = 1
[mariadb-tools]
name = MariaDB Tools
baseurl = https:~/~/downloads.mariadb.com/Tools/rhel/7/x86_64
gpgkey = file:~/~//etc/pki/rpm-gpg/MariaDB-Enterprise-GPG-KEY
gpgcheck = 1
enabled = 1
- 리포지터리 구성
- 패키지 설치 후 설정하기
$> yum install maxscale -y ... $> vi /etc/maxscale.cnf # MaxScale documentation: # https:~/~/mariadb.com/kb/en/mariadb-maxscale-25/ # Global parameters # # Complete list of configuration options: # https:~/~/mariadb.com/kb/en/mariadb-maxscale-25-mariadb-maxscale-configuration-guide/ [maxscale] threads=auto # Server definitions # # Set the address of the server to the network # address of a MariaDB server. # [server1] type=server address=192.168.0.102 port=3306 protocol=MariaDBBackend [server2] type=server address=192.168.0.103 port=3306 protocol=MariaDBBackend [server3] type=server address=192.168.0.101 port=3306 protocol=MariaDBBackend # Monitor for the servers # # This will keep MaxScale aware of the state of the servers. # MariaDB Monitor documentation: # https:~/~/mariadb.com/kb/en/maxscale-25-monitors/ [MariaDB-Monitor] type=monitor #module=mariadbmon #Replication으로 데이터 동기화시 선택 module=galeramon #GaleraCluster로 데이터 동기화시 선택 servers=server1,server2,server3 user=maxscale #maxscale이 db접근할때 사용하는 계정명 password=maxscale #maxscale이 db접근할때 사용하는 계정패스워드 monitor_interval=2000 # Service definitions # # Service Definition for a read-only service and # a read/write splitting service. # # ReadConnRoute documentation: # https:~/~/mariadb.com/kb/en/mariadb-maxscale-25-readconnroute/ [Read-Only-Service] type=service router=readconnroute servers=server1 user=myuser password=mypwd router_options=slave # ReadWriteSplit documentation: # https:~/~/mariadb.com/kb/en/mariadb-maxscale-25-readwritesplit/ [Read-Write-Service] type=service router=readwritesplit servers=server1,server2 #read / write 분산할 서버 정보 user=maxscale #maxscale이 db접근할때 사용하는 계정명 password=maxscale #maxscale이 db접근할때 사용하는 계정패스워드 # Listener definitions for the services # # These listeners represent the ports the # services will listen on. # [Read-Only-Listener] type=listener service=Read-Only-Service protocol=MariaDBClient port=4008 [Read-Write-Listener] type=listener service=Read-Write-Service protocol=MariaDBClient port=4006 -
Mariadb 구성하기
- 패키지 내려받기
$> wget https://downloads.mariadb.org/interstitial/mariadb-10.5.11/bintar-linux-x86_64/mariadb-10.5.11-linux-x86_64.tar.gz -O mariadb-10.5.11-linux-x86_64.tar.gz - DB설치 후 galera clutser 구성
$> tar -zxvf mariadb-10.5.11-linux-x86_64.tar.gz -C /usr/local/
...
$> vi /etc/my.cnf
[galera]
# Mandatory settings
wsrep_on=ON
wsrep_provider=/usr/local/mariadb/lib/galera-4/libgalera_smm.so
wsrep_cluster_address=gcomm:~/~/192.168.0.102,192.168.0.103,192.168.0.101
binlog_format=row
default_storage_engine=InnoDB
innodb_autoinc_lock_mode=2
wsrep_node_address=192.168.0.101
#
# Allow server to accept connections on all interfaces.
#
bind-address=0.0.0.0
#
# Optional setting
#wsrep_slave_threads=1
#innodb_flush_log_at_trx_commit=0
- 패키지 내려받기
- 첫번째 노드에서 galera cluster master 선언 (mariadb 프로세스도 실행함)
$>> galera_new_cluster - 나머지 노드에서 mariadb 실행
$>> ./mariadbd-safe - DB권한 설정
MariaDB [(none)]> grant select on mysql.* to maxscale@'%' identified by 'maxscale' with grant option;
모니터링
- maxscale서비스 실행
$>> systemctl start maxscale - maxscle에 등록된 서버 현항확인
$>> maxctrl list servers ┌─────────┬───────────────┬──────┬─────────────┬─────────────────────────┬──────┐ │ Server │ Address │ Port │ Connections │ State │ GTID │ ├─────────┼───────────────┼──────┼─────────────┼─────────────────────────┼──────┤ │ server1 │ 192.168.0.102 │ 3306 │ 2 │ Slave, Synced, Running │ │ ├─────────┼───────────────┼──────┼─────────────┼─────────────────────────┼──────┤ │ server2 │ 192.168.0.103 │ 3306 │ 0 │ Slave, Synced, Running │ │ ├─────────┼───────────────┼──────┼─────────────┼─────────────────────────┼──────┤ │ server3 │ 192.168.0.101 │ 3306 │ 0 │ Master, Synced, Running │ │ └─────────┴───────────────┴──────┴─────────────┴─────────────────────────┴──────┘ - 서비스 상태 확인
$>> maxctrl list services
┌────────────────────┬────────────────┬─────────────┬───────────────────┬─────────┐
│ Service            │ Router         │ Connections │ Total Connections │ Servers │
├────────────────────┼────────────────┼─────────────┼───────────────────┼─────────┤
│ Read-Write-Service │ readwritesplit │ 2           │ 4                 │ server1 │
├────────────────────┼────────────────┼─────────────┼───────────────────┼─────────┤
│ Read-Only-Service  │ readconnroute  │ 0           │ 0                 │ server1 │
└────────────────────┴────────────────┴─────────────┴───────────────────┴─────────┘
장애조치
- 전체DB서버 장애시 조치
- 각 DB서버 접속 후 데이터 경로 진입 후 "grastate.dat 파일 확인
$>> cat grastate.dat # GALERA saved state version: 2.1 uuid: 7d985eca-de63-11eb-87c6-0ad28b9e1f30 seqno: -1 safe_to_bootstrap: 0 - safe_to_bootstrap이 1인 값을 찾아서 해당 노드에서 galera_new__cluster 재실행
safe_to_bootstrap이 1인 값이 전체 down전에 master 역활했던 node
- 각 DB서버 접속 후 데이터 경로 진입 후 "grastate.dat 파일 확인
my.cnf를 이용한 mysql바이너리 로그 관리
설정예시 - 1개당 바이너리 로그는 500M가 최대크기이고, 30일동안 보관 후 자동 삭제
$> vi /etc/my.cnf
...
log-bin         = mysql-bin
log-bin-index   = mysql-bin
expire_logs_days = 30
max_binlog_size = 500M
...mysql 5.5 리플리케이션 구성하기
Mysql 5.5 Replication 구성하기(Master – Slave)
- 5.5부터는 동기화되는 Replication 구성이 가능(5.1은 비동기식으로 Data Sync시 오류 발생
-
마스터 서버 작업1. /etc/my.cnf파일 수정
$> vi /etc/my.cnf ... server-id = 1 binlog-do-db=test1234 # 적용할 DB명 log-bin=mysql-master-bin # 리플리케이션에 사용할 로그명- 마스터 서버 replication 플러그인 설치
mysql> INSTALL PLUGIN rpl_semi_sync_master SONAME 'semisync_master.so'; - 플러그인 활성화
mysql> set global rpl_semi_sync_master_enabled=1; Query OK, 0 rows affected (0.00 sec) mysql> set global rpl_semi_sync_master_timeout =1000; Query OK, 0 rows affected (0.00 sec) - 설치 및 활성화 확인
mysql> show variables like 'rpl_semi_sync%'; +————————————+——-+ | Variable_name | Value | +————————————+——-+ | rpl_semi_sync_master_enabled | ON | | rpl_semi_sync_master_timeout | 1000 | | rpl_semi_sync_master_trace_level | 32 | | rpl_semi_sync_master_wait_no_slave | ON | +————————————+——-+ - Slave 접속할 수 있게 권한 설정
mysql> grant replication slave on *.* to 'test'@'192.168.10.10' identified by 'test1234';
- 리플리케이션 상태 확인
mysql> show master status;
+————————-+———-+————–+——————+
| File | Position | Binlog_Do_DB | Binlog_Ignore_DB |
+————————-+———-+————–+——————+
| mysql-master-bin.000001 | 107 | test1234 | |
+————————-+———-+————–+——————+
- 마스터 서버 replication 플러그인 설치
-
슬레이브 서버
-
/etc/my.cnf파일 수정
$> vi /etc/my.cnf ... server-id = 2 relay-log = slave-relay-bin- 플러그인 설치
mysql> INSTALL PLUGIN rpl_semi_sync_slave SONAME 'semisync_slave.so'; - 플러그인 활성화
mysql> set global rpl_semi_sync_slave_enabled=1; - 활성화 확인
mysql> show variables like ‘rpl_semi_sync%’; +———————————+——-+ | Variable_name | Value | +———————————+——-+ | rpl_semi_sync_slave_enabled | ON | | rpl_semi_sync_slave_trace_level | 32 | +———————————+——-+ 2 rows in set (0.01 sec) - Master서버와 연결
mysql> change master to master_host='192.168.10.20', master_user='test', master_password='test1234', master_log_file='mysql-master-bin.000001', master_log_pos=107;
- 플러그인 설치
-
Reference
- http://lks21c.blogspot.kr/2011/10/mysql-replication-semi-sync-how-to.html
- http://abydos.co.kr/xe/index.php?document_srl=1886
mysql 기반의 리플리케이션 및 mmm 설치
MYSQL 설치
-
설치환경 구성1. Mysql사용자정보 추가
[root@localhost ~]# groupadd –g 1002 mysql [root@localhost ~]# useradd -M mysql -u 1002 –g 1002 -d /svc/mysql/- 추가 패키지 설치
[root@localhost ~]# yum install ncurses* openssl-devel* \ gdbm-devel* curl* gmp* libxml2* libtermcap* cmake* libc-client-devel\ libcurl-devel libxslt -y - 바이너리&환경설정 설치패키지&환경설정 다운로드
[root@localhost ~]# tar -zxf mysql-5.6.34-linux-glibc2.5-x86_64.tar.gz [root@localhost ~]# mv mysql-5.6.34-linux-glibc2.5-x86_64 /svc/mysql [root@localhost ~]# mv -f my.cnf /etc/my.cnf [root@localhost ~]# cp /svc/mysql/ [root@localhost ~]# ./scripts/mysql_install_db --user=mysql --datadir=/svc/db_data/ [root@localhost ~]# chown -R root: /svc/mysql/ [root@localhost ~]# chown -R mysql: /svc/db_data/ [root@localhost ~]# cp support-files/mysql.server /etc/init.d/mysqld [root@localhost ~]# chmod +x /etc/init.d/mysqld - 서비스 등록 및 실행
[root@localhost ~]# /etc/init.d/mysqld start
Starting mysqld: [ OK ]
- 추가 패키지 설치
-
MYSQL 이중화 구성1. 서버 ID설정 (Active/Standby 모두 설정)
[root@localhost ~]# vi /etc/my.cnf … server-id = 1 (Active는 1, Standby는 2로 설정)- 리플리케이션 권한 설정서버 리플리케이션 설정 (Active/Standby 모두 설정)
mysql> grant replication slave on . to 'repl'@'상대방DB_IP' identified by 'repl'; mysql> flush privileges; Query OK, 0 rows affected (0.00 sec) - 액티브 서버에서 수행
mysql> show master status \G; 1. row *************************** File: binlog.000004 Position: 722 Binlog_Do_DB: Binlog_Ignore_DB: Executed_Gtid_Set: 1 row in set (0.00 sec) ERROR: No query specified - 스탠바이서버에서 수행
mysql> change master to master_host='상대방DB_IP', master_user='repl', master_password='repl', master_log_file='binlog.000004', master_log_pos=722; Query OK, 0 rows affected, 2 warnings (0.02 sec) - 리플리케이션 연동 (각 DB서버에서 수행)
mysql> start slave; Query OK, 0 rows affected (0.00 sec) - Standby 시작 및 상태 확인 (Active/Standby 모두 설정)
mysql> show slave status \G;
*************************** 1. row ***************************
               Slave_IO_State: Waiting for master to send event
                  Master_Host: 상대방DB_IP
                  Master_User: repl
                  Master_Port: 3306
                Connect_Retry: 60
              Master_Log_File: binlog.000004
          Read_Master_Log_Pos: 722
               Relay_Log_File: relay-bin.000007
                Relay_Log_Pos: 280
        Relay_Master_Log_File: binlog.000005
             Slave_IO_Running: Yes
            Slave_SQL_Running: Yes
              Replicate_Do_DB:
          Replicate_Ignore_DB:
           Replicate_Do_Table:
       Replicate_Ignore_Table:
      Replicate_Wild_Do_Table:
  Replicate_Wild_Ignore_Table:
                   Last_Errno: 0
                   Last_Error:
                 Skip_Counter: 0
          Exec_Master_Log_Pos: 120
              Relay_Log_Space: 607
              Until_Condition: None
               Until_Log_File:
                Until_Log_Pos: 0
           Master_SSL_Allowed: No
           Master_SSL_CA_File:
           Master_SSL_CA_Path:
              Master_SSL_Cert:
            Master_SSL_Cipher:
               Master_SSL_Key:
        Seconds_Behind_Master: 0
Master_SSL_Verify_Server_Cert: No
                Last_IO_Errno: 0
                Last_IO_Error:
               Last_SQL_Errno: 0
               Last_SQL_Error:
  Replicate_Ignore_Server_Ids:
             Master_Server_Id: 1
                  Master_UUID: 2667fd34-0483-11e7-b59d-525400a0f91d
             Master_Info_File: /svc/db_data/master.info
                    SQL_Delay: 0
          SQL_Remaining_Delay: NULL
      Slave_SQL_Running_State: Slave has read all relay log; waiting for the slave I/O thread to update it
           Master_Retry_Count: 86400
                  Master_Bind:
      Last_IO_Error_Timestamp:
     Last_SQL_Error_Timestamp:
               Master_SSL_Crl:
           Master_SSL_Crlpath:
           Retrieved_Gtid_Set:
            Executed_Gtid_Set:
                Auto_Position: 0
1 row in set (0.00 sec)

ERROR:
No query specified
- 리플리케이션 권한 설정서버 리플리케이션 설정 (Active/Standby 모두 설정)
Mysql-MMM 설치하기
- Mysql-MMM구성도
- MMM(Multi-Master Replication Manager for MySQL)은 리플리케이션으로 DB데이터를 이중화했을때, 각 DBMS별로 상태 확인하여 ReadWrite, Readonly VIP를 관리하기 위한 오픈소스
- 서버별 설치 Component
대상서버
Component
역 할
svcdb/dashboard_db Mysql, mmm-agent Mysql, 데이터 동기화, mmm 상태확인 db monitor mmm-monitor 각 Agent별 Healthcheck, VIP 관리 - MMM접근 설정 (DB서버)
mysql> grant process,super,replication client on . to 'agent'@'자신IP' identified by 'agent'; Query OK, 0 rows affected (0.00 sec) mysql> flush privileges; Query OK, 0 rows affected (0.00 sec) - MMM-agent 설치 (DB서버)모니터 접근 허용하기 (DB서버)
mysql> GRANT REPLICATION CLIENT ON . TO 'monitor'@'MONITOR서버IP' IDENTIFIED BY 'monitor';
1 row in set (0.00 sec)
mysql> flush privileges;
Query OK, 0 rows affected (0.00 sec)
MMM agent 설치
- 설치에 필요한 패키지
- mysql-mmm-2.2.1-2.el6.noarch.rpm
- mysql-mmm-agent-2.2.1-2.el6.noarch.rpm
- mysql-mmm-tools-2.2.1-2.el6.noarch.rpm
OS환경에 따라 종속된 패키지가 필요할 수 있음. 종속된 패키지는 perl관련 패키지가 설치되어 있어야 함.
- mmm-agent설치
[root@localhost ~]# yum install –y mysql-mmm-2.2.1-2.el6.noarch.rpm [root@localhost ~]# yum install –y mysql-mmm-agent-2.2.1-2.el6.noarch.rpm [root@localhost ~]# yum install –y mysql-mmm-tools-2.2.1-2.el6.noarch.rpm - mmm-common.conf 설정
$> vi /etc/mysql-mmm/mmm_common.conf active_master_role writer <host default> cluster_interface bond0 #서버NIC 인터페이스 기재 pid_path /var/run/mysql-mmm/mmm_agentd.pid bin_path /usr/libexec/mysql-mmm/ replication_user repl #리플리케이션 사용자 입력 replication_password repl #리플리케이션 사용자 패스워드 agent_user agent #mmm을 통해 DBMS로 접근할 사용자 입력 agent_password agentpass #패스워드 입력 </host> <host db1> ip Mater 서버IP mode master peer db2 </host> <host db2> ip Standby 서버IP mode master peer db1 </host> <role writer> hosts db1, db2 ips DB VIP mode exclusive </role> - mmm - mmm_agent.conf 설정
$> vi /etc/mysql-mmm/mmm_agent.conf include mmm_common.conf # The 'this' variable refers to this server. Proper operation requires # that 'this' server (db1 by default), as well as all other servers, have the # proper IP addresses set in mmm_common.conf. this db1 # Active는 db1, Standby는 db2로 기재 - mmm-agent 서비스 실행 후 프로세스 상태 확인
[root@localhost ~]# /etc/init.d/mysql-mmm-agent start
Starting mmm_agentd: [ OK ]


[root@localhost ~]# ps -ef | grep mmm
root 8052 8031 0 10:12 pts/0 00:00:00 grep mmm
root 18251 1 0 2016 ? 00:00:00 mmm_agentd
root 18253 18251 0 2016 ? 04:03:18 mmm_agentd
MMM-monitor 설치 (Satistics#2 서버)
- 설치에 필요한 패키지
- mysql-mmm-2.2.1-2.el6.noarch.rpm
- mysql-mmm-monitor-2.2.1-2.el6.noarch.rpm
- mysql-mmm-tools-2.2.1-2.el6.noarch.rpm
OS환경에 따라 종속된 패키지가 필요할 수 있음. 종속된 패키지는 perl관련 패키지가 설치되어 있어야 함.
- svcdb용 MMM 설정
$> vi /etc/mysql-mmm/mmm_common_svcdb.conf active_master_role writer <host default> cluster_interface bond0 서버NIC 인터페이스 기재 pid_path /var/run/mysql-mmm/mmm_agentd_svcdb.pid bin_path /usr/libexec/mysql-mmm/ replication_user repl 리플리케이션 사용자 입력 replication_password repl 리플리케이션 사용자 패스워드 agent_user agent mmm을 통해 DBMS로 접근할 사용자 입력 agent_password agentpass 패스워드 입력 </host> <host db1> ip svcdb Mater 서버IP mode master peer db2 </host> <host db2> ip svcdb Standby 서버IP mode master peer db1 </host> <role writer> hosts db1, db2 ips svcdb VIP mode exclusive </role> $> vi /etc/mysql-mmm/mmm_mon_svcdb.conf include mmm_common_svcdb.conf <monitor> ip 127.0.0.1 pid_path /var/run/mysql-mmm/mmm_mond_svcdb.pid bin_path /usr/libexec/mysql-mmm status_path /var/lib/mysql-mmm/mmm_mond_svcdb.status ping_ips svcdb RIP IP는 콤마(,)로 구분 auto_set_online 60 port 9991 </monitor> <host default> monitor_user mmm_monitor mmm 접근 사용자 monitor_password monitorpw mmm 패스워드정보 </host> debug 0 $> vi /etc/mysql-mmm/mmm_mon_log_svcdb.conf log4perl.logger = INFO, MMMLog log4perl.appender.MMMLog = Log::Log4perl::Appender::File log4perl.appender.MMMLog.Threshold = INFO log4perl.appender.MMMLog.filename = /var/log/mysql-mmm/mmm_mond_svcdb.log log4perl.appender.MMMLog.recreate = 1 log4perl.appender.MMMLog.layout = PatternLayout log4perl.appender.MMMLog.layout.ConversionPattern = %d %5p %m%n -
서비스 등록
- init.d스크립트 복사
[root@localhost ~]# cp /etc/init.d/mysql-mmm-monitor /etc/init.d/mysql-mmm-svcdb - 스크립트 수정
$> vi /etc/init.d/mysql-mmm-svcdb
#!/bin/sh
#
# mysql-mmm-monitor  This shell script takes care of starting and stopping
#                    the mmm monitoring daemon.
#
# chkconfig: - 64 36
# description:  MMM Monitor.
# processname: mmm_mond
# config: /etc/mysql-mmm/mmm_mon.conf
# pidfile: /var/run/mysql-mmm/mmm_mond.pid

# Source function library and defaults file.
. /etc/rc.d/init.d/functions
. /etc/default/mysql-mmm-monitor

# Cluster name (it can be empty for default cases)
CLUSTER='svcdb'
LOCKFILE='/var/lock/subsys/mysql-mmm-monitor'
prog='MMM Monitor Daemon'

if [ "$CLUSTER" != "" ]; then
       MMMD_MON_BIN="/usr/sbin/mmm_mond @$CLUSTER"
MMMD_MON_PIDFILE="/var/run/mysql-mmm/mmm_mond_$CLUSTER.pid"
else
       MMMD_MON_BIN="/usr/sbin/mmm_mond"
       MMMD_MON_PIDFILE="/var/run/mysql-mmm/mmm_mond.pid"
Fi
- init.d스크립트 복사
-
dashboard_db MMM설정
$> vi /etc/mysql-mmm/mmm_common_dashboard_db.conf active_master_role writer <host default> cluster_interface bond0 서버NIC 인터페이스 기재 pid_path /var/run/mysql-mmm/mmm_agentd-cssatdb.pid bin_path /usr/libexec/mysql-mmm/ replication_user repl 리플리케이션 사용자 입력 replication_password repl 리플리케이션 사용자 패스워드 agent_user agent mmm을 통해 DBMS로 접근할 사용자 입력 agent_password agentpass 패스워드 입력 </host> <host db1> ip dashboard_db Mater 서버IP mode master peer db2 </host> <host db2> ip dashboard_db Standby 서버IP mode master peer db1 </host> <role writer> hosts db1, db2 ips dashboard_db VIP mode exclusive </role> $> vi /etc/mysql-mmm/mmm_mon_dashboard_db.conf include mmm_common_dashboard_db.conf <monitor> ip 127.0.0.1 pid_path /var/run/mysql-mmm/mmm_mond_dashboard_db.pid bin_path /usr/libexec/mysql-mmm status_path /var/lib/mysql-mmm/mmm_mond_dashboard_db.status ping_ips dashboard_db RIP입력 IP는 콤마(,)로 구분 auto_set_online 60 port 9990 </monitor> <host default> monitor_user mmm_monitor mmm 접근 사용자 monitor_password monitorpw mmm 패스워드정보 </host> debug 0 $> vi /etc/mysql-mmm/mmm_mon_log_dashboard_db.conf log4perl.logger = INFO, MMMLog log4perl.appender.MMMLog = Log::Log4perl::Appender::File log4perl.appender.MMMLog.Threshold = INFO log4perl.appender.MMMLog.filename = /var/log/mysql-mmm/mmm_mond_dashboard_db.log log4perl.appender.MMMLog.recreate = 1 log4perl.appender.MMMLog.layout = PatternLayout log4perl.appender.MMMLog.layout.ConversionPattern = %d %5p %m%n- 서비스 등록
- init.d스크립트 복사
[root@localhost ~]# cp /etc/init.d/mysql-mmm-monitor /etc/init.d/mysql-mmm-dashboard_db
- init.d스크립트 내용변경
%> vi /etc/init.d/mysql-mmm-dashboard_db #!/bin/sh mysql-mmm-monitor This shell script takes care of starting and stopping the mmm monitoring daemon. chkconfig: - 64 36 description: MMM Monitor. processname: mmm_mond config: /etc/mysql-mmm/mmm_mon.conf pidfile: /var/run/mysql-mmm/mmm_mond.pid Source function library and defaults file. . /etc/rc.d/init.d/functions . /etc/default/mysql-mmm-monitor Cluster name (it can be empty for default cases) CLUSTER='dashboard_db' LOCKFILE='/var/lock/subsys/mysql-mmm-monitor' prog='MMM Monitor Daemon' if [ "$CLUSTER" != "" ]; then MMMD_MON_BIN="/usr/sbin/mmm_mond @$CLUSTER" MMMD_MON_PIDFILE="/var/run/mysql-mmm/mmm_mond_$CLUSTER.pid" else MMMD_MON_BIN="/usr/sbin/mmm_mond" MMMD_MON_PIDFILE="/var/run/mysql-mmm/mmm_mond.pid" fi - Centos7 환경에서MMM-monitor등록
- systemctl 서비스 생성 및 등록
[root@localhost ~]# cd /usr/lib/systemd/system [root@localhost system]# cp mysql-mmm-monitor.service mysql-mmm-monitor_svcdb.service [root@localhost system]# cp mysql-mmm-monitor.service mysql-mmm-monitor_dashboard_db.service [root@localhost system]# systemctl enable mysql-mmm-monitor_svcdb.service [root@localhost system]# systemctl enable mysql-mmm-monitor_dashboard_db.service $> vi /usr/lib/systemd/system/ mysql-mmm-monitor_svcdb.service [Unit] Description=MySQL MMM Monitor After=network.target mysqld.service [Service] Type=forking PIDFile=/var/run/mmm_mond_svcdb.pid ExecStart=/etc/init.d/mysql-mmm-monitor-svcdb start ExecStop=/etc/init.d/mysql-mmm-monitor-svcdb stop PrivateTmp=true [Install] WantedBy=multi-user.target $> vi /usr/lib/systemd/system/ mysql-mmm-monitor_dashboard_db.service [Unit] Description=MySQL MMM Monitor After=network.target mysqld.service [Service] Type=forking PIDFile=/var/run/mmm_mond_svcdb.pid ExecStart=/etc/init.d/mysql-mmm-monitor-dashboard_db start ExecStop=/etc/init.d/mysql-mmm-monitor-dashboard_db stop PrivateTmp=true [Install] WantedBy=multi-user.target -
서비스 실행
- MMM-monitor 서비스 실행 (monitor서버에서 실행)
[root@localhost ~]# /etc/init.d/mysql-mmm-svcdb start Starting mmm_mond: [ OK ] [root@localhost ~]# /etc/init.d/mysql-mmm-dashboard_db start Starting mmm_mond: [ OK ] - Mysql 프로세스 실행 상태 확인서비스 상태 확인 (db서버에서 실행)
[root@localhost ~]# ps –ef | grep mysql root 6714 1 0 Jan08 ? 00:00:00 /bin/sh /usr/local/mysql/bin/mysqld_safe --datadir=/home/mysqldata --pid-file=/home/mysqldata/localhost.pid mysql 7856 6714 0 Jan08 ? 00:26:50 /usr/local/mysql/bin/mysqld --basedir=/usr/local/mysql --datadir=/home/mysqldata --plugin-dir=/usr/local/mysql/lib/plugin --user=mysql --log-error=/home/mysqldata/error.log --open-files-limit=8192 --pid-file=/home/mysqldata/localhost.pid --socket=/tmp/mysql.sock --port=3306 - Mysql 쿼리 처리여부 확인
[root@localhost ~]# mysql -u root -p'root패스워드' -e'select now()' 2017-03-12 19:06:14 - Mmm 프로세스상태 확인
[root@localhost ~]# ps -ef | grep mmm root 10832 1 0 Mar07 ? 00:00:00 mmm_mond-dashboard_db root 10834 10832 0 Mar07 ? 00:04:27 mmm_mond-dashboard_db root 10843 10834 0 Mar07 ? 00:01:49 perl /usr/libexec/mysql-mmm/monitor/checker @dashboard_db ping_ip root 10846 10834 0 Mar07 ? 00:01:03 perl /usr/libexec/mysql-mmm/monitor/checker @dashboard_db mysql root 10848 10834 0 Mar07 ? 00:00:35 perl /usr/libexec/mysql-mmm/monitor/checker @dashboard_db ping root 10850 10834 0 Mar07 ? 00:01:29 perl /usr/libexec/mysql-mmm/monitor/checker @dashboard_db rep_backlog root 10852 10834 0 Mar07 ? 00:01:28 perl /usr/libexec/mysql-mmm/monitor/checker @dashboard_db rep_threads root 10960 1 0 Mar07 ? 00:00:00 mmm_mond-svcdb root 10962 10960 0 Mar07 ? 00:04:23 mmm_mond-svcdb root 10969 10962 0 Mar07 ? 00:01:47 perl /usr/libexec/mysql-mmm/monitor/checker @svcdb ping_ip root 10972 10962 0 Mar07 ? 00:01:03 perl /usr/libexec/mysql-mmm/monitor/checker @svcdb mysql root 10974 10962 0 Mar07 ? 00:00:35 perl /usr/libexec/mysql-mmm/monitor/checker @svcdb ping root 10976 10962 0 Mar07 ? 00:01:27 perl /usr/libexec/mysql-mmm/monitor/checker @svcdb rep_backlog root 10978 10962 0 Mar07 ? 00:01:27 perl /usr/libexec/mysql-mmm/monitor/checker @svcdb rep_threads root 29560 27996 0 21:40 pts/3 00:00:00 grep mmm - MMM 이중화 상태 확인 (dashboard_db)
[root@localhost ~]# mmm_control @dashboard_db show db1(192.168.67.230) master/ONLINE. Roles: writer(192.168.67.229) db2(192.168.67.231) master/ONLINE. Roles: - MMM 이중화 상태 확인 (svcdb)
[root@localhost ~]# mmm_control @svcdb show db1(192.168.67.224) master/ONLINE. Roles: writer(192.168.67.223) db2(192.168.67.225) master/ONLINE. Roles: - DBMS별 상태 확인 (svcdb)
[root@localhost ~]# mmm_control @svcdb checks all db2 ping [last change: 2017/03/09 11:03:42] OK db2 mysql [last change: 2017/03/09 11:03:42] OK db2 rep_threads [last change: 2017/03/09 11:03:42] OK db2 rep_backlog [last change: 2017/03/09 06:02:35] OK: Backlog is null db1 ping [last change: 2017/03/09 11:03:42] OK db1 mysql [last change: 2017/03/09 11:03:42] OK db1 rep_threads [last change: 2017/03/09 11:03:42] OK db1 rep_backlog [last change: 2017/03/09 11:03:42] OK: Backlog is null - DBMS별 상태 확인 (dashboard_db)
[root@localhost ~]# mmm_control @dashboard_db checks all
db2 ping [last change: 2017/03/09 10:58:37] OK
db2 mysql [last change: 2017/03/09 10:58:37] OK
db2 rep_threads [last change: 2017/03/09 10:58:37] OK
db2 rep_backlog [last change: 2017/03/09 10:58:37] OK: Backlog is null
db1 ping [last change: 2017/03/09 10:58:37] OK
db1 mysql [last change: 2017/03/09 10:58:37] OK
db1 rep_threads [last change: 2017/03/09 10:58:37] OK
db1 rep_backlog [last change: 2017/03/09 10:58:37] OK: Backlog is null
- MMM-monitor 서비스 실행 (monitor서버에서 실행)
FAQ
- 설치 과정의 오류
현상 rpm설치시 아래내용으로 메시지 출력후 설치 실패
[root@localhost ~]# rpm -Uvh 123.rpm
warning: 123.rpm: Header V3 RSA/SHA256 Signature, key ID 0608b895: NOKEY
error: Failed dependencies:
perl(Log::Log4perl) is needed by mysql-mmm-2.2.1-2.el6.noarch원인 MMM 설치시 종속된 패키지 설치 실패 확인사항 perl-Proc-Daemon, perl-Proc-ProcessTable, perl-Log, perl-Mail 패키시 설치여부 확인 조치방안 관련된 전체 패키지 내려받은 후 설치작업 수행 - MMM-monitor 서비스 구동 실패현상
현상 설치 및 설정완료후 서비스 구동시 구동불가
[root@localhost ~]# /etc/init.d/mysql-mmm-dashboard_db-monitor start
Starting MMM Monitor Daemon: Configuration file /etc/mysql-mmm/mmm_mon_dashboard_db.conf is world readable! at
/usr/share/perl5/vendor_perl/MMM/Common/Config.pm line 132 [실패]원인 Mmm config의 권한 설정의 오류 확인사항 /etc/mysql-mmm/ 경로에 있는 config파일의 퍼미션 확인 조치방안 전체 퍼미션을 640으로 설정 수행
Chmod 640 /etc/mysql-mmm/*.conf - VIP할당 실패
현상 Mmm 서비스 구동 후 IP할당불가 원인 monitor에서 mysql로 접근하는 권한이 오류가 있어 mysql상태체크 불가 확인사항 /var/log/mysql-mmm/mmm-agent.log에서 Can't connect to MySQL sever 문자열 존재여부 확인 조치방안 Mysql 접근권한 설정 - MMM 리소스 확인시 중복출력
현상 mmm_config를 통해 DBMS별 상태 확인 불가 원인 Group별 생성되는 포트를 생성하지 않는 경우 발생 확인사항 /etc/mysql-mmm/mmm_mon_svcdb.conf, /etc/mysql-mmm/mmm_mon_svcdb.conf 파일안에 port항목이 기재되어 있고, 각각 다른 포트를 사용하는지 확인 조치방안 dbms별 포트 설정 - Centos7에서 mmm_monitor cluster 구성실패
현상 Systemctl을 이용한 mysql-monitor 서비스 작동 실패 원인 Systemctl을 이용한 mmm-monitor실행은 cluster모드를 지원하지 않음 확인사항 Systemctl 구문안에 ExecStart / ExecStop 구문의 명령어 확인
/etc/init.d/mysql-mmm-monitor- 파일이 있는지 확인조치방안 설정파일 및 서비스 구동 명령어 확인
mysql 데이터값 변경하기
mysql 전체 컬럼의 데이터 변경하기
테이블명 : test_table
업데이트 대상 컬럼 : name_cols
원래 문자 : linux
바꿀문자 : windows
MYSQL> update test_table set name_cols=replace(name_cols,'linux','windows');reference
mysql 리플리케이션 UUID오류문제
mysql 통째로 복사한 이후에 리플리케이션 구성할때 slave status확인하면 UUID관련된 오류가 발생합니다.
mysql> show slave status \G;
*************************** 1. row ***************************
               Slave_IO_State:
                  Master_Host: 192.168.0.130
                  Master_User: repl
                  Master_Port: 3306
                Connect_Retry: 60
              Master_Log_File: mysql-bin.000005
          Read_Master_Log_Pos: 502
               Relay_Log_File: localhost-relay-bin.000001
                Relay_Log_Pos: 4
        Relay_Master_Log_File: mysql-bin.000005
             Slave_IO_Running: No
            Slave_SQL_Running: Yes
              Replicate_Do_DB:
          Replicate_Ignore_DB:
           Replicate_Do_Table:
       Replicate_Ignore_Table:
      Replicate_Wild_Do_Table:
  Replicate_Wild_Ignore_Table:
                   Last_Errno: 0
                   Last_Error:
                 Skip_Counter: 0
          Exec_Master_Log_Pos: 502
              Relay_Log_Space: 120
              Until_Condition: None
               Until_Log_File:
                Until_Log_Pos: 0
           Master_SSL_Allowed: No
           Master_SSL_CA_File:
           Master_SSL_CA_Path:
              Master_SSL_Cert:
            Master_SSL_Cipher:
               Master_SSL_Key:
        Seconds_Behind_Master: NULL
Master_SSL_Verify_Server_Cert: No
                Last_IO_Errno: 1593
                Last_IO_Error: Fatal error: The slave I/O thread stops because master and slave have equal MySQL server UUIDs; these UUIDs must be different for replication to work.
               Last_SQL_Errno: 0
               Last_SQL_Error:
  Replicate_Ignore_Server_Ids:
             Master_Server_Id: 1
                  Master_UUID:
             Master_Info_File: /usr/local/mysql/var/master.info
                    SQL_Delay: 0
          SQL_Remaining_Delay: NULL
      Slave_SQL_Running_State: Slave has read all relay log; waiting for the slave I/O thread to update it
           Master_Retry_Count: 86400
                  Master_Bind:
      Last_IO_Error_Timestamp: 160409 23:55:09
     Last_SQL_Error_Timestamp:
               Master_SSL_Crl:
           Master_SSL_Crlpath:
           Retrieved_Gtid_Set:
            Executed_Gtid_Set:
                Auto_Position: 0
1 row in set (0.00 sec)

ERROR:
No query specified
master, slave 각 서버 UUID값이 중복되면 데이터 동기화가 실패합니다.
양쪽 서버모두 uuid 값을 확인해보면 Value값이 동일한데요.
여기 해결책은 auto.cnf파일을 삭제하고 mysql 재시작해주면 됩니다. auto.cnf파일은 보통 데이터디렉토리에 저장되어 있습니다.
mysql> show variables like '%uuid%';
+---------------+--------------------------------------+
| Variable_name | Value                                |
+---------------+--------------------------------------+
| server_uuid   | 90af1fbb-fe5e-11e5-883a-0050569b3781 |
+---------------+--------------------------------------+
1 row in set (0.00 sec)mysql 백업데이터에서 일부 데이터만 적용하기
복원 시나리오
현재 사용중인 db명이 web이고, 테이블 명이 member의 테이블의 데이터 중에서 id가 test인 데이터를 삭제된 상황.
SQL 형태로 백업된 데이터에서 복원하는 과정
- SQL형태로 백업된 데이터를 임시 DB에 복원
$> mysql -u root -p test < backup.sql Enter password: - 복원된 임시DB에서 추출해야할 데이터 조건달기
$> mysqldump -u root -p test member --where="id='test'" --skip-add-drop-table > result.sql- skip-add-drop-table 옵션을 추가해주면, 기존 테이블이 있을때, drop되는 것을 방지
- 추출된 sql 파일을 사용중인 DB에 복원
$> mysql -u root -p web < result
Enter password:
Mysql Audit 기능 설정
개 요
- Mysql내에 접근기록을 사용할 수 있는 Audit 플러그인 설명
- 제약사항
- Mysql 5.6이상 설치가 가능하나, Mysql내에는 Enterprise Edition만 제공되는 것으로 파악
- MariaDB내에는 Audit Plugin이 제공되어 MariaDB에 저장된 플러그인을 통해 Audit 기능 활성화 가능
설치 방법
- Mysql 접속 후 플러그인 경로 확인
mysql> show global variables like 'plugin_dir'; +---------------+------------------------+ | Variable_name | Value | +---------------+------------------------+ | plugin_dir | //usr/local/mysql/lib/plugin/ | +---------------+------------------------+ 1 row in set (0.00 sec)- 이경우 플러그인이 저장된 경로는 //usr/local/mysql/lib/plugin/ 경로로 설정되어 있음
- audit 플러그인 복사
$> cp server_audit.so /usr/local/mysql/lib/plugin/ - Mysql에 Audit 플러그인 연동
mysql> install plugin server_audit soname 'server_audit.so'; Query OK, 0 rows affected (0.00 sec) mysql> show plugins; +----------------------------+----------+--------------------+----------------------+---------+ | Name | Status | Type | Library | License | +----------------------------+----------+--------------------+----------------------+---------+ | binlog | ACTIVE | STORAGE ENGINE | NULL | GPL | | mysql_native_password | ACTIVE | AUTHENTICATION | NULL | GPL | | sha256_password | ACTIVE | AUTHENTICATION | NULL | GPL | | CSV | ACTIVE | STORAGE ENGINE | NULL | GPL | | MyISAM | ACTIVE | STORAGE ENGINE | NULL | GPL | | MRG_MYISAM | ACTIVE | STORAGE ENGINE | NULL | GPL | | PERFORMANCE_SCHEMA | ACTIVE | STORAGE ENGINE | NULL | GPL | | MEMORY | ACTIVE | STORAGE ENGINE | NULL | GPL | | InnoDB | ACTIVE | STORAGE ENGINE | NULL | GPL | | INNODB_TRX | ACTIVE | INFORMATION SCHEMA | NULL | GPL | | INNODB_LOCKS | ACTIVE | INFORMATION SCHEMA | NULL | GPL | | INNODB_LOCK_WAITS | ACTIVE | INFORMATION SCHEMA | NULL | GPL | | INNODB_CMP | ACTIVE | INFORMATION SCHEMA | NULL | GPL | | INNODB_CMP_RESET | ACTIVE | INFORMATION SCHEMA | NULL | GPL | | INNODB_CMPMEM | ACTIVE | INFORMATION SCHEMA | NULL | GPL | | INNODB_CMPMEM_RESET | ACTIVE | INFORMATION SCHEMA | NULL | GPL | | INNODB_CMP_PER_INDEX | ACTIVE | INFORMATION SCHEMA | NULL | GPL | | INNODB_CMP_PER_INDEX_RESET | ACTIVE | INFORMATION SCHEMA | NULL | GPL | | INNODB_BUFFER_PAGE | ACTIVE | INFORMATION SCHEMA | NULL | GPL | | INNODB_BUFFER_PAGE_LRU | ACTIVE | INFORMATION SCHEMA | NULL | GPL | | INNODB_BUFFER_POOL_STATS | ACTIVE | INFORMATION SCHEMA | NULL | GPL | | INNODB_TEMP_TABLE_INFO | ACTIVE | INFORMATION SCHEMA | NULL | GPL | | INNODB_METRICS | ACTIVE | INFORMATION SCHEMA | NULL | GPL | | INNODB_FT_DEFAULT_STOPWORD | ACTIVE | INFORMATION SCHEMA | NULL | GPL | | INNODB_FT_DELETED | ACTIVE | INFORMATION SCHEMA | NULL | GPL | | INNODB_FT_BEING_DELETED | ACTIVE | INFORMATION SCHEMA | NULL | GPL | | INNODB_FT_CONFIG | ACTIVE | INFORMATION SCHEMA | NULL | GPL | | INNODB_FT_INDEX_CACHE | ACTIVE | INFORMATION SCHEMA | NULL | GPL | | INNODB_FT_INDEX_TABLE | ACTIVE | INFORMATION SCHEMA | NULL | GPL | | INNODB_SYS_TABLES | ACTIVE | INFORMATION SCHEMA | NULL | GPL | | INNODB_SYS_TABLESTATS | ACTIVE | INFORMATION SCHEMA | NULL | GPL | | INNODB_SYS_INDEXES | ACTIVE | INFORMATION SCHEMA | NULL | GPL | | INNODB_SYS_COLUMNS | ACTIVE | INFORMATION SCHEMA | NULL | GPL | | INNODB_SYS_FIELDS | ACTIVE | INFORMATION SCHEMA | NULL | GPL | | INNODB_SYS_FOREIGN | ACTIVE | INFORMATION SCHEMA | NULL | GPL | | INNODB_SYS_FOREIGN_COLS | ACTIVE | INFORMATION SCHEMA | NULL | GPL | | INNODB_SYS_TABLESPACES | ACTIVE | INFORMATION SCHEMA | NULL | GPL | | INNODB_SYS_DATAFILES | ACTIVE | INFORMATION SCHEMA | NULL | GPL | | INNODB_SYS_VIRTUAL | ACTIVE | INFORMATION SCHEMA | NULL | GPL | | partition | ACTIVE | STORAGE ENGINE | NULL | GPL | | ARCHIVE | ACTIVE | STORAGE ENGINE | NULL | GPL | | FEDERATED | DISABLED | STORAGE ENGINE | NULL | GPL | | BLACKHOLE | ACTIVE | STORAGE ENGINE | NULL | GPL | | ngram | ACTIVE | FTPARSER | NULL | GPL | | validate_password | ACTIVE | VALIDATE PASSWORD | validate_password.so | GPL | | SERVER_AUDIT | ACTIVE | AUDIT | server_audit.so | GPL | +----------------------------+----------+--------------------+----------------------+---------+ - audit 플러그인 설치 후 맨 마지막 SERVER_AUDIT항목이 보이면 설치 완료
-
Audit 관련 설정 진행1. 이벤트 설정
mysql> set global server_audit_events=connect; Query OK, 0 rows affected (0.00 sec)- 로그 경로 설정
mysql> set global server_audit_file_path='//usr/local/mysql/logs/server_audit.log'; Query OK, 0 rows affected (0.00 sec) - 로그 로테이트 술정
mysql> set global server_audit_file_rotate_now=1; Query OK, 0 rows affected (0.00 sec) - 파일당 최대 사이트 설정, 10M로 설정예시 (Format : Byte)
mysql> set global server_audit_query_log_limit=10240000;
- 로그 경로 설정
- 보관주기 설정
mysql> set global server_audit_file_rotations=10; Query OK, 0 rows affected (0.00 sec)- 10개 보관 설정 (허용된 파일수에 도달하면 오래된 파일을 덮어씀)
- Audit 기능활성화
mysql> set global server_audit_logging=1; Query OK, 0 rows affected (0.00 sec) - 설정값 확인
mysql> show global variables like '%audit%'; +-------------------------------+--------------------------------------------------------------------------------------------------------------+ | Variable_name | Value | +-------------------------------+--------------------------------------------------------------------------------------------------------------+ | server_audit_events | CONNECT | | server_audit_excl_users | | | server_audit_file_path | //usr/local/mysql/logs/server_audit.log | | server_audit_file_rotate_now | ON | | server_audit_file_rotate_size | 1000000 | | server_audit_file_rotations | 10 | | server_audit_incl_users | | | server_audit_loc_info | OOOO | | server_audit_logging | ON | | server_audit_mode | 1 | | server_audit_output_type | file | | server_audit_query_log_limit | 10240000 | | server_audit_syslog_facility | LOG_USER | | server_audit_syslog_ident | mysql-server_auditing | | server_audit_syslog_info | | | server_audit_syslog_priority | LOG_INFO | +-------------------------------+--------------------------------------------------------------------------------------------------------------+ 16 rows in set (0.01 sec) - 로그 생성 여부 확인
$> ls -l //usr/local/mysql/logs/server_audit.log -rw-r----- 1 stoauser stoauser 81 Apr 24 17:01 /usr/local/mysql/logs/server_audit.log $> tail -f //usr/local/mysql/logs/server_audit.log 20190424 17:01:06,DB-TEST,root,localhost,7,0,DISCONNECT,,,0 20190424 17:01:35,DB-TEST,root,localhost,8,0,CONNECT,,,0 20190424 17:01:46,DB-TEST,root,localhost,8,0,DISCONNECT,,,0 - 영구적용을 위해 설정값 적용
$> vi /etc/my.cnf
...
######### Audit #############
plugin_load_add                         = server_audit
server_audit_logging                    = on
server_audit_events                     = connect
server_audit_output_type                = file
server_audit_file_path                  = /usr/local/mysql/logs/server_audit.log
server_audit_file_rotate_now            = ON
server_audit_file_rotate_size           = 1000000
server_audit_file_rotations             = 1024
...
기타사항
- Log output 을 syslog로 전달이 가능하며 server_audit_output_type 값을 syslog로 변경하면 된다.
- File 방식으로 사용할 경우 생성되는 로그는 격리된 공간에서 저장하는 것을 추천
Reference
- https://mariadb.com/kb/en/library/mariadb-audit-plugin-log-settings/
- https://dba.stackexchange.com/questions/178213/mysql-audit-and-general-log
- https://mariadb.com/kb/en/library/mariadb-audit-plugin/
mysql grant실행시 access denied 발생시 조치방법
mysql 데이터 이전(재설치 이후) root로 로그인하여 쿼리 작업이 다른 쿼리는 정상적으로 적용되는데,
grant구문 실행하면 access denied 처리될때,
요롷게..???
mysql> grant all privileges on *.* to 'root'@'1.2.3.4' identified by '123123' with grant option;
ERROR 1045 (28000): Access denied for user 'root'@'localhost' (using password: NO)
구글링결과.. 데이터 이전 작업 중 먼가 호환이 안되었던 모양.
다음과같이 mysqlupgrade를 실행했다.
$> mysql_upgrade -u root -p
Enter password: …
이하 화면 생략… …
맨 마지막 화면은 Running ‘mysql_fix_privilege_tables’… OK
일단 OK떨어졌으니, 다시 grant 적용해보자.
mysql> grant all privileges on *.* to 'root'@'1.2.3.4' identified by '123123' with grant option;
Query OK, 0 rows affected (0.00 sec)
오…된다….ㅋㅋ
물론, grant 구문에 대한 적용도 된다.ㅎㅎㅎ
Mysql innodb컴파일
Mysql 4버전은 innodb가 기본포함이지만, 5.1버전은 컴파일시 옵션을 넣어야 함.
$> ./configure --prefix=/usr/local/mysql \
--with-extra-charsets=all \
--with-readline \
--with-plugins=max \
--with-charset=utf8 \
--with-innodb  (혹은 --with-plugins=innobase)
설치 끝나고 innodb 포함 여부 확인은 mysql 접속해서 쿼리 날리면 됨
mysql> show variables like 'have_innodb';
+—————+——-+
| Variable_name | Value |
+—————+——-+
| have_innodb | YES |
+—————+——-+
1 row in set (0.00 sec)

show engines;
mysql> show engines;
+————+———+—————————————————————-+————–+——+————+
| Engine | Support | Comment | Transactions | XA | Savepoints |
+————+———+—————————————————————-+————–+——+————+
| ndbcluster | NO | Clustered, fault-tolerant tables | NULL | NULL | NULL |
| MRG_MYISAM | YES | Collection of identical MyISAM tables | NO | NO | NO |
| BLACKHOLE | YES | /dev/null storage engine (anything you write to it disappears) | NO | NO | NO |
| CSV | YES | CSV storage engine | NO | NO | NO |
| MEMORY | YES | Hash based, stored in memory, useful for temporary tables | NO | NO | NO |
| FEDERATED | NO | Federated MySQL storage engine | NULL | NULL | NULL |
| ARCHIVE | YES | Archive storage engine | NO | NO | NO |
| InnoDB | YES | Supports transactions, row-level locking, and foreign keys | YES | YES | YES |
| MyISAM | DEFAULT | Default engine as of MySQL 3.23 with great performance | NO | NO | NO |
+————+———+—————————————————————-+————–+——+————+
9 rows in set (0.00 sec)mysql replication 설정
- 5.5부터는 innodb를 기본엔진으로 사용하기 때문에, Myisam을 사용할 경우, 테이블 구성시 엔진타입을 따로 기재해 주어야 함.
-
- Master1 : 192.168.20.11
- Master2 : 192.168.20.12
- Mysql replication 구성하기(Dual Master)
- Master1 my.cnf파일 수정
- /etc/my.cnf파일에 해당 내용 추가하기
$> vi /etc/my.cnf
server-id       = 1
binlog-do-db=wordpress (리플리케이션 사용할 DB명, 여러개의 DB일 경우, 한칸씩 띄우면 됨. wordpress mysql, 전체 DB를 복제할경우엔는 따로 설정하지않아도 됨)
- /etc/my.cnf파일에 해당 내용 추가하기
- Master2 /etc/my.cnf파일에 내용 변경
$> vi /etc/my.cnf server-id = 2 binlog-do-db=wordpress - Master1에 master 플러그인 설치 및 활성화
mysql> INSTALL PLUGIN rpl_semi_sync_master SONAME 'semisync_master.so'; Query OK, 0 rows affected (0.00 sec) mysql> set global rpl_semi_sync_master_enabled=1; Query OK, 0 rows affected (0.00 sec) mysql> set global rpl_semi_sync_master_timeout =1000; Query OK, 0 rows affected (0.00 sec) mysql> show variables like 'rpl_semi_sync%'; +~-~-~-~-~-~-~-~-~-~-~-~-~-~-~-~-~-~-~-~-~-~-~-~-~-~-~-~-~-~-~-~-~-~-~-~-+~-~-~-~-~-~--+ | Variable_name | Value | +~-~-~-~-~-~-~-~-~-~-~-~-~-~-~-~-~-~-~-~-~-~-~-~-~-~-~-~-~-~-~-~-~-~-~-~-+~-~-~-~-~-~--+ | rpl_semi_sync_master_enabled | ON | | rpl_semi_sync_master_timeout | 1000 | | rpl_semi_sync_master_trace_level | 32 | | rpl_semi_sync_master_wait_no_slave | ON | +~-~-~-~-~-~-~-~-~-~-~-~-~-~-~-~-~-~-~-~-~-~-~-~-~-~-~-~-~-~-~-~-~-~-~-~-+~-~-~-~-~-~--+ - Master2서버에서 쿼리 적용할 수 있게 권한 부여
mysql> grant replication slave on *.* to 'repl_test'@'192.168.20.12' identified by 'repltest'; \\Query OK, 0 rows affected (0.00 sec) - Master2서버에 슬레이브 플러그인 설치 및 활성화
mysql> INSTALL PLUGIN rpl_semi_sync_slave SONAME 'semisync_slave.so'; mysql> set global rpl_semi_sync_slave_enabled=1; mysql> show variables like 'rpl_semi_sync%'; +~-~-~-~-~-~-~-~-~-~-~-~-~-~-~-~-~-~-~-~-~-~-~-~-~-~-~-~-~-~-~-~--+~-~-~-~-~-~--+ | Variable_name | Value | +~-~-~-~-~-~-~-~-~-~-~-~-~-~-~-~-~-~-~-~-~-~-~-~-~-~-~-~-~-~-~-~--+~-~-~-~-~-~--+ | rpl_semi_sync_slave_enabled | ON | | rpl_semi_sync_slave_trace_level | 32 | +~-~-~-~-~-~-~-~-~-~-~-~-~-~-~-~-~-~-~-~-~-~-~-~-~-~-~-~-~-~-~-~--+~-~-~-~-~-~--+ 2 rows in set (0.01 sec) - Master1서버에서 접속할 수 있게 권한 설정
mysql> grant replication slave on *.* to 'repl_test'@'192.168.20.11' identified by 'repltest'; - 양쪽 Master서버의 bin log, postion 초기화
mysql> reset master; - 각 서버 Master상태 확인
# Master1에서 확인
mysql> show master status;
+~-~-~-~-~-~-~-~-~-~-~-~-~-~-~-~-~-~-+~-~-~-~-~-~-~-~-~-~-+~-~-~-~-~-~-~-~-~-~-~-~-~-~-+~-~-~-~-~-~-~-~-~-~-~-~-~-~-~-~-~-~-+
| File             | Position | Binlog_Do_DB | Binlog_Ignore_DB |
+~-~-~-~-~-~-~-~-~-~-~-~-~-~-~-~-~-~-+~-~-~-~-~-~-~-~-~-~-+~-~-~-~-~-~-~-~-~-~-~-~-~-~-+~-~-~-~-~-~-~-~-~-~-~-~-~-~-~-~-~-~-+
| mysql-bin.000001 |      100 | wordpress    |                  |
+~-~-~-~-~-~-~-~-~-~-~-~-~-~-~-~-~-~-+~-~-~-~-~-~-~-~-~-~-+~-~-~-~-~-~-~-~-~-~-~-~-~-~-+~-~-~-~-~-~-~-~-~-~-~-~-~-~-~-~-~-~-+
1 row in set (0.00 sec)
# Master2에서 확인mysql> show master status; +~-~-~-~-~-~-~-~-~-~-~-~-~-~-~-~-~-~-+~-~-~-~-~-~-~-~-~-~-+~-~-~-~-~-~-~-~-~-~-~-~-~-~-+~-~-~-~-~-~-~-~-~-~-~-~-~-~-~-~-~-~-+ | File | Position | Binlog_Do_DB | Binlog_Ignore_DB | +~-~-~-~-~-~-~-~-~-~-~-~-~-~-~-~-~-~-+~-~-~-~-~-~-~-~-~-~-+~-~-~-~-~-~-~-~-~-~-~-~-~-~-+~-~-~-~-~-~-~-~-~-~-~-~-~-~-~-~-~-~-+ | mysql-bin.000001 | 100 | wordpress | | +~-~-~-~-~-~-~-~-~-~-~-~-~-~-~-~-~-~-+~-~-~-~-~-~-~-~-~-~-+~-~-~-~-~-~-~-~-~-~-~-~-~-~-+~-~-~-~-~-~-~-~-~-~-~-~-~-~-~-~-~-~-+ 1 row in set (0.00 sec) - 양쪽 서버 Master연결 (File과 Position을 맞추면 됨)
# Master1에서 수행
mysql> change master to master_host='192.168.20.12', master_user='repl_test', master_password='repltest', master_log_file='mysql-master-bin.000001', master_log_pos=100;
# Master2에서 수행mysql> change master to master_host='192.168.20.11', master_user='repl_test', master_password='repltest', master_log_file='mysql-master-bin.000001', master_log_pos=100; - 각서버 연결상태확인
Master1)
mysql> show slave status \G;
*************************** 1. row ***************************
               Slave_IO_State:
                  Master_Host: 192.168.20.12
                  Master_User: repl_test
                  Master_Port: 3306
                Connect_Retry: 60
              Master_Log_File: mysql-bin.000001
          Read_Master_Log_Pos: 107
               Relay_Log_File: ha1-relay-bin.000001
                Relay_Log_Pos: 4
        Relay_Master_Log_File: mysql-bin.000001
             Slave_IO_Running: Yes
            Slave_SQL_Running: Yes
              Replicate_Do_DB:
          Replicate_Ignore_DB:
           Replicate_Do_Table:
       Replicate_Ignore_Table:
      Replicate_Wild_Do_Table:
  Replicate_Wild_Ignore_Table:
                   Last_Errno: 0
                   Last_Error:
                 Skip_Counter: 0
          Exec_Master_Log_Pos: 107
              Relay_Log_Space: 107
              Until_Condition: None
               Until_Log_File:
                Until_Log_Pos: 0
           Master_SSL_Allowed: No
           Master_SSL_CA_File:
           Master_SSL_CA_Path:
              Master_SSL_Cert:
            Master_SSL_Cipher:
               Master_SSL_Key:
        Seconds_Behind_Master: 0
Master_SSL_Verify_Server_Cert: No
                Last_IO_Errno: 0
                Last_IO_Error:
               Last_SQL_Errno: 0
               Last_SQL_Error:
  Replicate_Ignore_Server_Ids:
             Master_Server_Id: 0
1 row in set (0.00 sec)
ERROR:
No query specified
Master2)mysql> show slave status \G; *************************** 1. row *************************** Slave_IO_State: Master_Host: 192.168.20.11 Master_User: repl_test Master_Port: 3306 Connect_Retry: 60 Master_Log_File: mysql-bin.000001 Read_Master_Log_Pos: 107 Relay_Log_File: ha2-relay-bin.000001 Relay_Log_Pos: 4 Relay_Master_Log_File: mysql-bin.000001 Slave_IO_Running: Yes Slave_SQL_Running: Yes Replicate_Do_DB: Replicate_Ignore_DB: Replicate_Do_Table: Replicate_Ignore_Table: Replicate_Wild_Do_Table: Replicate_Wild_Ignore_Table: Last_Errno: 0 Last_Error: Skip_Counter: 0 Exec_Master_Log_Pos: 107 Relay_Log_Space: 107 Until_Condition: None Until_Log_File: Until_Log_Pos: 0 Master_SSL_Allowed: No Master_SSL_CA_File: Master_SSL_CA_Path: Master_SSL_Cert: Master_SSL_Cipher: Master_SSL_Key: Seconds_Behind_Master: 0 Master_SSL_Verify_Server_Cert: No Last_IO_Errno: 0 Last_IO_Error: Last_SQL_Errno: 0 Last_SQL_Error: Replicate_Ignore_Server_Ids: Master_Server_Id: 0 1 row in set (0.00 sec) ERROR: No query specified
Mysql root 사용자 패스워드 재설정 방법
- Mysql 서비스 종료
$> killall mysqld - Mysql 옵션 적용하여 재시작
/usr/local/mysql/bin/mysqld_safe ~-~-skip-grant-tables & - Mysql root 사용자 로그인
$> /usr/local/mysql/bin/mysql -u root mysql * 정상적으로 수행될 경우 콘솔화면이 "mysql>" 으로 변경될 것입니다. - root 패스워드 재지정 (Mysql 5.7이하 버전에서 사용하세요.)
mysql> update user set password=password('변경할패스워드입력') where user = 'root'; mysql> flush privileges; mysql> quit; - 지정한 패스워드 입력하여 mysql 로그인
/usr/local/mysql/bin/mysql -u root -p
mysql utf8설정
mysql에 utf8로 강제 설정
$> cat /etc/my.cnf
...
[client]
default-character-set = utf8

...
[mysqld]
init_connect = SET collation_connection = utf8_general_ci
init_connect = SET NAMES utf8
default-character-set = utf8
character-set-server = utf8
collation-server = utf8_general_ci

...
[mysqldump]
default-character-set = utf8

...mysql에서 binlog 삭제
mysql에서 binlog 삭제하는 방법
- 특정날짜 이후의 로그값 삭제
mysql> "PURGE MASTER LOGS BEFORE DATE_SUB(CURRENT_DATE, INTERVAL 30 DAY)" - 특정 binlog 삭제
mysql> PURGE BINARY LOGS TO 'mysql-bin.000015';
mysqlcheck 유틸리티 사용법
mysqlcheck 유틸리티 사용법(analyze, optimize, repair)
mysqlcheck 유틸리티 사용법
cost 베이스 DB에서 DB전체를 한번에 analyze, optimize, repair 하기 위한 유틸리티 입니다.
파일위치 : mysql/bin
----------------------------------------------------
전체 체크 및 자동 복구
mysqlcheck -Aa --auto-repair -u root -p
mysqlcheck -Ao --auto-repair -u root -p
----------------------------------------------------
-A, --all-databases
-a, --analyze
-o, --optimize
-P 포트번호
----------------------------------------------------
특정 데이터베이스만 체크 및 자동 복구
mysqlcheck --auto-repair -u root -p 데이터베이스명
----------------------------------------------------
특정 테이블만 체크 및 자동 복구
mysqlcheck --auto-repair -u root -p 데이터베이스명 테이블명
----------------------------------------------------
명령어 수정하여 사용하기
mysqlrepair = mysqlcheck --repair
mysqlanalyze = mysqlcheck --analyze
mysqloptimize = mysqlcheck --optimize
----------------------------------------------------
mysql에 접속하여 개별적으로 하는 방법
mysql> use 데이터베이스명;
mysql> show tables;
mysql> check table 테이블명;
mysql> repair table 테이블명;
mysql> analyze table 테이블명;
mysql> optimize table 테이블명;
----------------------------------------------------
mytop 설치하기
mysql 프로세스 상태를 볼수 있는 유틸리티 mytop를 설치가이드
요구사항: Perl, DBI, DBD Mysql Module, Term::ReadKey
mytop은 기본적으로 show status와 show processlist를 CLI로 보여주는 프로그램입니다.
- 설치방법
-
패키지 설치
$> yum install -y perl-TermReadKey $> yum install -y perl-DBI*- dependency(DBI) 패키지 설치
$> tar xvzf DBI-1.37.tar.gz $> cd DBI-1.37 $> perl Makefile.PL $> make; make install - dependency(DBD-Mysql) 패키지 설치
$> tar xvzf DBD-Mysql-2.9003.tar.gz $> cd DBD-Mysql-2.9003 $> perl Makefile.PL $> make; make install - dependency(TermReadKey) 패키지 설치
$> tar xvzf TermReadKey-2.21.tar.gz $> cd TermReadKey-2.21 $> perl Makefile.PL $> make; make install - mytop 패키지 설치
$> tar xvzf mytop-1.2.tar.gz
$> cd mytop-1.2
$> perl Makefile.PL
$> make; make install
- dependency(DBI) 패키지 설치
-
사용절차
- 사전설정
# vi .mytop
user=root
pass=password - 화면 출력값 공유
d 특정 디비에 대해서만 보는 경우
f 지정된 쓰레드가 실행중인 쿼리를 모두 출력
h 간단히 보기
i 쉬고있는 쓰레드는 리스트에서 제외
k 쓰레드 연결을 종료
m 초당 실행 쿼리수 보기
p 화면 정지
q mytop 종료
r FLUSH STATUS 실행
s 화면 갱신 시간 설정
u 특정 사용자의 쓰레드만 보기
- 사전설정
-
추가 FAQ
- 추가 perl 관련 오류메시지 출력시
yum install -y perl* perl -MCPAN -eshell install Term::ReadKey install DBI install DBD::mysql - 시작할 때 Error in option spec: “long|!” 출력시
“long|!” => \$config{long_nums} 내용 주석처리 후 실행하면 됨
- 다운로드 경로
- mytop http://jeremy.zawodny.com/mysql/mytop/
- DBI http://search.cpan.org/
- DBD-Mysql http://search.cpan.org/
- Term::ReadKey http://search.cpan.org/
- 추가 perl 관련 오류메시지 출력시
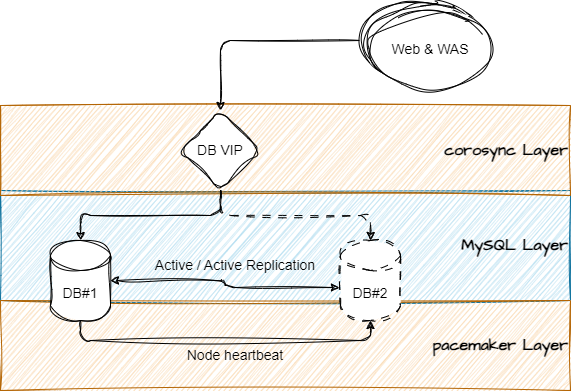
corosync / pacemaker 기반의 DB이중화
시작하는 말
안녕하세요, 고니 입니다.
기존에 작성했던 컨텐츠들 업데이트를 하면서 문서의 리팩토링(Refactoring)을 진행해보려고 합니다.
DB이중화를 구현하는 방식은 여러가지 방식이 있을껀데, 여전히 고민되고, 24시간내내 무결성을 검증할 수가 없는것 같습니다.
그 중에 maxscale기반의 DB 이중화 운영도 있겠지만, 또 다른 방식인 DB자체는 Active / Standby 형태로 운영할 수 있는 방법을 구축 / 운영해보았습니다.
|
|
| perplexity에서 생성한 AI이미지 |

시스템 구성방법
 |
|
Corosync & pacemaker로 서버간 상태 확인 / 서비스 전환 역활을 수행하고 Mysql을 DB데이터 동기화를 담당하게 됩니다. Failover / Failback 상태에도 데이터 유지를 위해 양쪽 replication 구성을 추천합니다 * 단방향 replication 구성시 failover 수행시 failback 절차가 좀 복잡해질수 있습니다 |
설치 & 구성하기
설치에 대한 자세해내 사항은 : corosync / pacemaker를 이용한 HA구성 여기를 참고하셔도 됩니다.
-
패키지 설치하기
$> yum install corosync pacemaker -y -
Mysql 서버간 health check를 위한 스크립트 구성
$> vi /etc/init.d/db_check #!/bin/bash case "$1" in "start") echo "start" ;; "stop") echo "stop" ;; # mysql에 구성된 read-only계정(서비스 상태 확인용) 생성해서 localhost 접속하여 현재시간 - select now() 쿼리 실행 "status") mysql --connect-timeout 2 -u monitor -p'모니터 계정패스워드' -h localhost -Nse 'select now()' result_code=$? #비정상 응답일 경우 로그를 남기고 DB VIP를 상대방 IP로 이전 if [[ $result_code -eq 1 ]] then echo "[$(date +%Y-%m-%d-%H:%M:%S)] DB Connection Error" >> /var/log/db_check pcs resource move DB_GROUP {{ 상대방IP }} fi ;; *) echo "start|stop|status" exit 1 ;; esac -
DB이중화를 위한 HA resource 구성
$> pcs cluster setup db_ha {{ DB1_IP }} {{ DB2_IP }} --force $> pcs cluster start --all $> pcs property set stonith-enabled=false $> pcs property set no-quorum-policy=ignore $> pcs resource defaults update resource-stickiness=100 $> pcs resource create DB_CHECK service:db_check op status timeout=10s interval=10s --group DB_GROUP $> pcs resource create DB_VIP ocf:heartbeat:IPaddr2 ip={{ DB_VIP }} cidr_netmask=32 op monitor interval=10s --group DB_GROUP -
구성정보 확인
# crm_mon -1
Stack: classic openais (with plugin)
Current DC: TEST-DB#1 (version 1.1.18-3.el6-bfe4e80420) - partition with quorum
Last updated: Wed Dec 18 18:29:46 2019
Last change: Mon Sep  2 19:26:34 2019 by root via crm_resource on TEST-DB#1

2 nodes configured (2 expected votes)
5 resources configured

Online: [ TEST-DB#1 TEST-DB#2 ]

Active resources:

 Resource Group: DB_GROUP
     DB_CHECK        (ocf::heartbeat:Filesystem):    Started TEST-DB#1
     DB_VIP          (ocf::heartbeat:IPaddr2):       Started TEST-DB#1
Reference
- https://docs.redhat.com/ko/documentation/red_hat_enterprise_linux/8/html/configuring_and_managing_high_availability_clusters/con_pacemaker-overview-overview-of-high-availability
- https://tech.osci.kr/%EA%B8%B0%EC%B4%88%EB%B6%80%ED%84%B0-%EC%8B%9C%EC%9E%91%ED%95%98%EB%8A%94-linux-pacemaker%EC%9D%98-%EC%9D%B4%ED%95%B4/
OracleDB
Centos에서 Oracle 10G 설치
-
패키지 설치
$> yum -y groupinstall "Desktop" "X Window System" "GNOME Desktop Environment" "Desktop Platform Development" "Desktop Platform" $> yum -y install glibc* libaio* compat-libstdc* compat-gcc* gcc* libXp* openmotif* compat-db* xorg-x11-deprecated-libs compat-lib* $> yum install kde-i18n-Korean -y $> yum install fonts-korean -y- Centos 6 64비트만
$> yum install -y xorg-x11-xauth.x86_64 xorg-x11-apps.x86_64
$> yum install -y libXp libXtst binutils compat-db compat-libstdc++-33 glibc glibc-devel glibc-headers gcc gcc-c++ libstdc++ cpp make libaio ksh elfutils-libelf sysstat libaio libaio-devel setarch  libXp.i686 libXtst-1.0.99.2-3.el6.i686 glibc-devel.i686 libgcc-4.4.4-13.el6.i686 compat-libstdc++* compat-libf2c* compat-gcc* compat-libgcc* libXt.i686 libXtst.i686
$> yum install -y glibc-2.12-1.7.el6_0.5.i686
- Centos 6 64비트만
- 커널 파라미터 설정
$> echo "kernel.shmmax = 536870912 kernel.shmmni = 4096 kernel.sem = 250 32000 100 128 net.ipv4.ip_local_port_range = 1024 65000 net.core.rmem_default=262144 net.core.rmem_max=262144 net.core.wmem_default=262144 net.core.wmem_max=262144" >> /etc/sysctl.conf $> sysctl -p - 계정설정
$> echo "#Oracle setting * soft nproc 2047 * hard nproc 16384 * soft nofile 1024 * hard nofile 65536" >> /etc/security/limits.conf $> echo "session required pam_limits.so" >> /etc/pam.d/login $> groupadd oinstall $> useradd -g oinstall oracle $> passwd oracle {{ 패스워드 입력 두번 }} $> mkdir /usr/local/oracle $> chown oracle.oinstall /usr/local/oracle - 설치시 OS정보 변경 수행
$> mv /etc/redhat-release /etc/redhat-release_ori $> echo "redhat-4" > /etc/redhat-release - 시스템 설정 적용
$> echo " # Oracle Settings TMP=/tmp; export TMP TMPDIR=$TMP; export TMPDIR ORACLE_BASE=/usr/local/oracle; export ORACLE_BASE ORACLE_HOME=$ORACLE_BASE/product/10.2.0/db_1; export ORACLE_HOME ORACLE_SID=orcl; export ORACLE_SID ORACLE_TERM=xterm; export ORACLE_TERM PATH=/usr/sbin:$PATH; export PATH PATH=$ORACLE_HOME/bin:$PATH; export PATH LD_LIBRARY_PATH=$ORACLE_HOME/lib:/lib:/usr/lib; export LD_LIBRARY_PATH CLASSPATH=$ORACLE_HOME/JRE:$ORACLE_HOME/jlib:$ORACLE_HOME/rdbms/jlib; export CLASSPATH if [ $USER = "oracle" ]; then if [ $SHELL = "/bin/ksh" ]; then ulimit -p 16384 ulimit -n 65536 else ulimit -u 16384 -n 65536 fi fi" >> /etc/profile - 시스템 기동시 Oracle 구동을 위한 적용
echo "
source /etc/profile
su - oracle -c \"\$ORACLE_HOME/bin/lsnrctl start\"
su - oracle -c \"\$ORACLE_HOME/bin/dbstart\"
" >> /etc/rc.d/rc.local
Centos에서 oracle 11g 설치
-
패키지 설치하기
$> yum -y groupinstall "Desktop" "X Window System" "GNOME Desktop Environment" "Desktop Platform Development" "Desktop Platform" $> yum -y install glibc* libaio* compat-libstdc* compat-gcc* gcc* libXp* openmotif* compat-db* xorg-x11-deprecated-libs compat-lib* $> yum install kde-i18n-Korean -y $> yum install fonts-korean -y $> yum install -y binutils-2.* compat-libstdc++-33* elfutils* gcc-4.* gcc-c++-4.* glibc-2.* glibc* ksh* libaio* libgomp* libgcc* libstdc++* unixODBC-2* unixODBC-devel* numactl-devel* sysstat* pdksh*- Centos6 64비트에서는 추가 패키지 설치
$> yum install -y xorg-x11-xauth.x86_64 xorg-x11-apps.x86_64
$> yum install -y libXp libXtst binutils compat-db compat-libstdc++-33 glibc glibc-devel glibc-headers gcc gcc-c++ libstdc++ cpp make libaio ksh elfutils-libelf sysstat libaio libaio-devel setarch  libXp.i686 libXtst-1.0.99.2-3.el6.i686 glibc-devel.i686 libgcc-4.4.4-13.el6.i686 compat-libstdc++* compat-libf2c* compat-gcc* compat-libgcc* libXt.i686 libXtst.i686
$> yum install -y glibc-2.12-1.7.el6_0.5.i686
- Centos6 64비트에서는 추가 패키지 설치
- 커널 파라미터 적용
$> echo "fs.suid_dumpable = 1 fs.aio-max-nr = 1048576 fs.file-max = 6815744 kernel.shmall = 2097152 kernel.shmmax = 536870912 kernel.shmmni = 4096 # semaphores: semmsl, semmns, semopm, semmni kernel.sem = 250 32000 100 128 net.ipv4.ip_local_port_range = 9000 65500 net.core.rmem_default=4194304 net.core.rmem_max=4194304 net.core.wmem_default=262144 net.core.wmem_max=1048586" >> /etc/sysctl.conf $> sysctl -p - 계정 설정
$> echo "oracle soft nproc 2047 oracle hard nproc 16384 oracle soft nofile 4096 oracle hard nofile 65536 oracle soft stack 10240" >> /etc/security/limits.conf $> groupadd oinstall $> useradd -g oinstall oracle $> passwd oracle {{ 패스워드 입력 2번 }} $> mkdir /usr/local/oracle $> chown oracle.oinstall /usr/local/oracle - OS정보 수정
mv /etc/redhat-release /etc/redhat-release_ori echo "redhat-4" > /etc/redhat-release - 시스템 변수 설정
$> echo " # Oracle Settings TMP=/tmp; export TMP TMPDIR=\$TMP; export TMPDIR ORACLE_HOSTNAME=orcl.localdomain; export ORACLE_HOSTNAME ORACLE_UNQNAME=DB11G; export ORACLE_UNQNAME ORACLE_BASE=/usr/local/oracle; export ORACLE_BASE ORACLE_HOME=\$ORACLE_BASE/product/11.2.0/db_1; export ORACLE_HOME ORACLE_SID=orcl; export ORACLE_SID PATH=/usr/sbin:\$PATH; export PATH PATH=\$ORACLE_HOME/bin:\$PATH; export PATH LD_LIBRARY_PATH=\$ORACLE_HOME/lib:/lib:/usr/lib; export LD_LIBRARY_PATH CLASSPATH=\$ORACLE_HOME/jlib:\$ORACLE_HOME/rdbms/jlib; export CLASSPATH" >> /etc/profile - 시스템 구동시 오라클 구동
$> echo "
source /etc/profile
su - oracle -c \"\$ORACLE_HOME/bin/lsnrctl start\"
su - oracle -c \"\$ORACLE_HOME/bin/dbstart\"
" >> /etc/rc.d/rc.local
Centos에서 oracle 12c 설치하기
- 패키지 설치하기
$> yum install binutils compat-libcap1 compat-libstdc++-33 compat-libstdc++-33.i686 gcc gcc-c++ glibc glibc.i686 glibc-devel glibc-devel.i686 ksh libgcc -y $> yum install libgcc.i686 libstdc++ libstdc++.i686 libstdc++-devel libstdc++-devel.i686 libaio libaio.i686 libaio-devel libaio-devel.i686 libXext libXext.i686 -y $> yum install libXtst libXtst.i686 libX11 libX11.i686 libXau libXau.i686 libxcb libxcb.i686 libXi libXi.i686 unixODBC unixODBC-devel -y - 커널파라미터 수정
$> echo "fs.file-max = 6815744 kernel.sem = 250 32000 100 128 kernel.shmmni = 4096 kernel.shmall = 1073741824 kernel.shmmax = 4398046511104 net.core.rmem_default = 262144 net.core.rmem_max = 4194304 net.core.wmem_default = 262144 net.core.wmem_max = 1048576 fs.aio-max-nr = 1048576 net.ipv4.ip_local_port_range = 9000 65500" >> /etc/sysctl.conf $> sysctl -p - 계정정보 설정
$> echo "oracle soft nofile 1024 oracle hard nofile 65536 oracle soft nproc 16384 oracle hard nproc 16384 oracle soft stack 10240 oracle hard stack 32768" >> /etc/security/limits.conf $> groupadd -g 54321 oinstall $> groupadd -g 54322 dba $> groupadd -g 54323 oper $> useradd -u 54321 -g oinstall -G dba,oper oracle $> passwd oracle {{ 패스워드 입력 2회 }} $> mkdir -p /usr/local/oracle/product/12.1.0/db_1 $> mkdir /usr/local/oraInventory $> chown -R oracle:oinstall /usr/local/oracle $> chown oracle.oinstall /usr/local/oraInventory $> chmod -R 775 /usr/local/oracle - 시스템 변수 설정
$> echo " # Oracle Settings export TMP=/tmp export TMPDIR=\$TMP export ORACLE_HOSTNAME=orcl.localdomain export ORACLE_UNQNAME=orcl export ORACLE_BASE=/usr/local/oracle export ORACLE_HOME=\$ORACLE_BASE/product/12.1.0/db_1 export ORACLE_SID=orcl export PATH=/usr/sbin:\$PATH export PATH=\$ORACLE_HOME/bin:\$PATH export LD_LIBRARY_PATH=\$ORACLE_HOME/lib:/lib:/usr/lib export CLASSPATH=\$ORACLE_HOME/jlib:\$ORACLE_HOME/rdbms/jlib" >> /home/oracle/.bash_profile - 시스템 구동 후 DB실행
$> echo "
source /etc/profile
su - oracle -c \"\$ORACLE_HOME/bin/lsnrctl start\"
su - oracle -c \"\$ORACLE_HOME/bin/dbstart\"
" >> /etc/rc.d/rc.local
oracle 10g 실행시 failed to auto-start… vikrkuma_new/oracle 메시지 출력할때
오라클 실행시 “Failed to auto-start Oracle Net Listene using /ade/vikrkuma_new/oracle/bin/tnslsnr” 이런 메시지가 뜨는경우 조치방법(근데 오라클은 정상적으로 잘 된다!)

조치사항
$> vi $ORACLE_HOME/bin/dbstart
...
ORACLE_HOME_LISTNER=/ade/vikrkuma_new/oracle
ORACLE_HOME_LISTNER=$ORACLE_HOME 으로 교체
...
reference
oracle 10g 아카이브 모드 설정
- 아카이브 모드 상태 확인
SQL> archive log list \\Database log mode No Archive Mode Automatic archival Disabled Archive destination USE_DB_RECOVERY_FILE_DEST Oldest online log sequence 1 Current log sequence 2 \\\\SQL> show parameter spfile \\NAME TYPE VALUE ~-~-~-~-~-~-~-~-~-~-~-~-~-~-~-~-~-~-~-~-~-~-~-~-~-~-~-~-~-~-~-~-~-~-~-~- ~-~-~-~-~-~-~-~-~-~-- ~-~-~-~-~-~-~-~-~-~-~-~-~-~-~-~-~-~-~-~-~-~-~-~-~-~-~-~-~-~- spfile string /u01/app/oracle/product/10.2.0 /db_1/dbs/spfileTSH1.ora - 아카이브 모드 설정
SQL> ALTER SYSTEM SET log_archive_dest_1='location=/u01/app/oracle/oradata/data reopen=60' scope=spfile; System altered. \\\\SQL> ALTER SYSTEM SET log_archive_format='%t_%s_%r.arc' scope=spfile; System altered. - Oracle 종료
SQL> shutdown immediate Database closed. Database dismounted. ORACLE instance shut down. - Oracle 시작
SQL> startup mount .ORACLE instance started. \\Total System Global Area 608174080 bytes Fixed Size 1220844 bytes Variable Size 171970324 bytes Database Buffers 432013312 bytes Redo Buffers 2969600 bytes Database mounted. - log모드 변경
SQL> alter database archivelog; Database altered. - 아카이브모드 설정내용 확인
SQL> archive log list Database log mode Archive Mode Automatic archival Enabled Archive destination /u01/app/oracle/oradata/data Oldest online log sequence 1 Next log sequence to archive 2 Current log sequence 2 - DB Open
SQL> alter database open; Database altered. - DB 셧다운 & Cold Backup 권장
SQL> shutdown immediate Database closed. Database dismounted. ORACLE instance shut down. - log파일 생성확인
SQL> ALTER SYSTEM SWITCH LOGFILE;
\\System altered.
oracle 10g dbstart에러 조치방법
DB구동시 에러메시지 출력
[oracle@localhost ~]$ /usr/local/oracle/product/10.2.0/db_1/bin/dbstart

Failed to auto-start Oracle Net Listene using /ade/vikrkuma_new/oracle/bin/tnslsnr

Processing Database instance "orcl": log file /usr/local/oracle/product/10.2.0/db_1/startup.log
조치방법
$> vi /usr/local/oracle/product/10.2.0/db_1/bin/dbstart
#ORACLE_HOME_LISTNER=/ade/vikrkuma_new/oracle

ORACLE_HOME_LISTNER=$ORACLE_HOMEOracle 몇가지 사용쿼리들
- 오라클 테이블 스페이스를 emp2로 설정해서 생성
SQL> create tablespace testdb datafile '/home/oracle/oradata/TSH1/testdb.dbf' size 500m; - test_user으로 계정 생성하고 테이블 스페이스는 testdb1으로 설정
SQL> CREATE USER test_user IDENTIFIED BY userdata1 DEFAULT TABLESPACE testdb TEMPORARY TABLESPACE TEMP; - 권한주기
SQL> GRANT connect, resource, create session,create table TO test_user; - testdb에 테이블 생성
SQL> create table emp2( empno number, ename varchar2(20), deptno number); - 사용자가 가지고 있는 테이블 확인
SQL> select table_name from user_tables; TABLE_NAME ------------------------------ EMP2 - 테이블 구조 확인
SQL> desc emp2 Name Null? Type ----------------------------------------- -------- ---------------------------- EMPNO NUMBER ENAME VARCHAR2(20) DEPTNO NUMBER - 테이터 insert 해보기
SQL> insert into emp2 values(123,'test_user',456); SQL> select * from emp2; EMPNO ENAME DEPTNO ---------- -------------------- ---------- 123 test_user 456 - 데이터 업데이트 하기
SQL> update emp2 set ename='wow' where ename='ggg'; 1 row updated. SQL> select * from emp2; EMPNO ENAME DEPTNO ---------- -------------------- ---------- 123 test_user 456 123 wow 102 - 테이블 스페이스 확인
SQL> select tablespace_name,file_name from dba_data_files; - 계정 패스워드 변경
SQL> show user; USER is "test_user" SQL> alter user iheart identified by pass2; - 15분전 쿼리 했던 데이터 복구방법
INSERT INTO A SELECT * FROM A AS OF TIMESTAMP(SYSTIMESTAMP - INTERVAL '15' MINUTE); - 데이터베이스명 확인
SQL> select name, db_unique_name from v$database; NAME DB_UNIQUE_NAME --------- ------------------------------ ORCL orcl - SID 확인방법
SQL> select instance from v$thread;
INSTANCE
--------------------------------------------------------------------------------
orcl
Oracle 실행절차
작업 버전 : Oracle 10g
네트워크 포트 확인 (1521포트 LISTEN 확인)
웹 서비스 구동 web서비스 기본계정
사용자이름 : sys, 암호 : 설치할 때 입력한 암호
다음으로접속 : sysdba
Oracle10g업데이트 후 에러
- 오라클 10g 패치 후(10.2.0.2 -> 10.2.0.5) startup 명령어로 DB를 open 하려고 할 때,
ORA-01092: ORACLE instance terminated. Disconnection forced 에러 발생 - 발생 원인
오라클 엔진만 패치되고 DB에 패치가 제대로 적용되지 않았을 경우 -
해결방안1. DB데이터 업데이트
SQL> sqlplus / as sysdba
SQL> startup upgrade;
SQL> @$ORACLE_HOME/rdbms/admin/catupgrd.sql
*** 시간 약 15~20분걸림- DB종료 후 재기동
SQL> shutdown immediate; SQL> startup; SQL> @$ORACLE_HOME/rdbms/admin/utlrp.sql SQL> ! - $ORACLE_HOME/bin에 존재하는 파일에 권한 부여
[oracle@localhost ~] cd $ORACLE_HOME/install
[oracle@install ~] ./changePerm.sh
SQL> select * from v$version;
- DB종료 후 재기동
Oracle에서 사용자Lock풀기
Oracle에서 Lock걸린 사용자 해제 절차
- Oracle에서 사용자 정보 확인
SQL> select username,account_status from dba_users; USERNAME ACCOUNT_STATUS ------------------------------ -------------------------------- EXFSYS EXPIRED & LOCKED DMSYS EXPIRED & LOCKED WMSYS EXPIRED & LOCKED XDB EXPIRED & LOCKED ORDPLUGINS EXPIRED & LOCKED SI_INFORMTN_SCHEMA EXPIRED & LOCKED OLAPSYS EXPIRED & LOCKED MDDATA EXPIRED & LOCKED DIP EXPIRED & LOCKED SCOTT EXPIRED & LOCKED TSMSYS EXPIRED & LOCKED TEST LOCKED - lock된 test계정정보 수정
SQL> alter user test account unlock; - unlock 정보 확인
SQL> select username,account_status from dba_users; USERNAME ACCOUNT_STATUS ------------------------------ -------------------------------- MGMT_VIEW OPEN SYS OPEN SYSTEM OPEN DBSNMP OPEN SYSMAN OPEN TEST OPEN SCOTT EXPIRED OUTLN EXPIRED & LOCKED MDSYS EXPIRED & LOCKED ORDSYS EXPIRED & LOCKED CTXSYS EXPIRED & LOCKED - 계정 패스워드 설정
SQL> ALTER USER test IDENTIFIED BY testuser!!!!;
postgresSQL
postgresSQL 9.2.4 설치
-
설치정보
- Postgressql : 9.2.4
- OS : Centos 5.10
-
postgressql 컴파일때 필요한 패키지 설치
$> yum -y install compat-readline43 readline-devel crypto-utils.* openssl* readline-devel pam-devel -
압축 해제하고 , 컴파일 -> 설치 들어가기
$> tar -zxvf postgresql-9.2.4.tar.gz $> cd postgresql-9.2.4 ./configure \ --enable-nls=’ko’ \ --enable-depend \ --enable-thread-safety \ --mandir=/usr/share/man \ --with-includes=/usr/include \ --with-pam \ --with-openssl \ --without-tcl \ --without-perl \ --without-python $> gmake ; gmake install -
postgres사용자 추가
$> groupadd dba $> adduser -d /usr/local/pgsql -g dba -c “PostgreSQL Master User” -m -s $> /bin/bash postgres $> mkdir /usr/local/pgsql/data $> chown postgres /usr/local/pgsql/data $> chown -R postgres:dba /usr/local/pgsql $> cd /usr/local/pgsql $> chown -R root lib include -
추가된 postgres sql 사용자에 대해서 postgessql 사용할수 있게 설정
$> su – postgres $> echo " export MANPATH=\$HOME/man export PGDATA=/usr/local/pgsql/data export PATH=$PATH:/usr/local/pgsql/bin" >> /usr/local/pgsql/.bash_profile $> source /usr/local/pgsql/.bash_profile $> exit -
postgressql DB초기화 하기
$> su - postgres -c "/usr/local/pgsql/bin/initdb -D /usr/local/pgsql/data" -
재부팅 이후에도 실행할 수 있게 rc.local에 등록하기
$> echo 'su – postgres -c "/usr/local/pgsql/bin/pg_ctl start -D /usr/local/pgsql/data/" &' >> /etc/rc.d/rc.local -
네트워크에서 5432번 포트 열려있는지 확인
$> netstat -antp
Active Internet connections (servers and established)
Proto Recv-Q Send-Q Local Address Foreign Address State PID/Program name
...
tcp 0 0 127.0.0.1:5432 0.0.0.0:* LISTEN 22435/postgres
...
postgresSQL 9.4.26 설치
패키지 설치진행
- db실행 사용자 및 data 디렉토리 생성
$> useradd psql $> mkdir /home/data $> chown -R psql: /home/data - source 파일 다운로드
$> wget https://ftp.postgresql.org/pub/source/v9.4.26/postgresql-9.4.26.tar.gz --no-check-certificate - depencency 패키지 설치
$> yum install \ readline-devel \ zlib-devel \ openssl-devel \ tcl-devel -y - 컴파일 후 설치진행
$> ./configure --prefix=/usr/local/psql --with-openssl --with-tcl
$> make -j 4
$> make -j 4 install
DB 실행
- psql 실행
$> su - psql $> cd /usr/local/psql/bin $> ./initdb -D /home/data The files belonging to this database system will be owned by user "psql". This user must also own the server process. The database cluster will be initialized with locale "ko_KR.UTF-8". The default database encoding has accordingly been set to "UTF8". initdb: could not find suitable text search configuration for locale "ko_KR.UTF-8" The default text search configuration will be set to "simple". Data page checksums are disabled. fixing permissions on existing directory /home/data ... ok creating subdirectories ... ok selecting default max_connections ... 100 selecting default shared_buffers ... 128MB selecting default timezone ... ROK selecting dynamic shared memory implementation ... posix creating configuration files ... ok creating template1 database in /home/data/base/1 ... ok initializing pg_authid ... ok initializing dependencies ... ok creating system views ... ok loading system objects' descriptions ... ok creating collations ... ok creating conversions ... ok creating dictionaries ... ok setting privileges on built-in objects ... ok creating information schema ... ok loading PL/pgSQL server-side language ... ok vacuuming database template1 ... ok copying template1 to template0 ... ok copying template1 to postgres ... ok syncing data to disk ... ok WARNING: enabling "trust" authentication for local connections You can change this by editing pg_hba.conf or using the option -A, or --auth-local and --auth-host, the next time you run initdb. Success. You can now start the database server using: ./postgres -D /home/data or ./pg_ctl -D /home/data -l logfile start - 프로세스 실행
$ /usr/local/psql/bin/postgres -D /home/data/ >logfile 2>&1 & - 프로세스 실행상태 확인
$> ps -ef | grep post
psql     16193 16108  0 10:54 pts/0    00:00:00 /usr/local/psql/bin/postgres -D /home/data/
psql     16195 16193  0 10:54 ?        00:00:00 postgres: checkpointer process
psql     16196 16193  0 10:54 ?        00:00:00 postgres: writer process
psql     16197 16193  0 10:54 ?        00:00:00 postgres: wal writer process
psql     16198 16193  0 10:54 ?        00:00:00 postgres: autovacuum launcher process
psql     16199 16193  0 10:54 ?        00:00:00 postgres: stats collector process
psql     16201 16108  0 10:54 pts/0    00:00:00 grep --color=auto post

 netstat -antp | grep postgres
(Not all processes could be identified, non-owned process info
 will not be shown, you would have to be root to see it all.)
tcp        0      0 127.0.0.1:5432          0.0.0.0:*               LISTEN      16193/postgres
tcp6       0      0 ::1:5432                :::*                    LISTEN      16193/postgres
postgresql 데이터 백업/관리
- DB데이터 백업하기
-bash-4.1$ pg_dump testdb > test.sql - DB 스키마만 덤프할때
bash-4.1$ pg_dump -s testdb > test.sql - 데이터 복원
bash-4.1$ psql testdb < test.sql
싱글모드 진입절차
Centos7버전에서 HDD 수동 드라이버 구성
HDD 수동 드라이버 구성 (자동으로 드라이브 검색 실패시)
설치 옵션 입력

Tab키 입력 후 하단에 inst.dd 입력
드라이버 추가

입력 완료 후 'c' 입력
Centos 7.x 설치하기 (DVD 미디어로 설치) 3번과정 참조
- 수동으로 HDD 드라이브 추가하여 설치 한 이후, 커널 업데이트 진행시,업데이트하는 커널에는 해당 드라이브 정보가 빠져있게 되어 디스크정보를 못찾거나, 레이드 정보가 틀어지는 이슈사항이 있기 때문에, 수동 HDD 드라이브 추가시 yum update부분은 신중하게 판단해야 함.
- 해결방안은 업데이트하는 커널에도 해당 디스크 드라이브를 추가할 수 있게
커널 컴파일을 하는 방법과 Yum update 시 커널은 제외할 수 있게 옵션 설정이 필요함